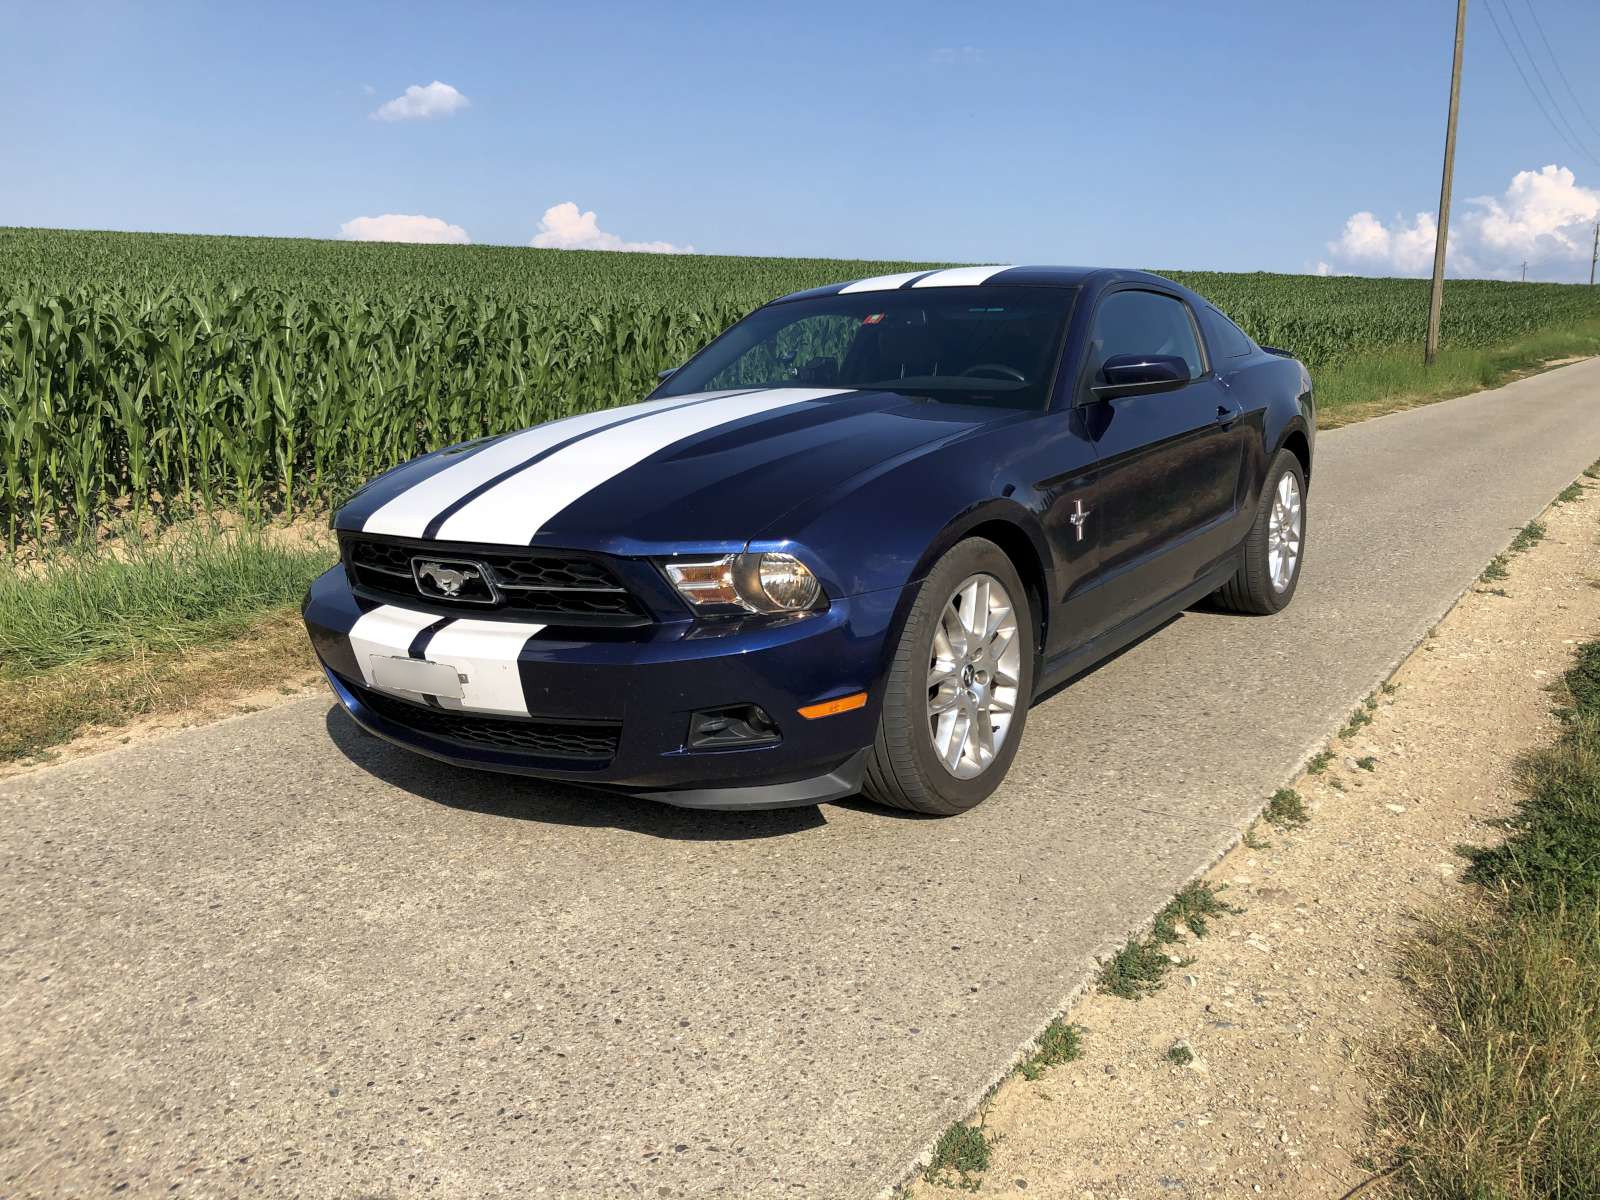
My American car in the Swiss country side... she feels almost like home. (click to enlarge)
A couple of years ago I bought a second-hand 2012 Ford Mustang 3.7L V6 that was a direct import from the United States. Mustangs were very rare cars in Switzerland a few years ago, because Ford did not sell them directly and the few available were bought overseas by private owners. Today they are a bit more common, as you can buy a new one directly from the dealer, but they are still rare cars.
My American car in the Swiss country side... she feels almost like
home. (click to enlarge)
I think it looks great, it has a nice sound, and it's really fun to drive. I love these small "American" details like the all-red tail-lights or the orange side-markers that make it stand out in the traffic. It's a little different than all the other cars. For sure it doesn’t go unnoticed and everybody looks at you.
In spite of its fairly powerful engine, it's not a sport car and it's not easy to drive fast. The soft suspensions and the solid rear axle make it a difficult animal to tame. Driving her in a narrow and winding road is like dancing with a bad tempered but beautiful lady. Once you know her, it's really fun, but you'd better watch out as she'll try to throw you off the read as soon as you dare a little too much. She won't forgive your mistakes, but it's a rewarding experience if you play it by her rules.
I love this car and I really enjoy driving it, but there are a few annoyances that drive me nuts. Maybe because I'm not used to American cars, but there are small details that bothered me enough to dig into these issues and modify the car to my taste.
This is the first thing you notice when you sit in the car: chimes sound all the time. The safety belt one is really annoying. I always wear a belt when I drive. I never forgot it, not a single time in more than twenty years, but I hate that a machine reminds me what to do. I understand that the airbag can be dangerous if the seatbelt is not buckled up; still I don't want a machine to annoy me every time. I like to sit down in my car, start the engine and let it idle for a few seconds while I make myself comfortable in the seat, put my phone on its stand and buckle up. After all, it's my car and has to fit my own idea of comfort.
First I looked on the internet for a solution and found some cheat codes that looked like this:
| Make sure the doors are closed and the parking brake is engaged. Turn the ignition key to the "Run" position but don't crank the engine, wait for the red seat belt light to turn off (it takes about a minute), and then connect and disconnect the seat belt nine times ending with it disconnected. Wait for the orange air bag light to turn on, then off. Connect and disconnect the seat belt one more time, cross your fingers and the chime should be disabled... if you're lucky. |
Of course I tried it out but it didn't work very well: the chime sounded for a shorter time and was a bit less tedious as before, but that nerve-wracking sound was still there every time I turned the ignition on and more effective actions were needed.
I first tried disconnecting the seatbelt switch under the driver seat as I was used to do with my Japanese cars, but this just made the situation worse: the orange airbag warning light showed up on the dashboard. I tried shorting the wire to ground and a few random resistors values, but nothing worked. Measuring the resistance of the switch with a multimeter did not bring any useful result, neither: it read around 500 to 600 kΩ regardless of the belt being buckled or not, but depending on the polarity of the meter... what a strange switch. Measuring the voltage with a multimeter did not work, neither: no meaningful measurement was possible. Of course, I didn't want to prevent the correct operation of the airbag for just an annoying chime and, running out of time, I reconnected the belt switch.
Of course I searched the internet for a suitable fix: a resistor, a diode, or whatever could convince the restraints control module (RCM) that the seatbelt is buckled... but I couldn't find anything useful, nothing that worked: unbelievable. This is actually what convinced me to share this modification as I think I'm not the only one with this issue. It's not just for the quietness when you enter the vehicle, but you may also want to replace your seat with a sportier one that has a 4 or 5 points safety harness and no switch, for example.
As a temporary fix, I installed a seatbelt extension in the receptacle and this got rid of the chime. But it was not a good solution: will this cheap, unbranded and imported extension hold the force of a car accident? Or will it just snap causing more harm than good? So, a better solution had to be found. Furthermore, this strange switch that had no measurable resistance or voltage variation but worked within the car circuit puzzled me.
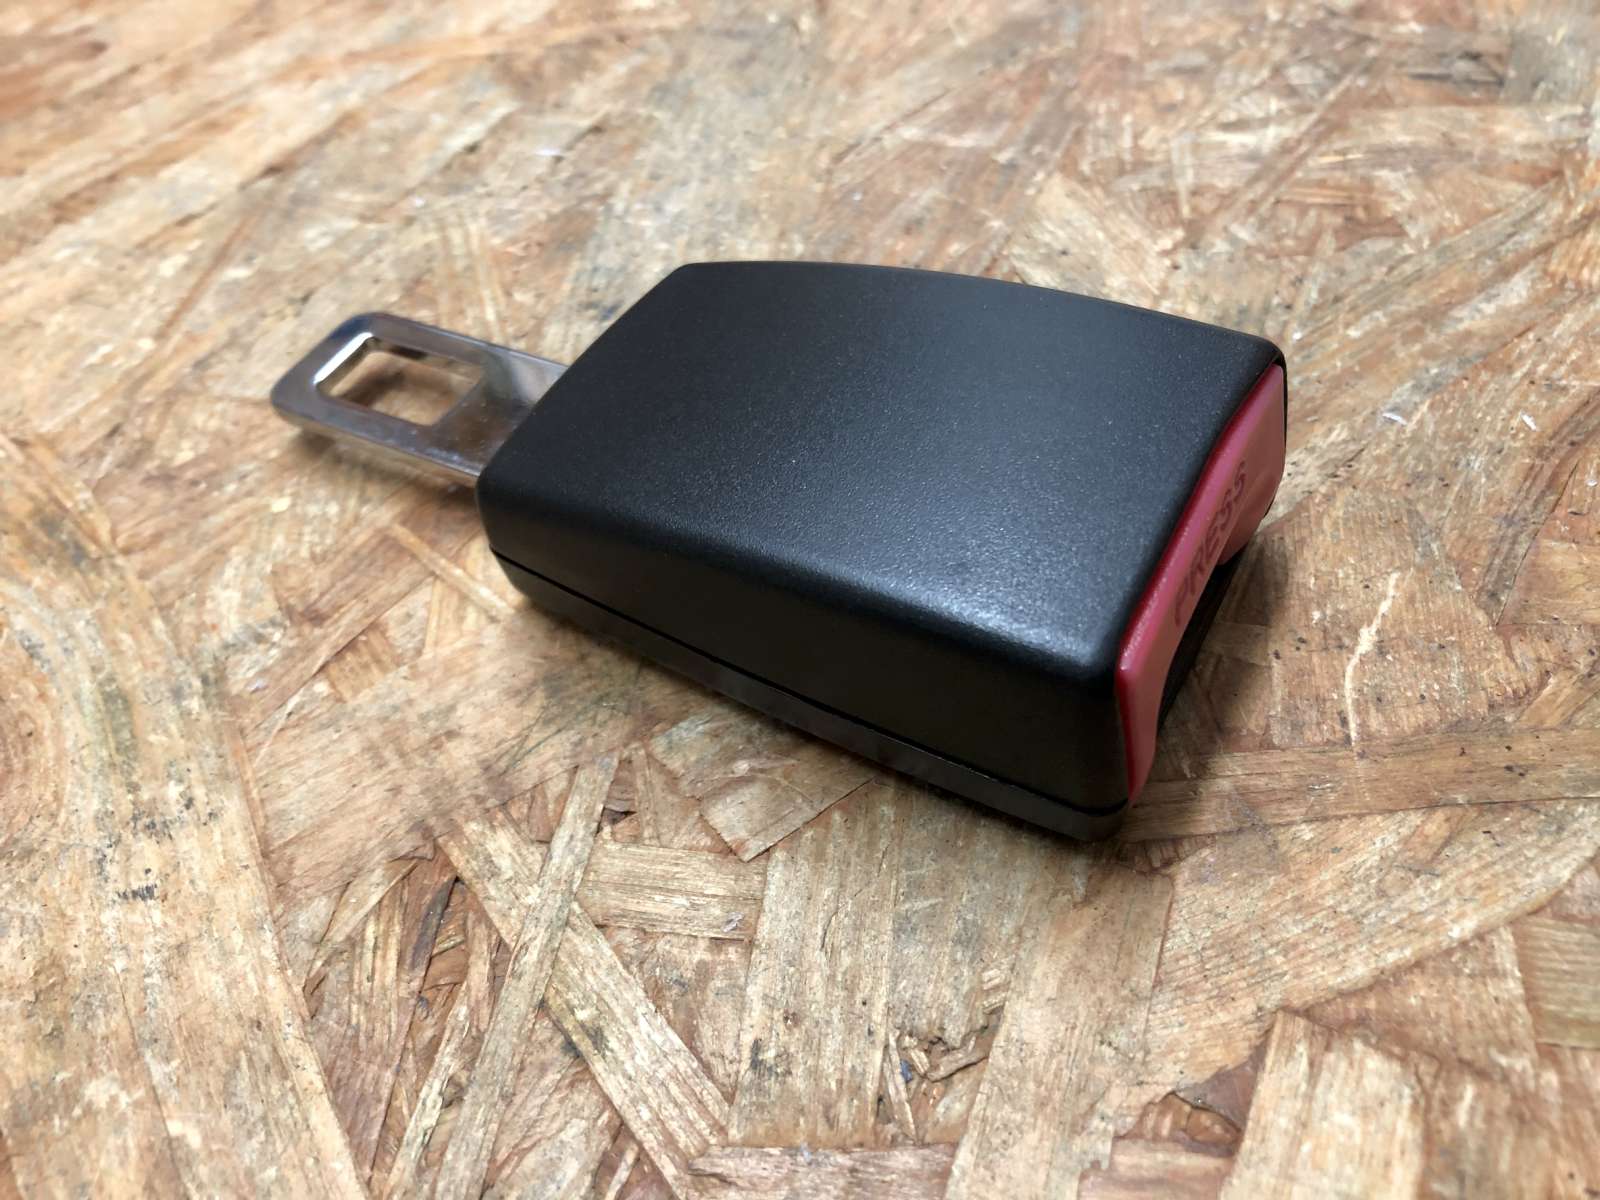
A cheap imported seatbelt extension: it kills the chime but is it
safe? (click to enlarge)
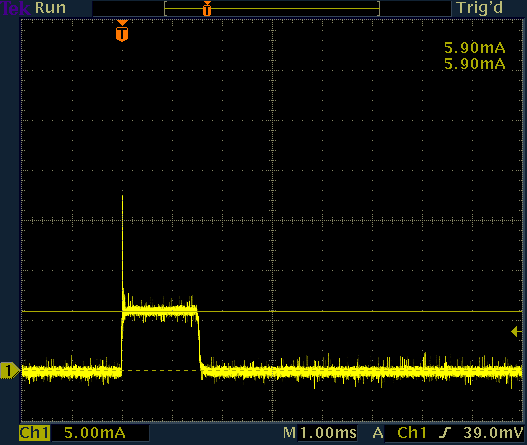
So I came back with my trusty oscilloscope a few weeks later and did some measurements on what was really going on with that switch. I was surprised to see that the switch is fed with 1.5 ms 4.9 V pulses at a frequency of 5 Hz. The pulses are present all the time the ignition key is in the "run" position (and possibly also in the "start" position, I didn't check this).
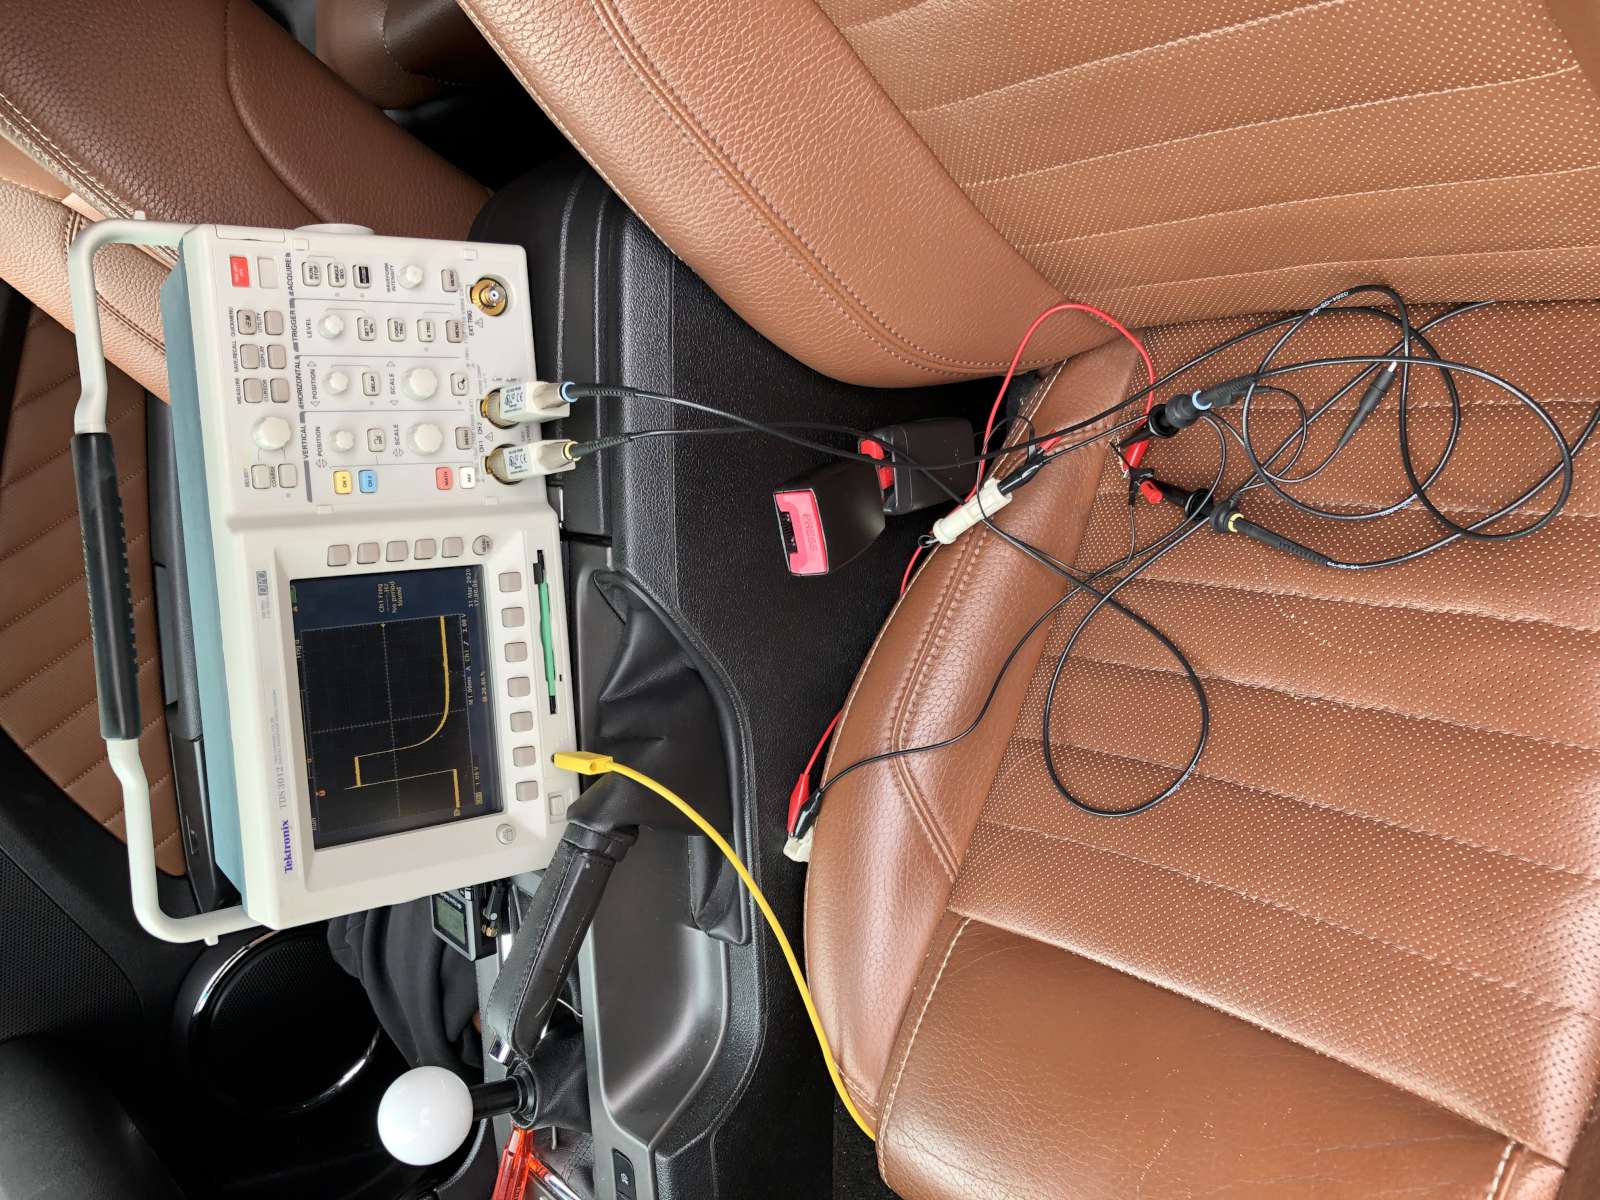
Measuring the current in the seatbelt switch with an oscilloscope and
a 10 Ω resistor. (click to enlarge)
The voltage amplitude of the pulses doesn't depend on the status of the belt (buckled or unbuckled), but the current does. By inserting a 10 Ω resistor in the circuit and measuring the voltage across, I could determine that the current is 15 mA when the belt is buckled and 5.9 mA when it's not buckled.
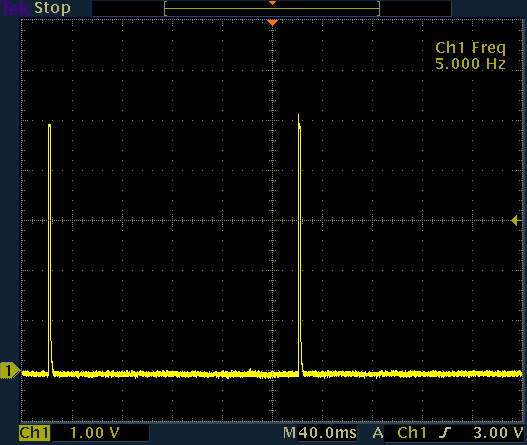 Voltage pulse on the switch. The voltage stays the same, no matter if the seatbelt is buckled or not. |
|
 Current pulse in the switch when the seatbelt is unbuckled. |
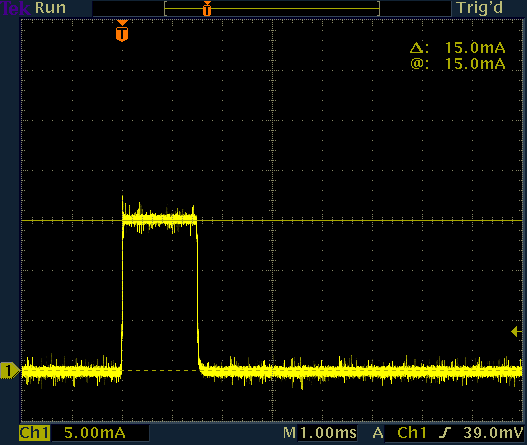 Current pulse in the switch when the seatbelt is buckled. |
These currents correspond to an equivalent resistance of 327 Ω and 830 Ω, respectively. Surely enough, replacing the switch with a 330 Ω resistor solved the problem: no seatbelt chime, no red seatbelt reminder light and no orange airbag warning light, neither. Done.
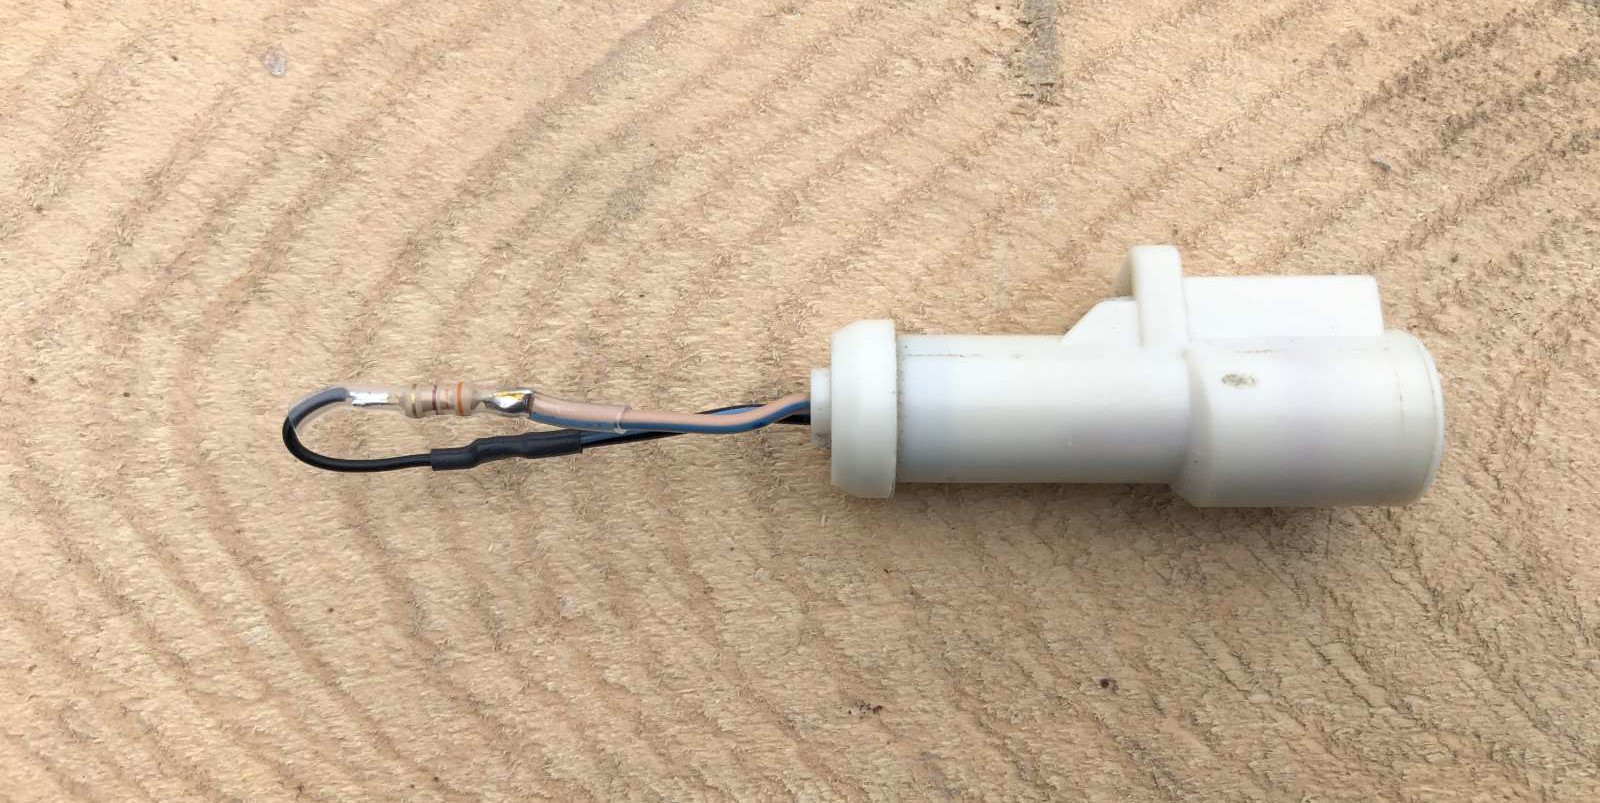
The modified connector with the 330 Ω resistor that
replaces the seatbelt switch. (click to enlarge)
Why the manufacturer choose such a complicated system instead of just a dry contact is still a mystery to me. I understand that they want to address the risk of a switch malfunction or a wiring problem; still I think a switch and a resistor would have worked just as well. I wonder if one day we will have to do some strong cryptography decryption to disable a seatbelt reminder...
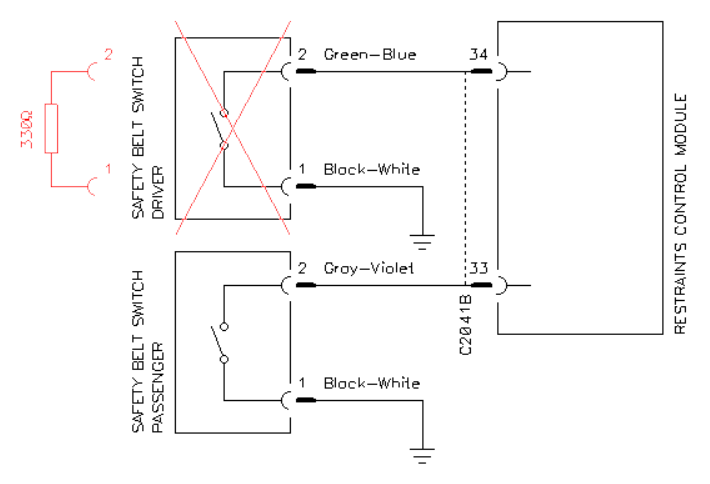
Circuit diagram of the modification to disable seatbelt reminder
chime. (click to enlarge)
I didn't check the passenger side, but there are good chances that the same trick also works in exactly the same way.
After this modification not only the chime is gone, but the red
seatbelt light on the dashboard is gone, too.
Even when you turn the key in the ignition to start the engine, that light
won't show up anymore. (click to enlarge)
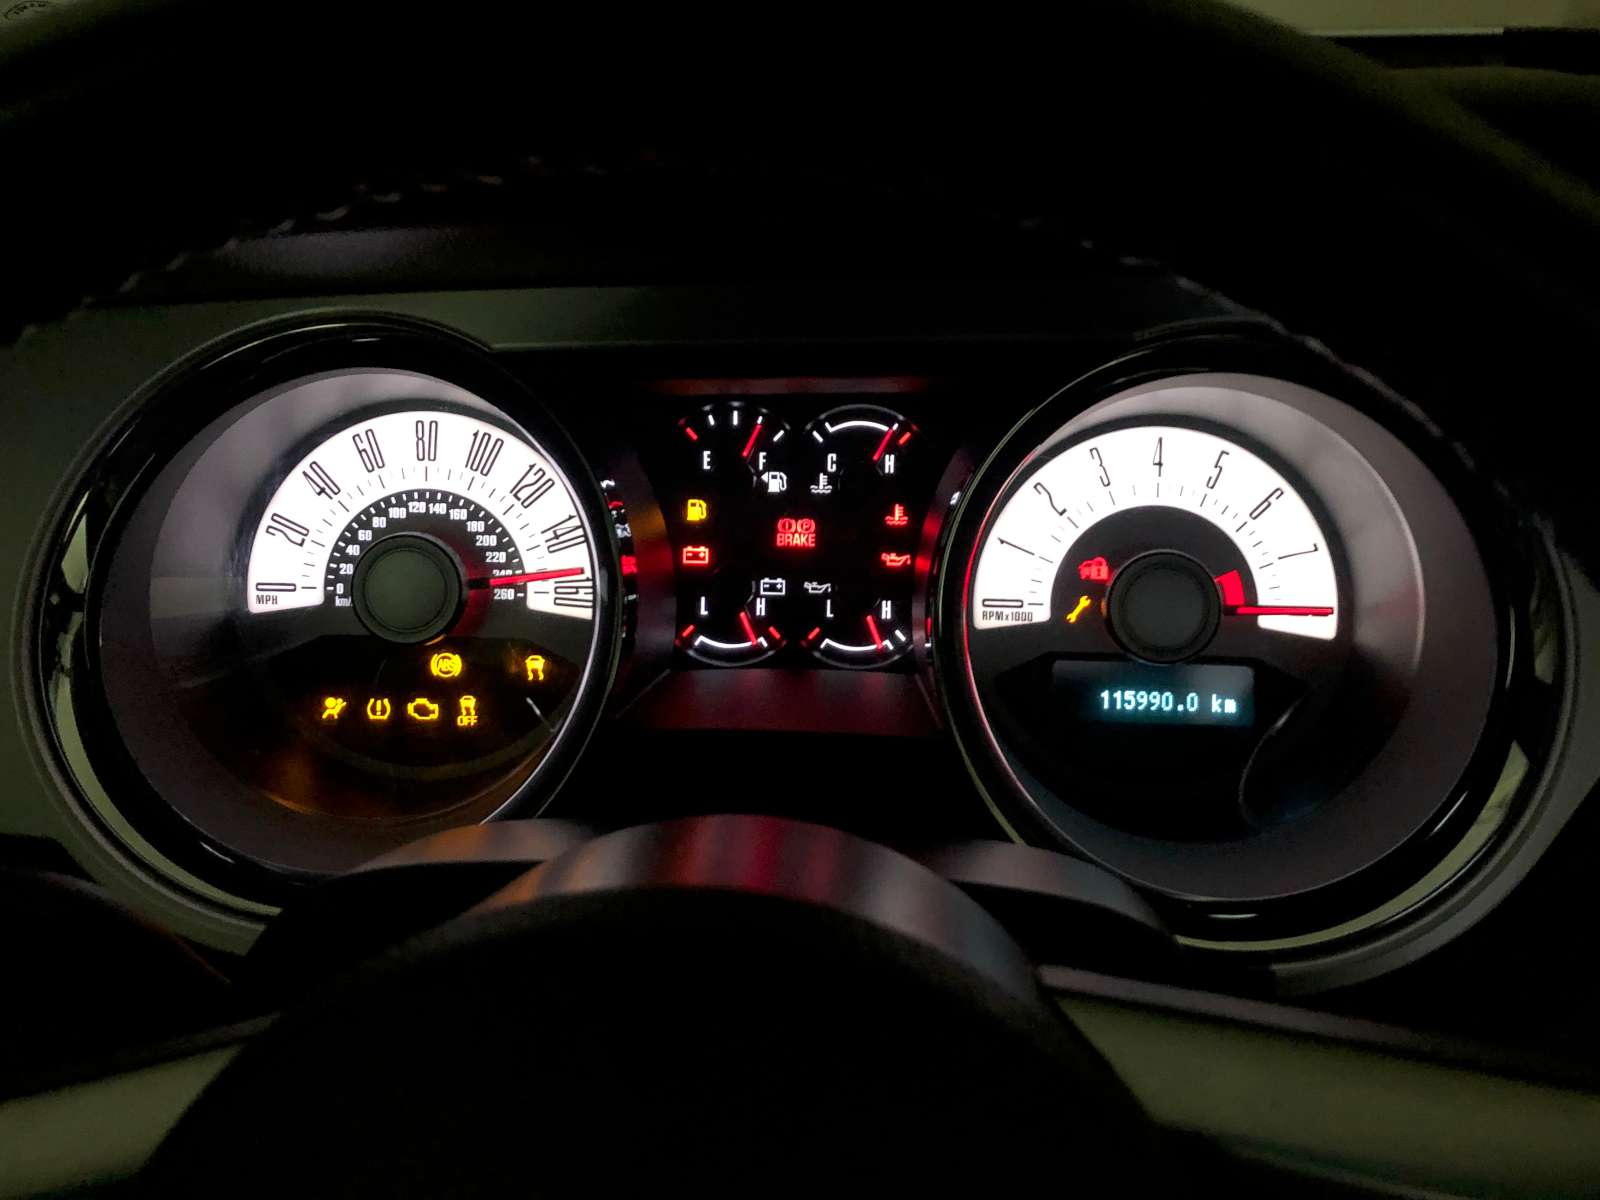
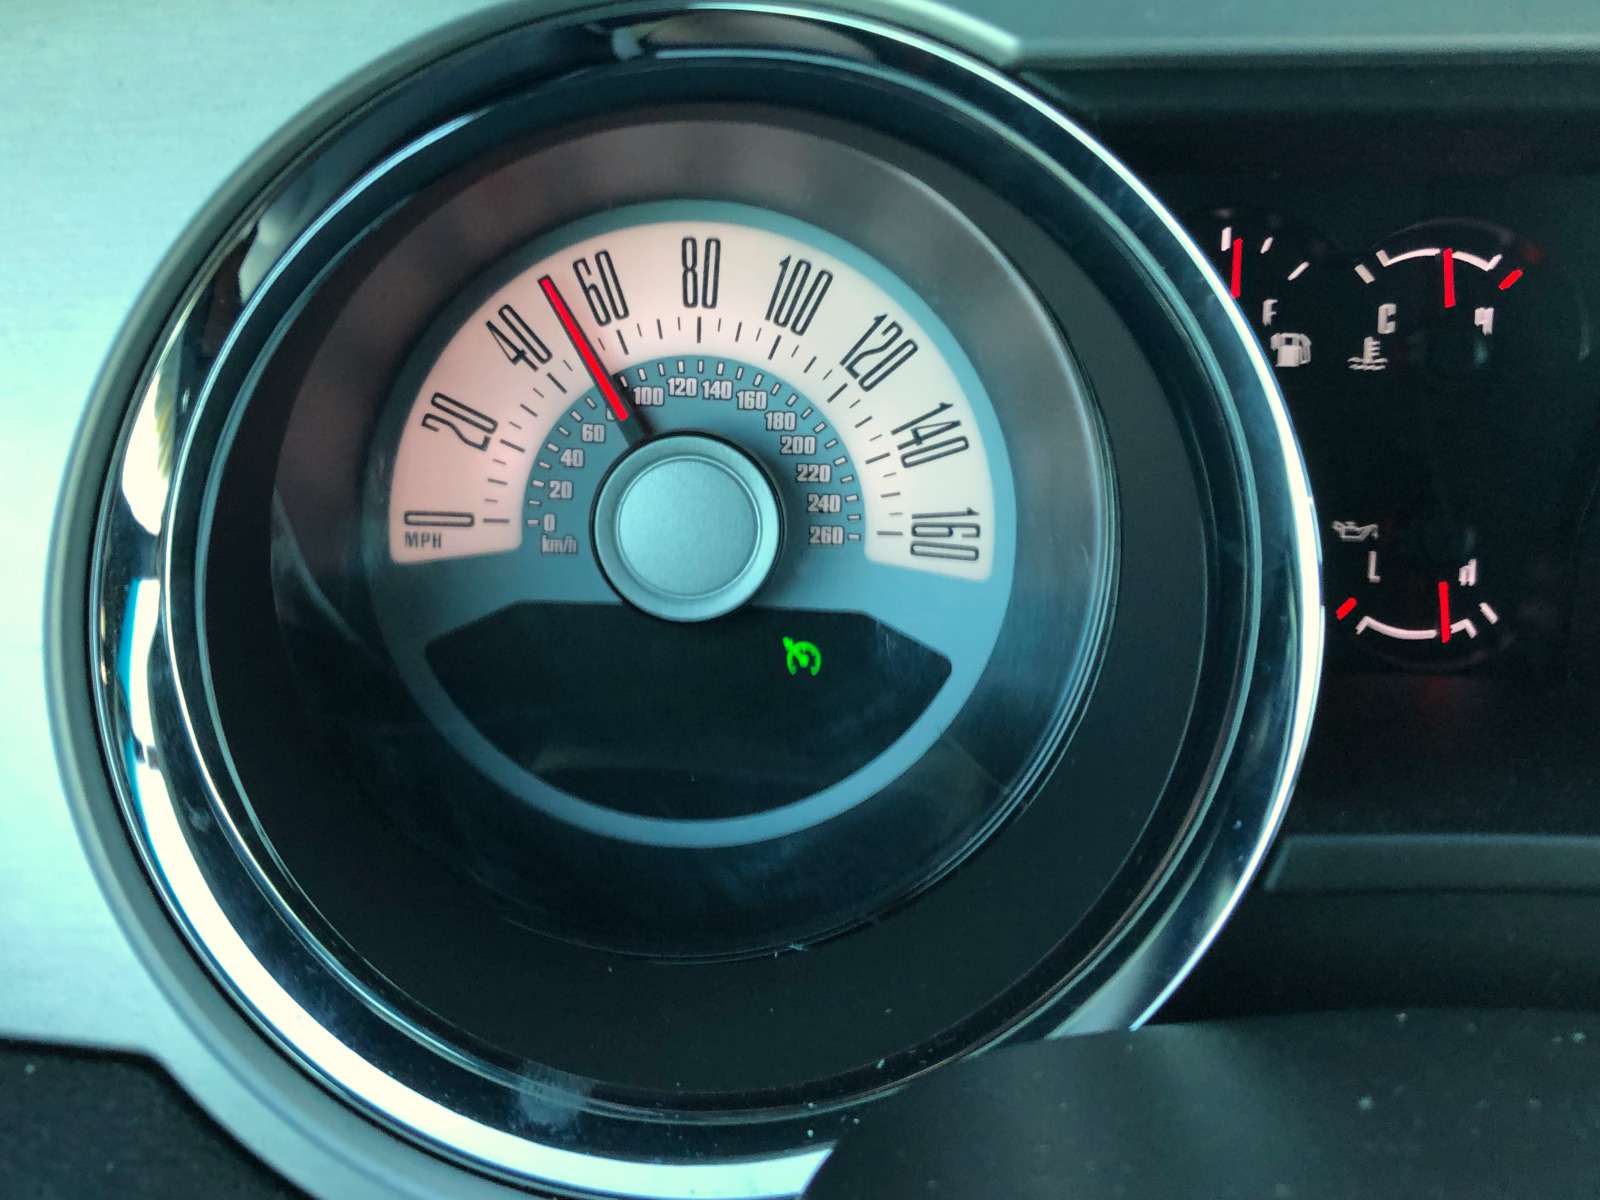
As all American cars, my Mustang has a speedometer in mph. They included a secondary scale in km/h, but the digits are so small that is almost impossible to read. I'm glad it's there though; otherwise I couldn't get it approved for street use by the local authorities. So, I bought a cheap GPS that accurately displays the speed in km/h besides telling me my route and warning me if I'm speeding. So I stuck its suction cup on the windscreen and connected its charger to the cigarette lighter.
How fast am I driving?
50 mph, ok, but is it 79 km/h? Or maybe 83 km/h? Hard to tell on
this gauge. (click to enlarge)
Problem solved? Not quite, yet. When I turn off the car by turning the ignition key to the "off" position, the power on the cigarette lighter stays on. I tried with the power point in the center console, and it stays on, too. Both cigarette lighter outlets are on at all times, directly connected to the battery (each through its own fuse). So I now have to manually switch on and off my GPS every time I step in and out of the car. And my phone charger stays on as well, casting a blue light all night long in my parked car (and draining my battery as well). Again, maybe I'm not used to American cars, but this annoys me. Why are the accessories staying on when I turn the ignition off?
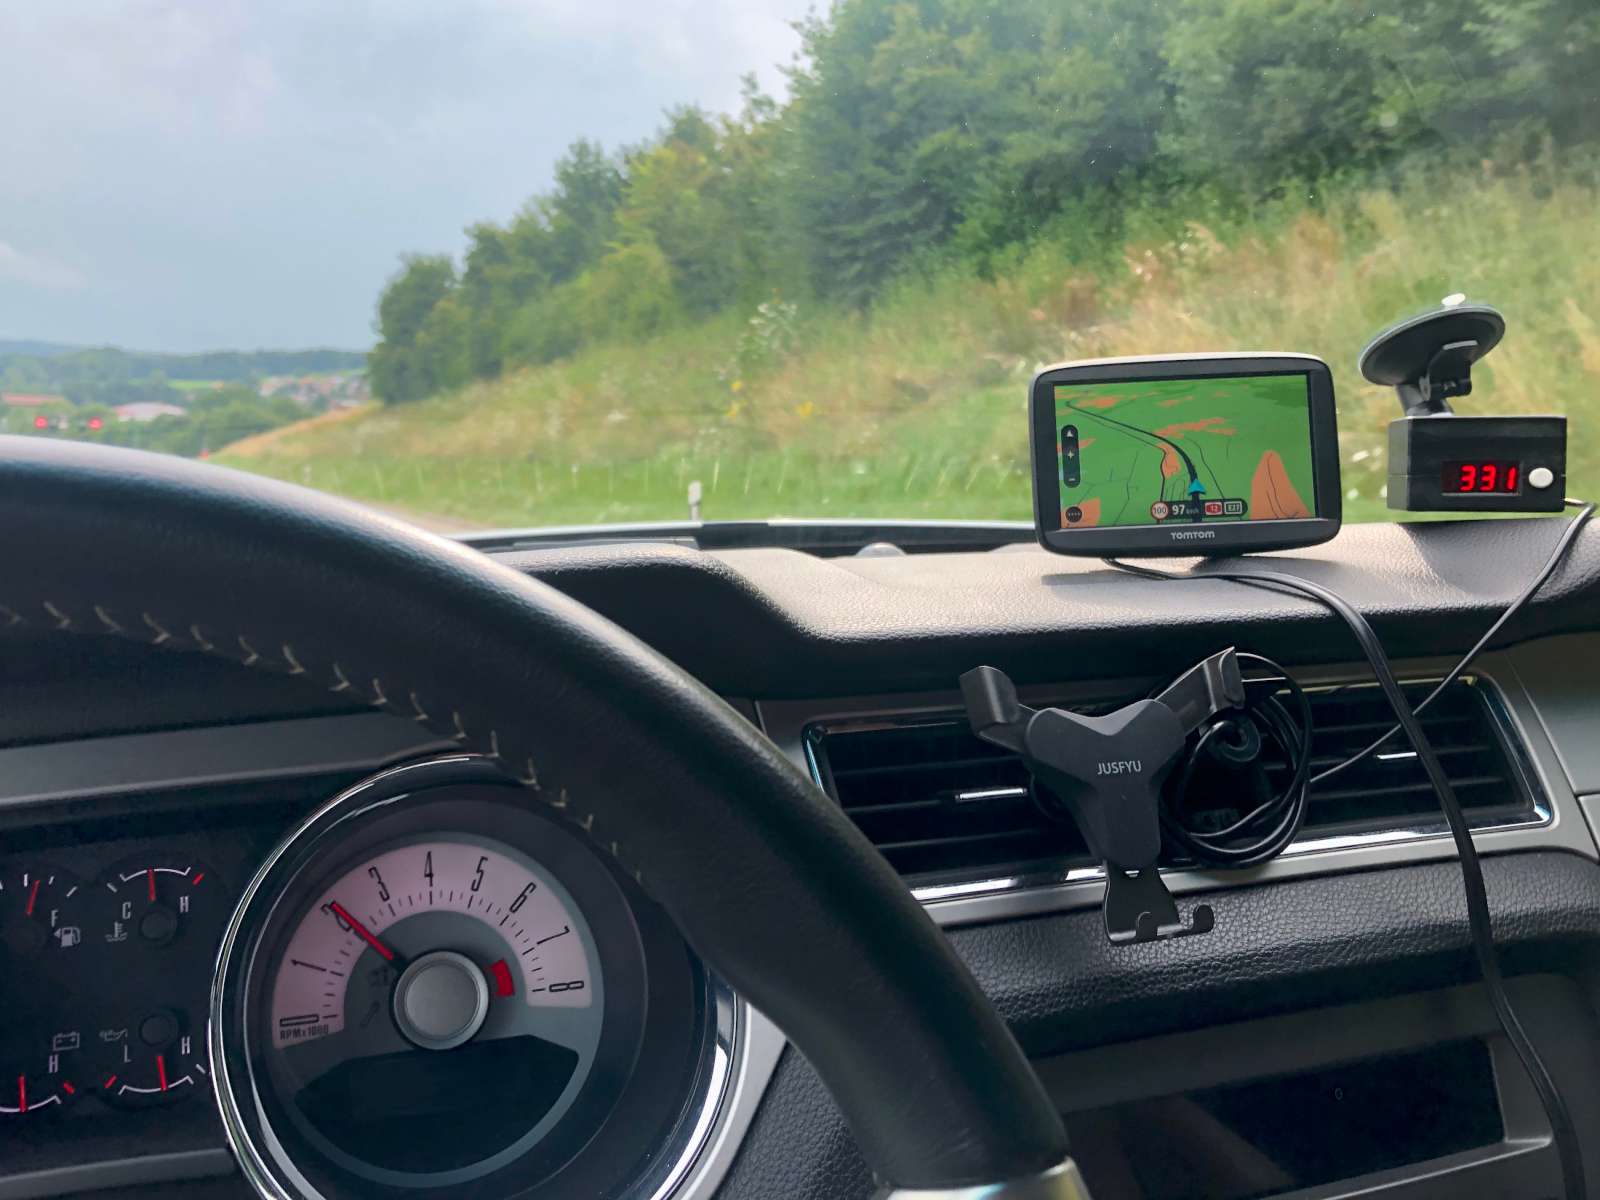
A cheap GPS on the windshield shows the current speed with much more
accuracy than the factory speedometer.
The device with the red display next to the GPS is a home-made altimeter.
(click to enlarge)
By the way, I thought that removing the ignition would turn off the majority of the electronics of the car, but this is no longer the case in modern cars, and not only in this one... The majority of the modules are constantly on: they only go into a sort of low-power sleep mode (maybe).
Anyway, I had to do something about this. The two cigarette lighter connectors are connected with two 20 A cartridge fuses (F5 and F22) in the battery junction box under the hood next to the battery. In the same box, I found that F39 (used to control the rear window defroster relay) only receives power when the ignition is in the "start" or "run" position. So I tapped into it to drive an additional relay to switch my outlets. The easiest way to tap into a fuse is to use an "add-a-circuit" mini-blade fuse tap as it keeps the original fuse and adds a new fuse for the new tap. F39 is a mini-blade fuse rated 5 A, and is located in a convenient location that doesn't interfere with the cover. Because the new fuse only fits after the original F39 (the add-a-circuit only has space to fit that way), I chose 3 A for the new fuse to keep the selectivity with F39: should something bad happen with my relay, only the new fuse will blow and the original F39 should resist.
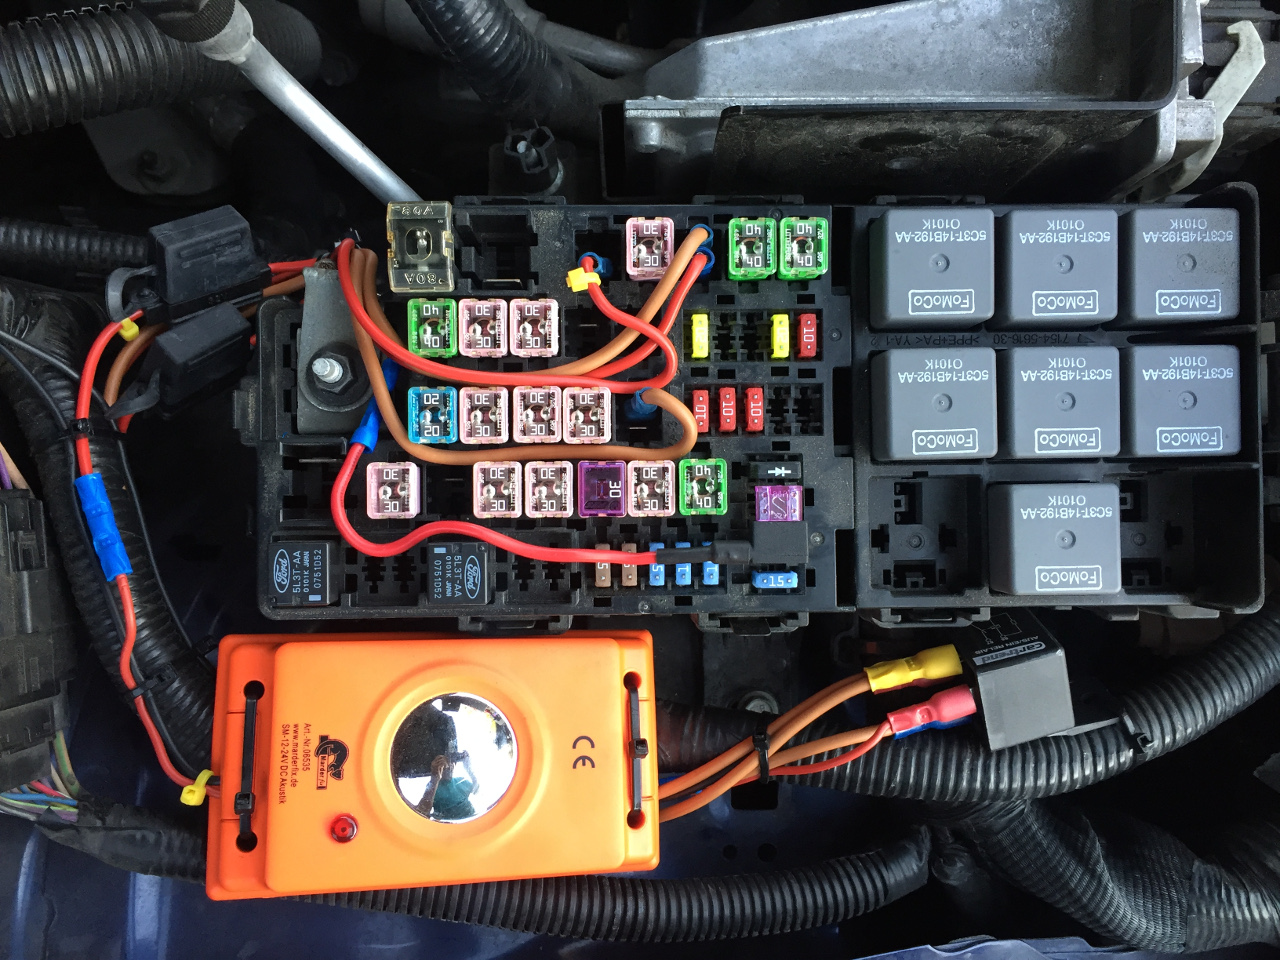
Picture of the modified battery junction box with the additional
cigarette lighter relay and the rodent repeller (marked by the yellow ties).
The battery charger plug is not visible in this picture as it's directly
connected to the battery poles. (click to enlarge)
This tap only drives the coil of a relay and 3 A are more than enough. I choose to use only one 30 A relay and drive both outlets with a single 20 A fuse. I know that before I had two independent 20 A fuses and that my modification result in less available power, but I only need to charge my phone and power my GPS, so I have plenty of current. I didn't have a larger relay on hand and didn't feel like installing two relays. Should I ever need the extra power, I still have the original fuses in the glovebox and I can restore the original circuit in less than a minute. Of course I used large cross-section copper wires (4 mm2) to whithstand the 20 A current.
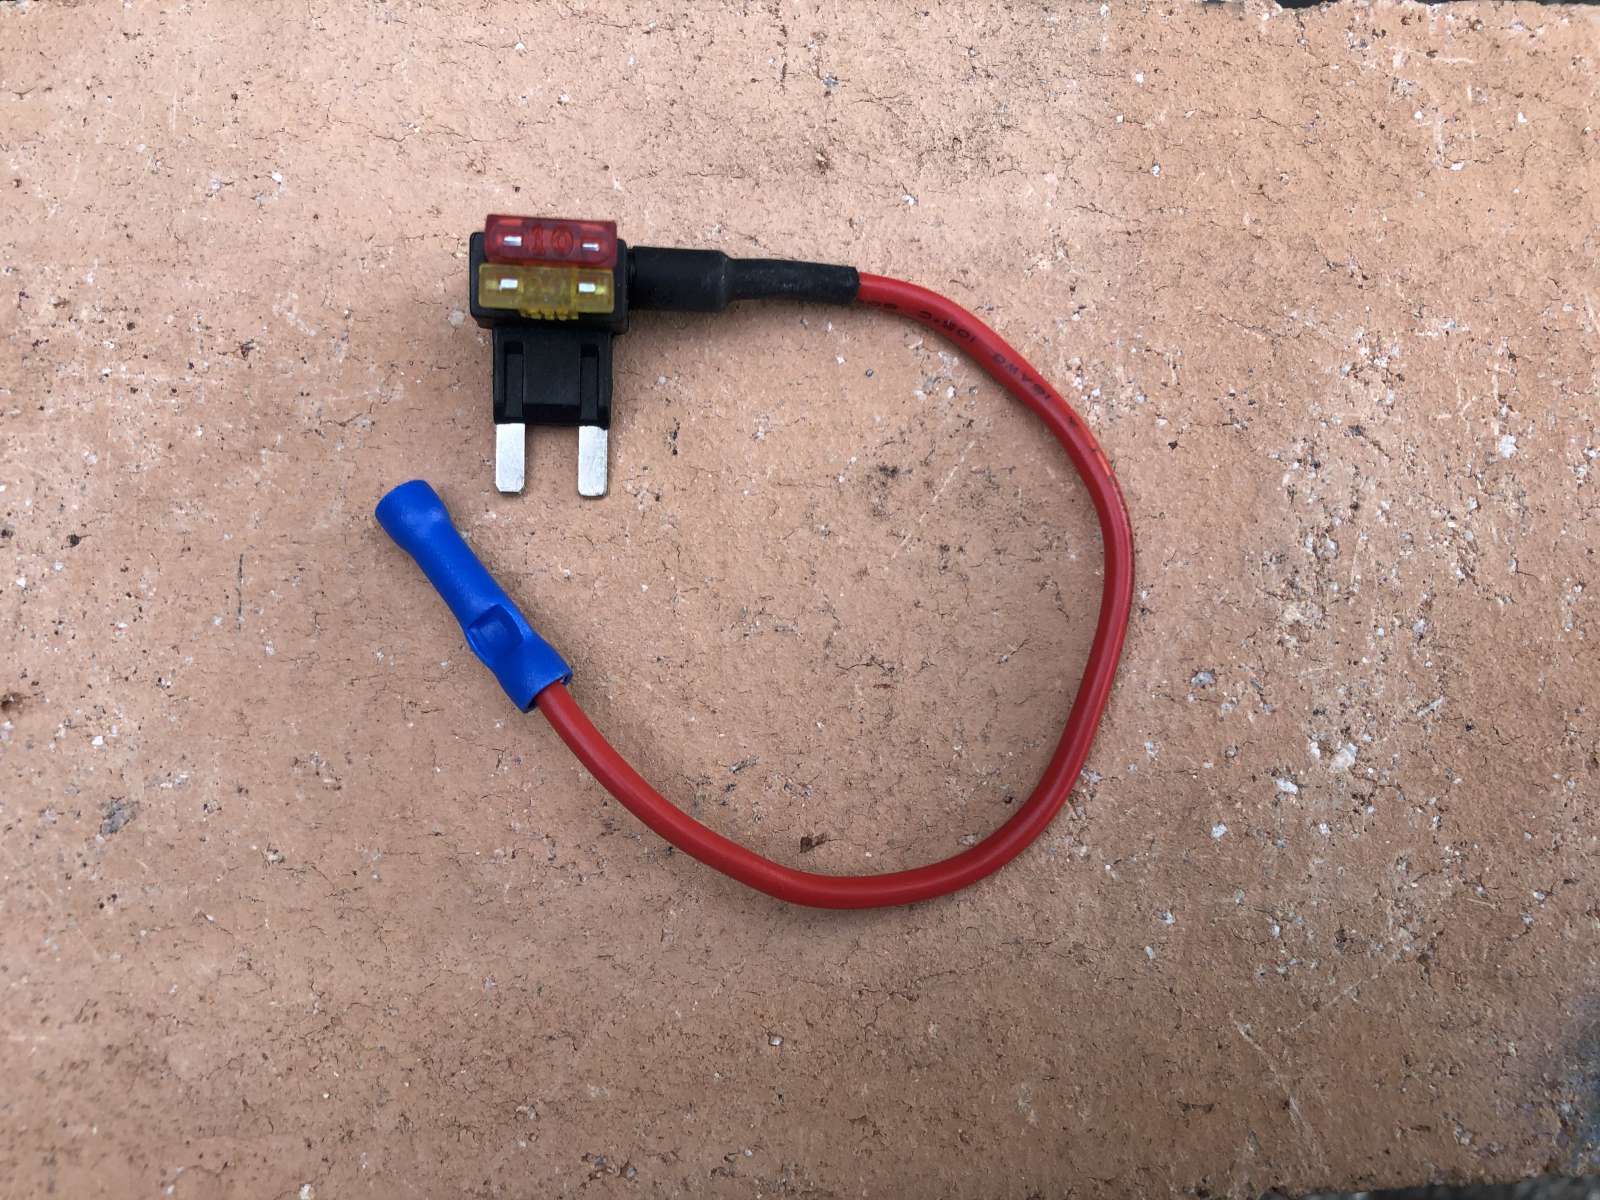
These "add-a-circuit" devices are handy to add an additional
circuit by simply replacing an existing fuse.
They hold two fuses, one (bottom) is the original and the other (top) goes to
the tap wire for the additional circuit.
In this picture the fuses have different ratings than the ones used for
switching the cigarette lighters plug.
(click to enlarge)
The nice thing about cartridge fuses is that they fit standard 6.35 mm female blade connectors so it's very easy to install wires instead of the fuse and I placed my little circuit just outside of the battery junction box.
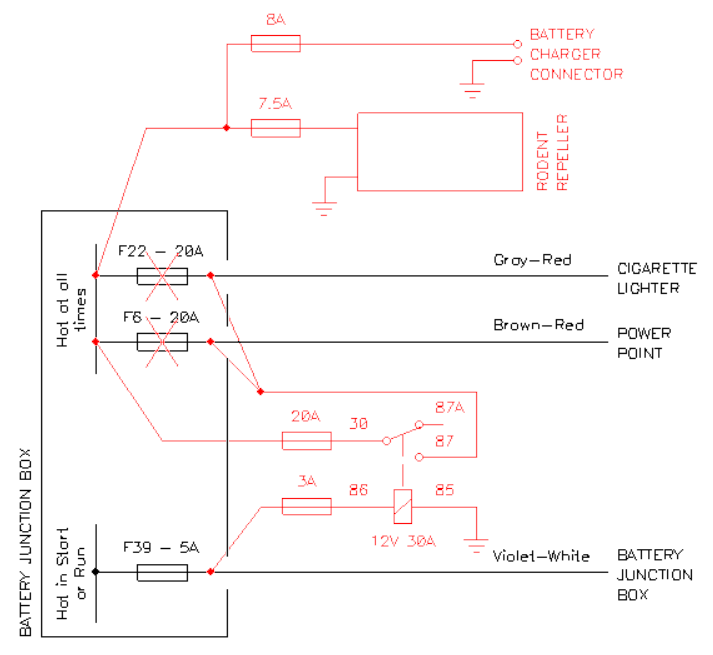
Circuit diagram of the modification to switch the cigarette lighter
power with the ignition. (click to enlarge)
While I was tampering with the battery junction box I also addressed two additional small problems. Since I often park my car outside, I already had weasels visiting my engine. Hopefully they only chewed the insulation of the firewall, but it's still an unpleasant surprise. Furthermore, I only drive my Mustang in summer as it's not a fun car to drive on snowy mountain roads, but the battery cannot survive 6 months alone as it goes flat in only about two (as I said, all the modules are constantly powered on...). So, while I was at it, I also installed an ultrasonic rodent repeller and a connector for a battery charger, both protected by their own fuse.
My car is equipped with auto headlights and at first glance that looks like a cool feature: headlights turn on at dusk and turn off at dawn; simple and easy. But then the law changed and now every car has to drive with its headlights on all the time or be equipped with daytime running lights. This kills the auto headlights feature. Adding daytime running lights would ruin the look of the car: they are just ugly add-ons. Switching the headlights on and off every time is a pain, it's easy to forget and I don't want to risk a fine. Furthermore, there is no headlights indicator light on the dashboard, so you have no idea if the headlights are on or off. Therefore I decided to correct this with another relay. Probably the dealer could reprogram some modules to add this feature, but here nobody really knows how to tweak these foreign cars, so I chose to do it my way. And a relay is much cheaper than one hour in an official Ford dealership anyway...
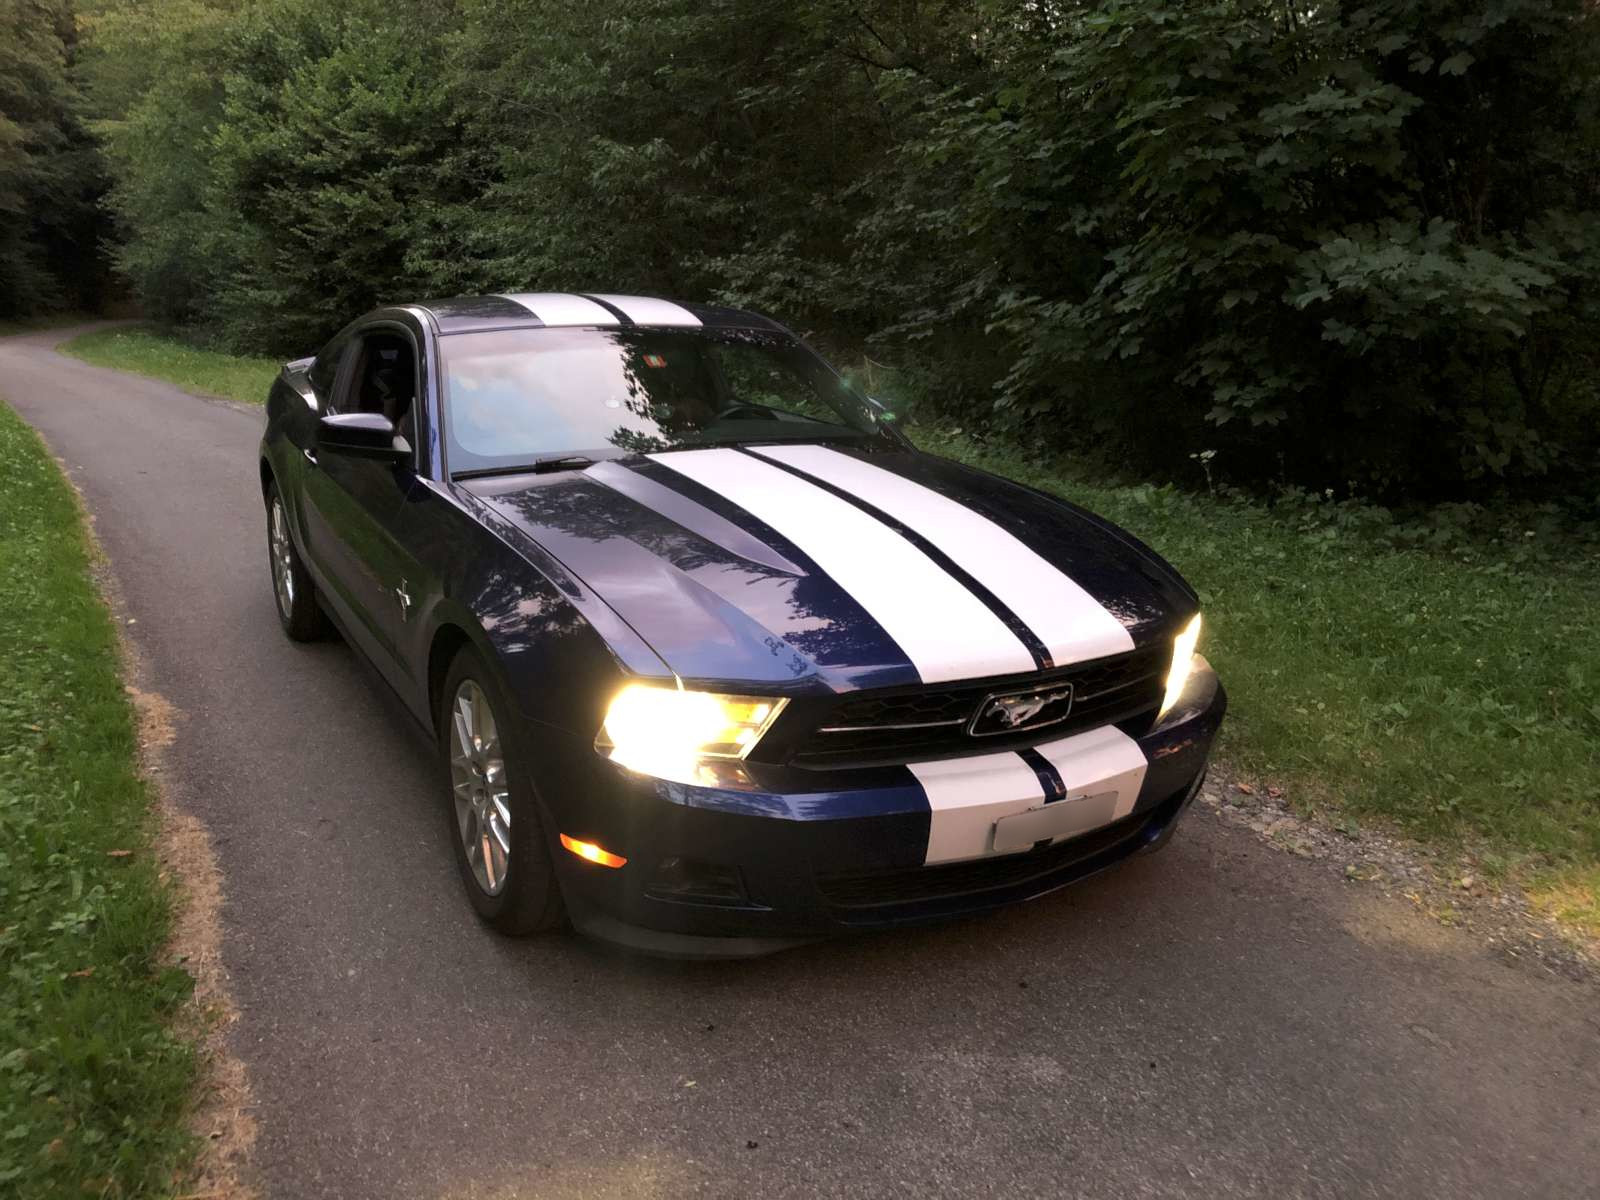
My American car in a Swiss forest. (click to enlarge)
The headlights switch connects to the smart junction box with six wires all going to connector C2280B. The smart junction box can be easily accessed behind the kick-panel on the passenger side, somehow between the front wheel and the door. I just rewired it in such a way that, when the switch is in the "auto" position, headlights turn on when the ignition is in "start" or "run" and off in "acc" or "off". All other positions of the switch ("off", "park", "low beam",...) work as usual, but now, with the switch on "auto" the headlights turn on when I start the engine and off when I turn it off.
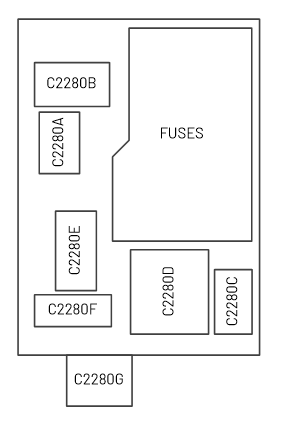
Locations of the C2280 connectors on the smart junction box.
If you are afraid that the additional current of the headlights may have a bad effect on the battery when cranking the engine, be reinsured: Subaru does that on their models since twenty or more years and I never had any issue. If, one day, I really need to start the engine with a partially drained battery, I can still manually turn off the headlights with the switch before a critical cold start. But I'm using this modification since 2017 and never had any problem: it always starts right up.
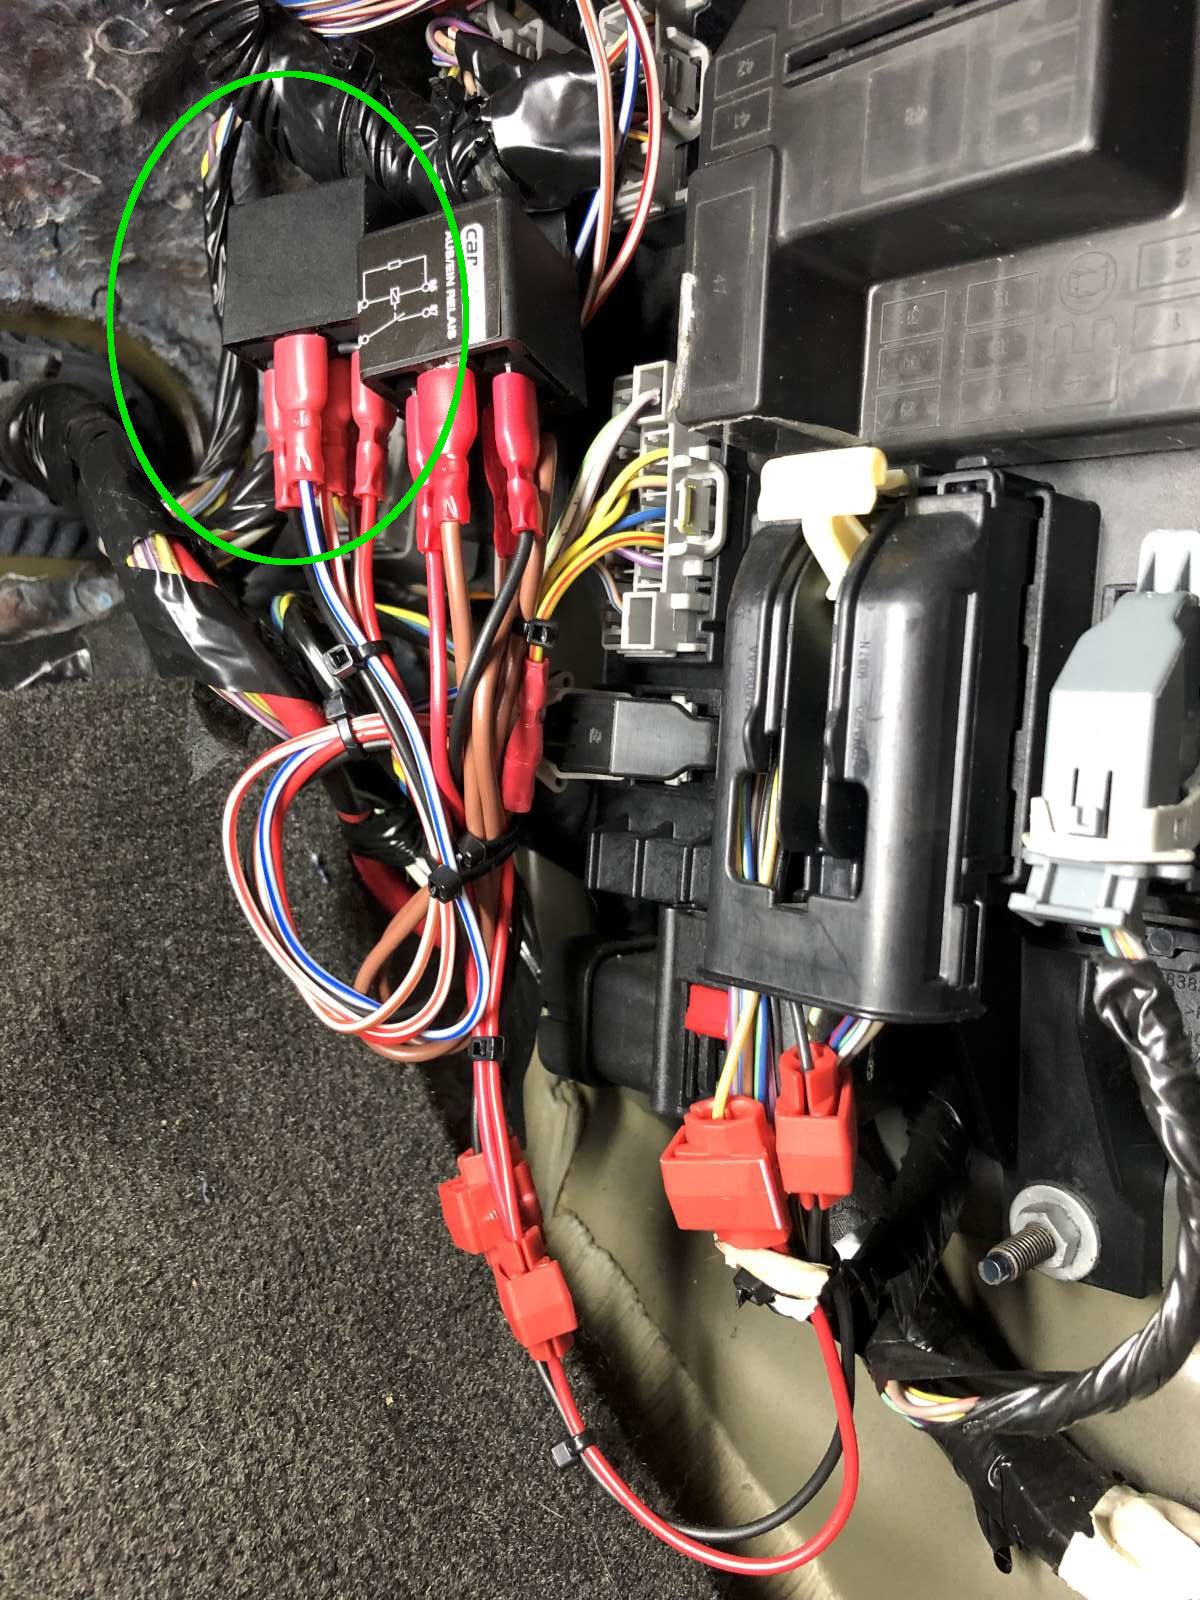
View of the modified smart junction box, the additional relay for the auto-headlights is indicated by the green circle.. (click to enlarge)
The modification is quite simple, but requires cutting one wire. It's important that the relay is a double-throw type, because if you disconnect all pins the headlights turn on. To keep them off, the "off" pin must be connected to ground. Beware that the connector C2280B has many wires and a few have the same colors: make sure you connect or cut the correct ones, for example by checking with the "beep function" of a multimeter. To drive the relay, suitable power and ground wires can be found on C2280D after fuse F35 that is used to control the auxiliary body module: here power is present only when the ignition is in the "start" or "run" position.
Because my relay was a cheap imported I had to add a 1N4007 flywheel diode, making sure the anode is connected to ground. To keep the relay in place I simply attached it to a large cable harness with a cable tie; there is plenty of space behind the kick panel.
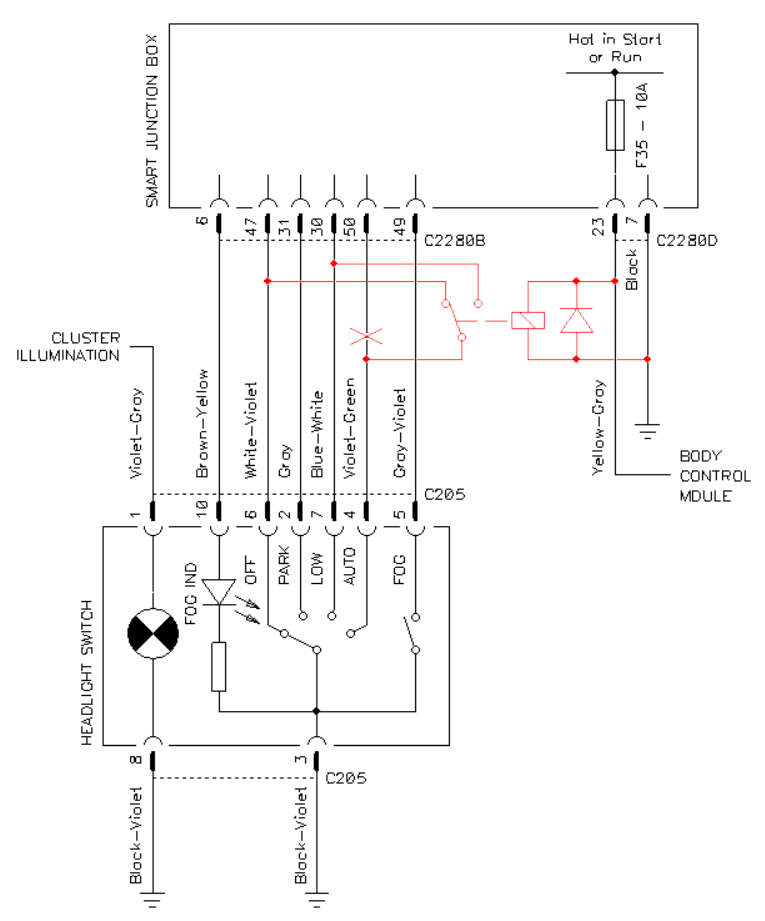
Circuit diagram of the modification to automatically switch the
headlight on and off with the ignition. (click to enlarge)

These progressive turn signals look really beautiful... it's a pity to
disable this feature. (click to enlarge)
My Mustang comes with progressive turn signals. Although they look really cool, they are not allowed by local regulations. Fortunately it's very easy to convert them to regular blinking signals simply by shorting together the three (inner, middle and outer) stop/signal wires. And by removing the short, it reverts back to progressive turn signals. The modification is very simple as all the wires are easily accessible just behind the trim panel in the trunk. I used vampire taps and 6.35 mm female blade connectors. Once the wiring is in place, it takes only about a minute to go from progressive to solid turn signals and back.
Circuit diagram of the modification to turn the progressive turn
signals into normal blinking ones. (click to enlarge)
It's a pity to disable such a cool feature as progress turn signals, but dura lex sed lex.
 The three wires of the progressive turn signal are tapped with vampire blade connectors, ready to install the bridge between them. As it is, it still works as a progressive turn signal. (click to enlarge) |
 The three wires are shorted together and the turn signal now works as a regular blinking one. (click to enlarge) |
Another annoying chime is the reminder for the key in the ignition that rings when I insert the key before closing the door: and that's almost every time I jump in the car. I hate that, nobody dies if I have my key in the ignition. Hopefully, this can be disabled quite easily: the ignition switch has a dedicated contact that closes and lets battery voltage through when the key is in. This gray-striped blue wire runs to the smart junction box on connector C2280B pin 35. Cutting this wire is all it takes to disable the chime. Beware that it's not the only blue wire with a gray stripe on C2280B: make sure you cut the one connecting to pin 35 by verifying that it carries battery voltage only when the key is in the ignition. Measure twice, cut once. Adding two small heat-shrink sleeves on the freshly cut wires prevents from accidental short circuits. Or, the solution I ended up with is to install a small jumper wire with two insulated connectors so that this feature can be easily enabled or disabled. Of course, now the reminder is disabled and it's easier to forget the key in the ignition, but all my other cars don't have this reminder and I'm perfectly fine with it.
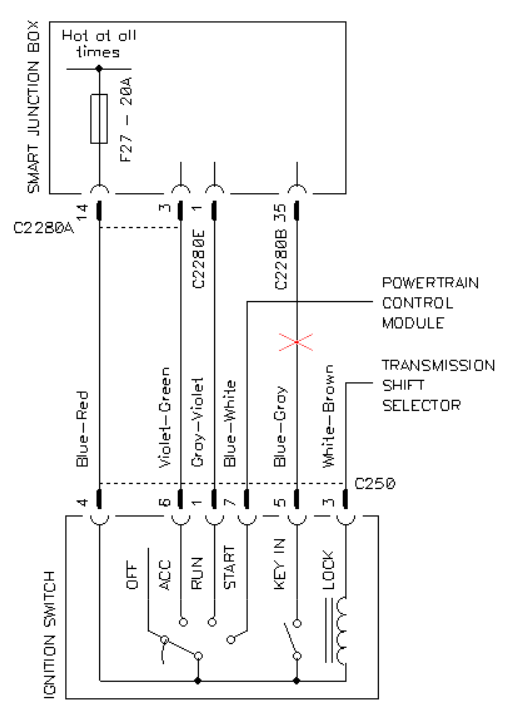
Circuit diagram of the modification to disable the key in ignition
reminder chime. (click to enlarge)
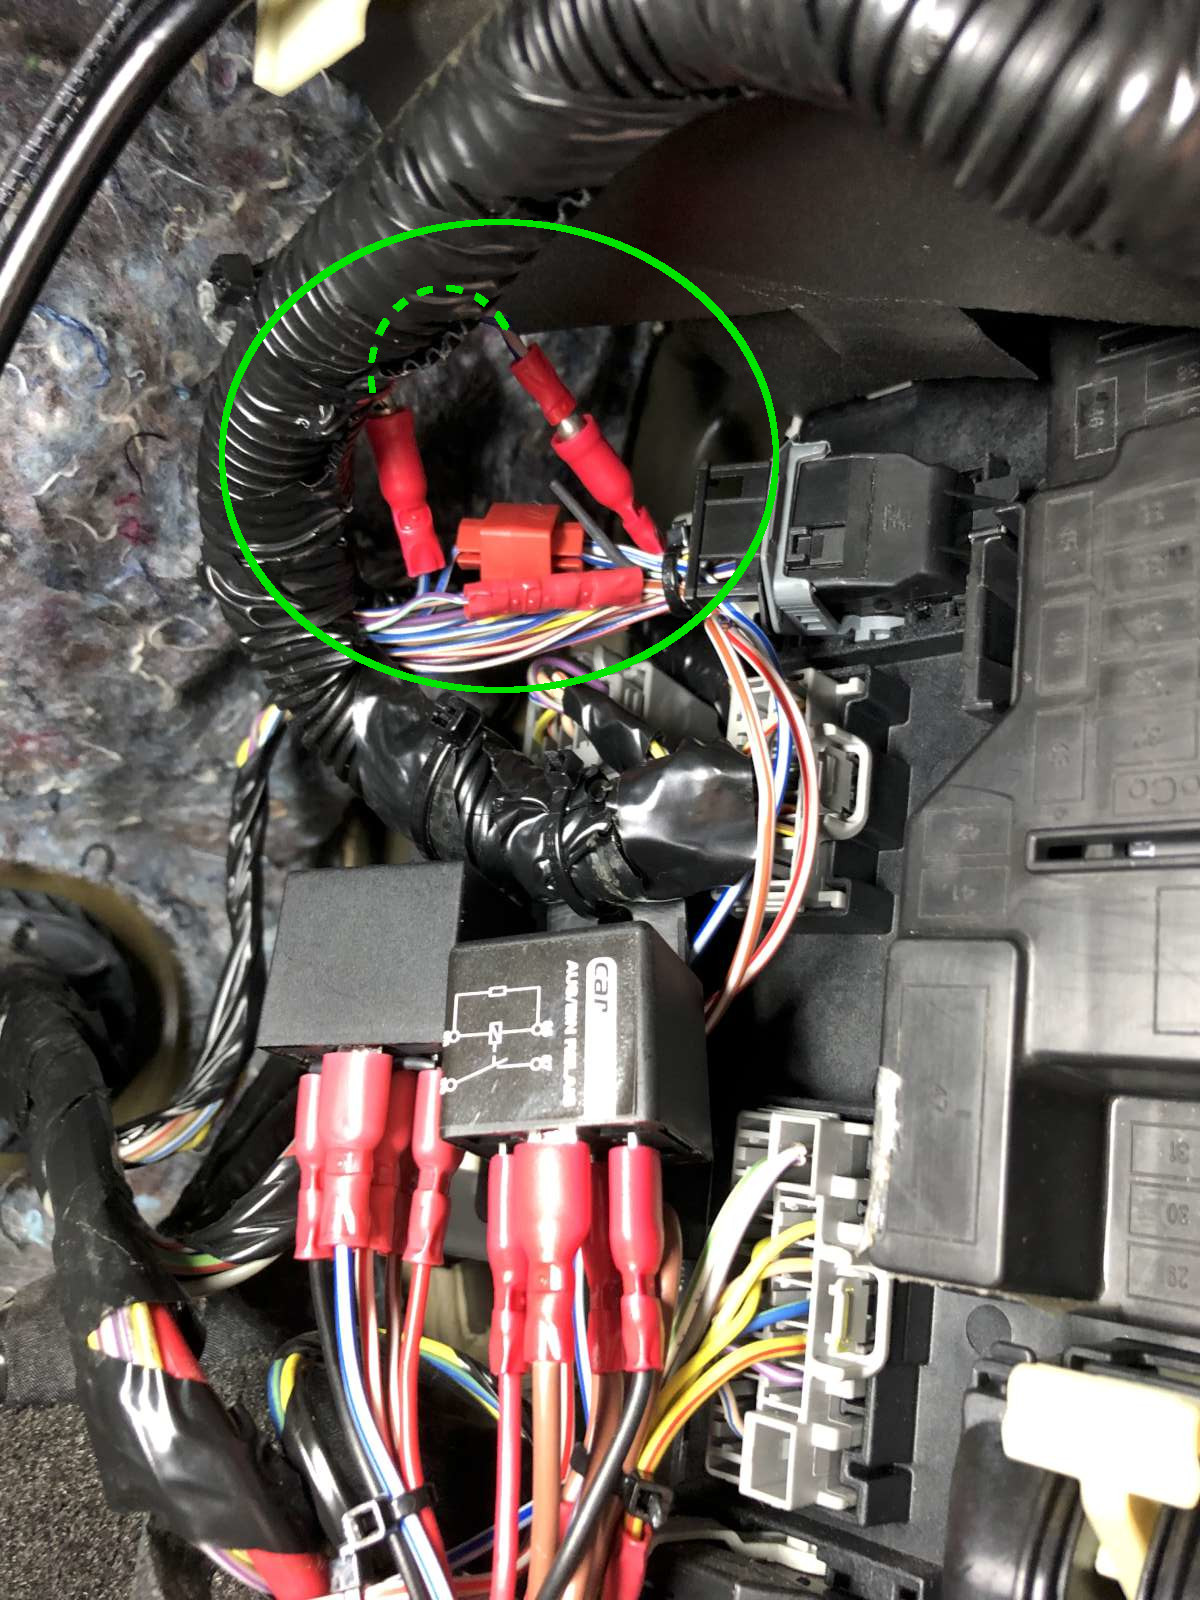
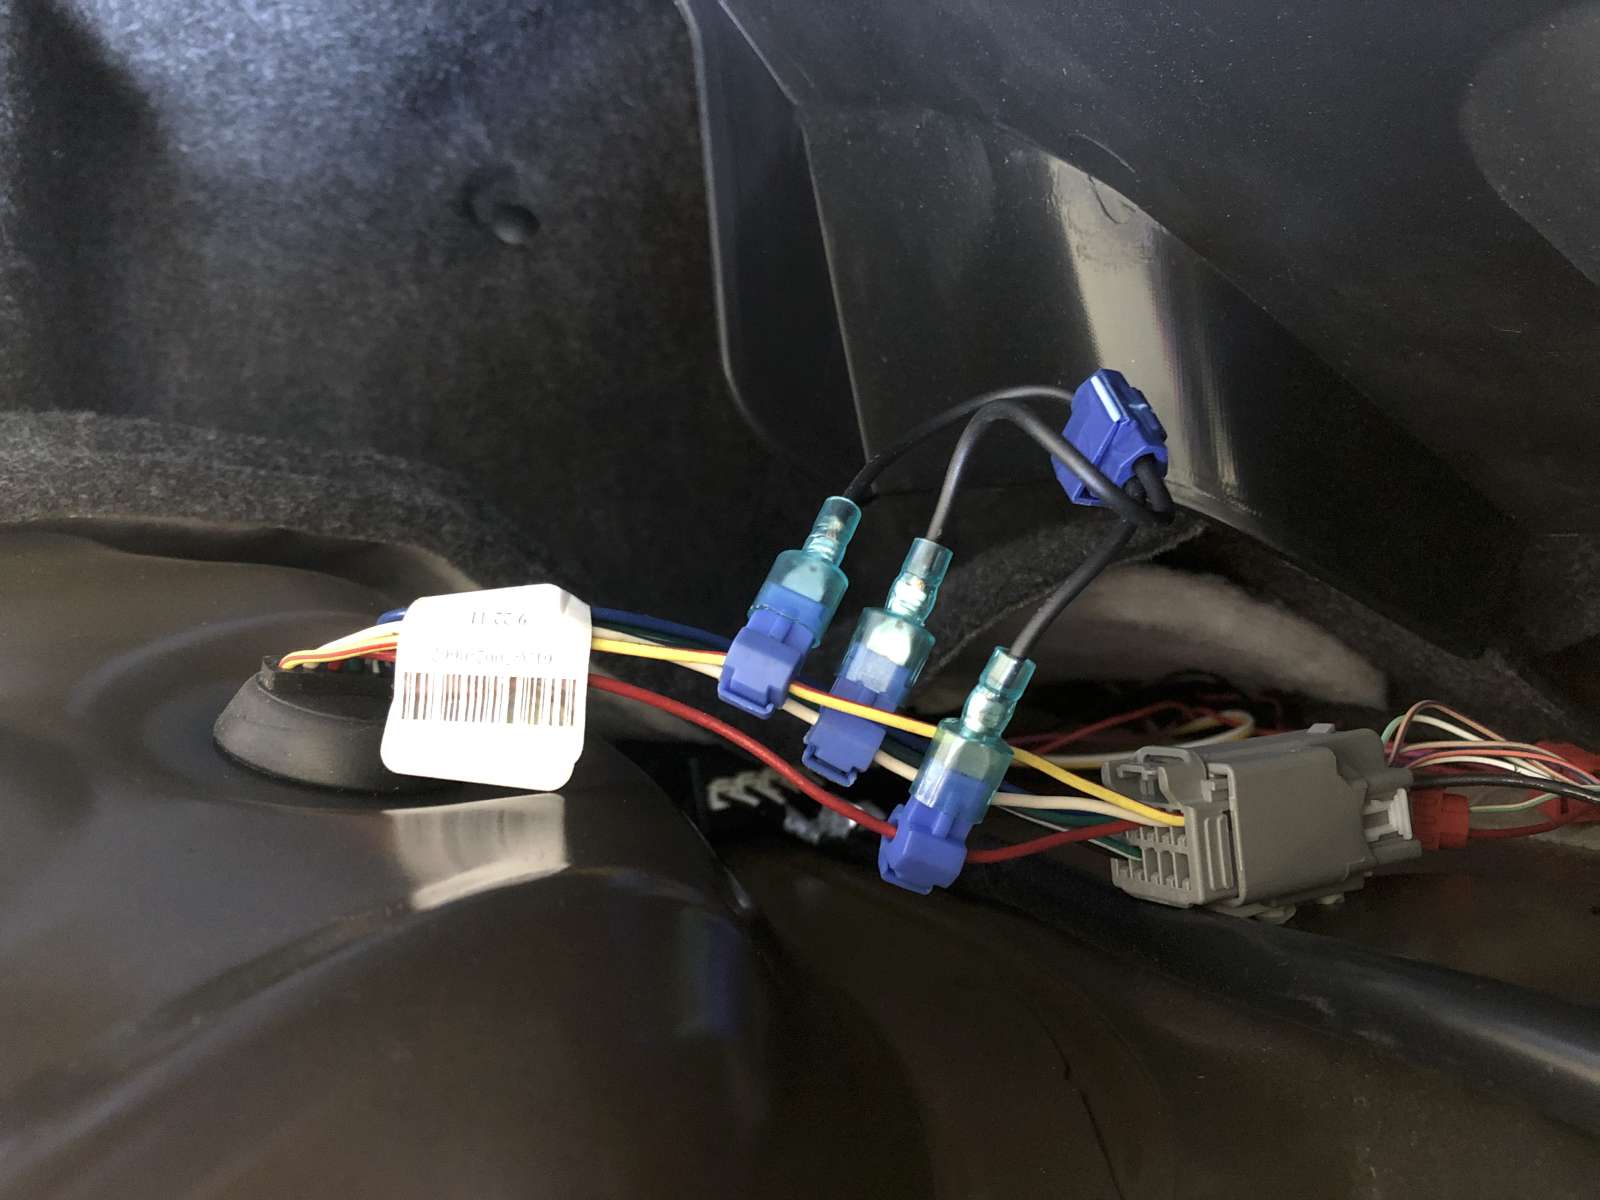
The modified wire for the key in ignition reminder indicated by the
green circle: here it has been cut and spliced with a jumper wire so that is
can easily be connected and disconnected.
(click to enlarge)
The car comes equipped with a factory alarm system. I did not pay any attention to it until it went off in the middle of the nigh for no apparent reason. And this happened again while I was at work. This was too much and I had to do something about it. I live in a quiet country, close to a quiet city and in a quiet neighborhood: car theft is the last of my problems; this can be easily dealt with a good insurance but waking up my neighbors in the middle of the night is a much bigger problem.
I read the manual but there is no way to lock your car without engaging the alarm. I don't need a car alarm and I don't want one. Again, I could go to the Ford dealership and ask them to reprogram my car, but I choose again to install a relay because it's much easier and cheaper.
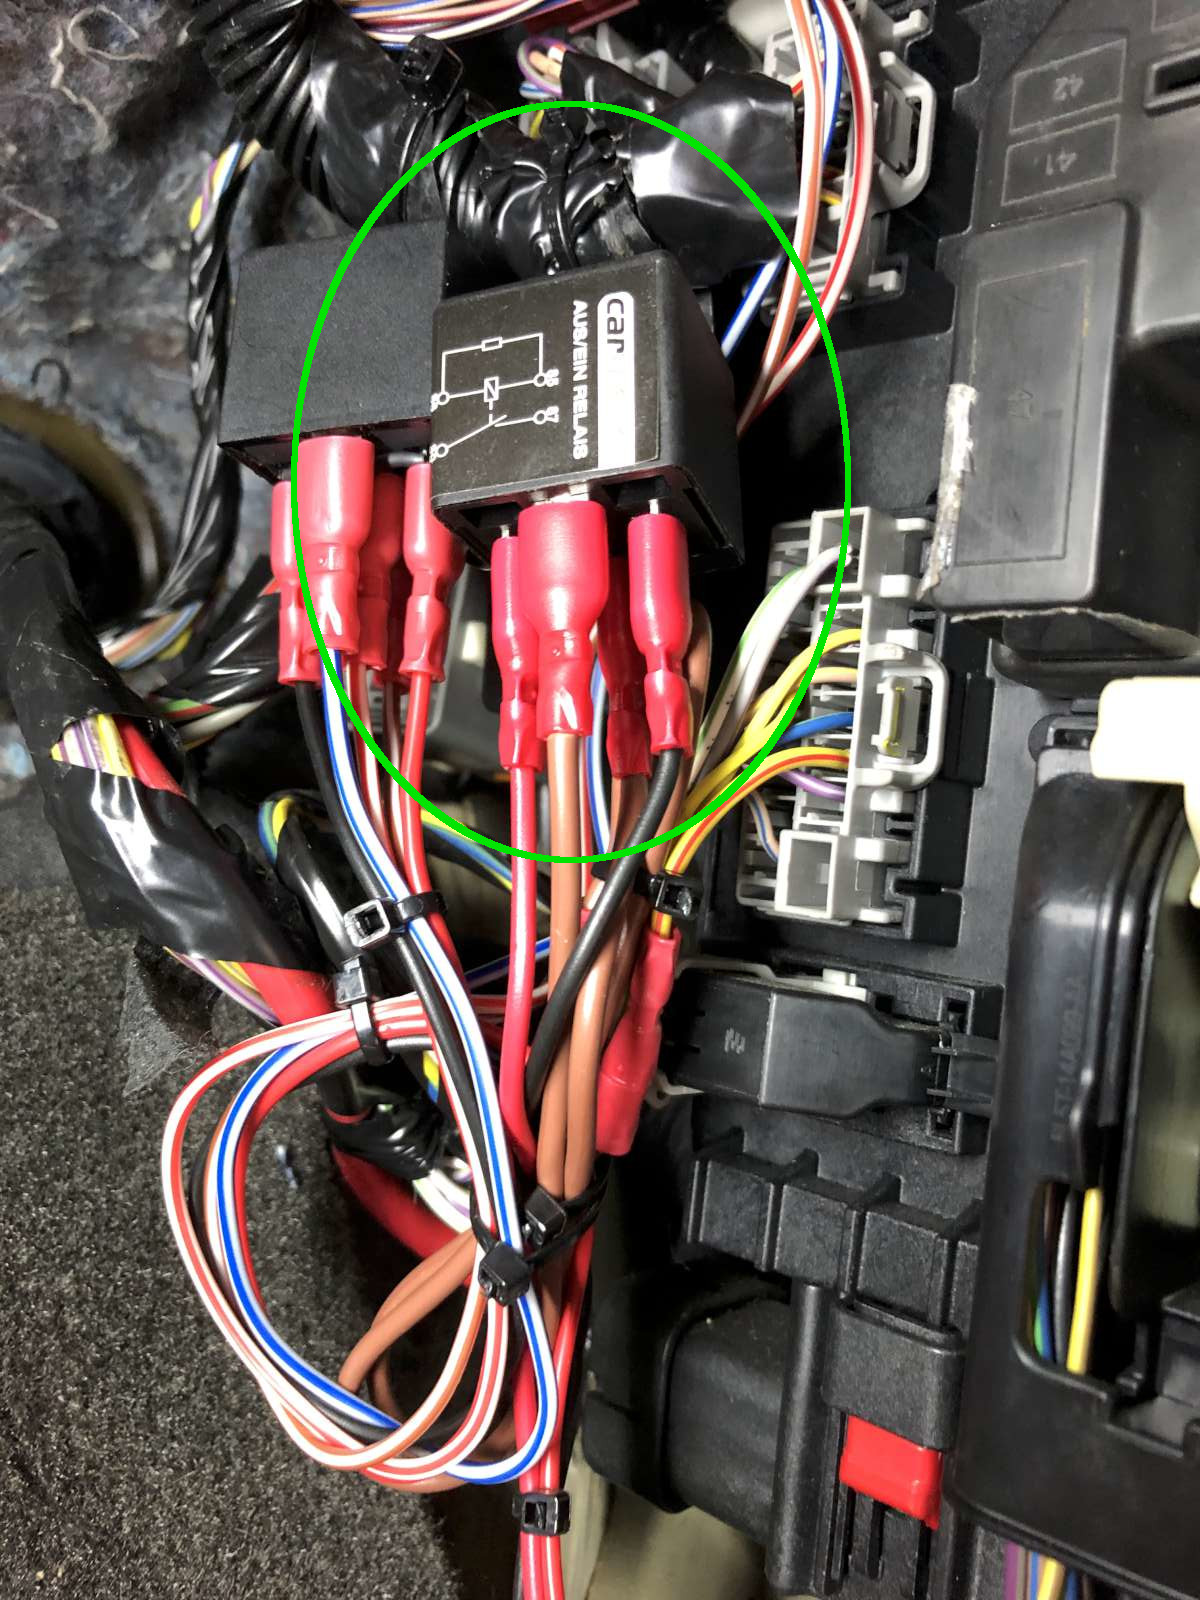
Picture of the smart junction box with the additional relay (indicated
by the green circle) to mute the horn when the ignition is turned off.
(click to enlarge)
The alarm uses the horn to produce its sound: to mute it, I installed another relay that turns on when the ignition is in the "run" or "start" position. If you shut off the engine, the horn is disabled; when the engine runs, you can honk as usual. The alarm still works, but it only flashes the headlights and the warning lights, which is ok to me. It’s true that this modification disables the panic button on the key fob and the acoustic confirmation that you locked the doors, but I don't need those features anyway and I'm happier not to have them. The car exhaust is already loud enough and my neighbors appreciate this little contribution to their quietness.
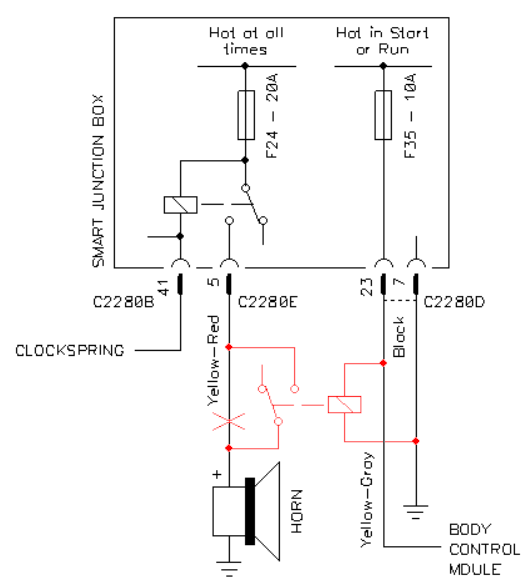
Circuit diagram of the modification to mute the horn when the ignition
is turned off. (click to enlarge)
I know that the V6 doesn't sound as "American" as the classic cross-plane V8s, but it still has a great sound even with the factory exhaust, at least from the outside. It has a small tendency to burble when you release the throttle around 3'000 to 3'500 rpm and I love that: no wonder that's my favorite shifting point. But form inside the car the sound is too soft and damped to my taste and I wanted to hear the engine a little more.
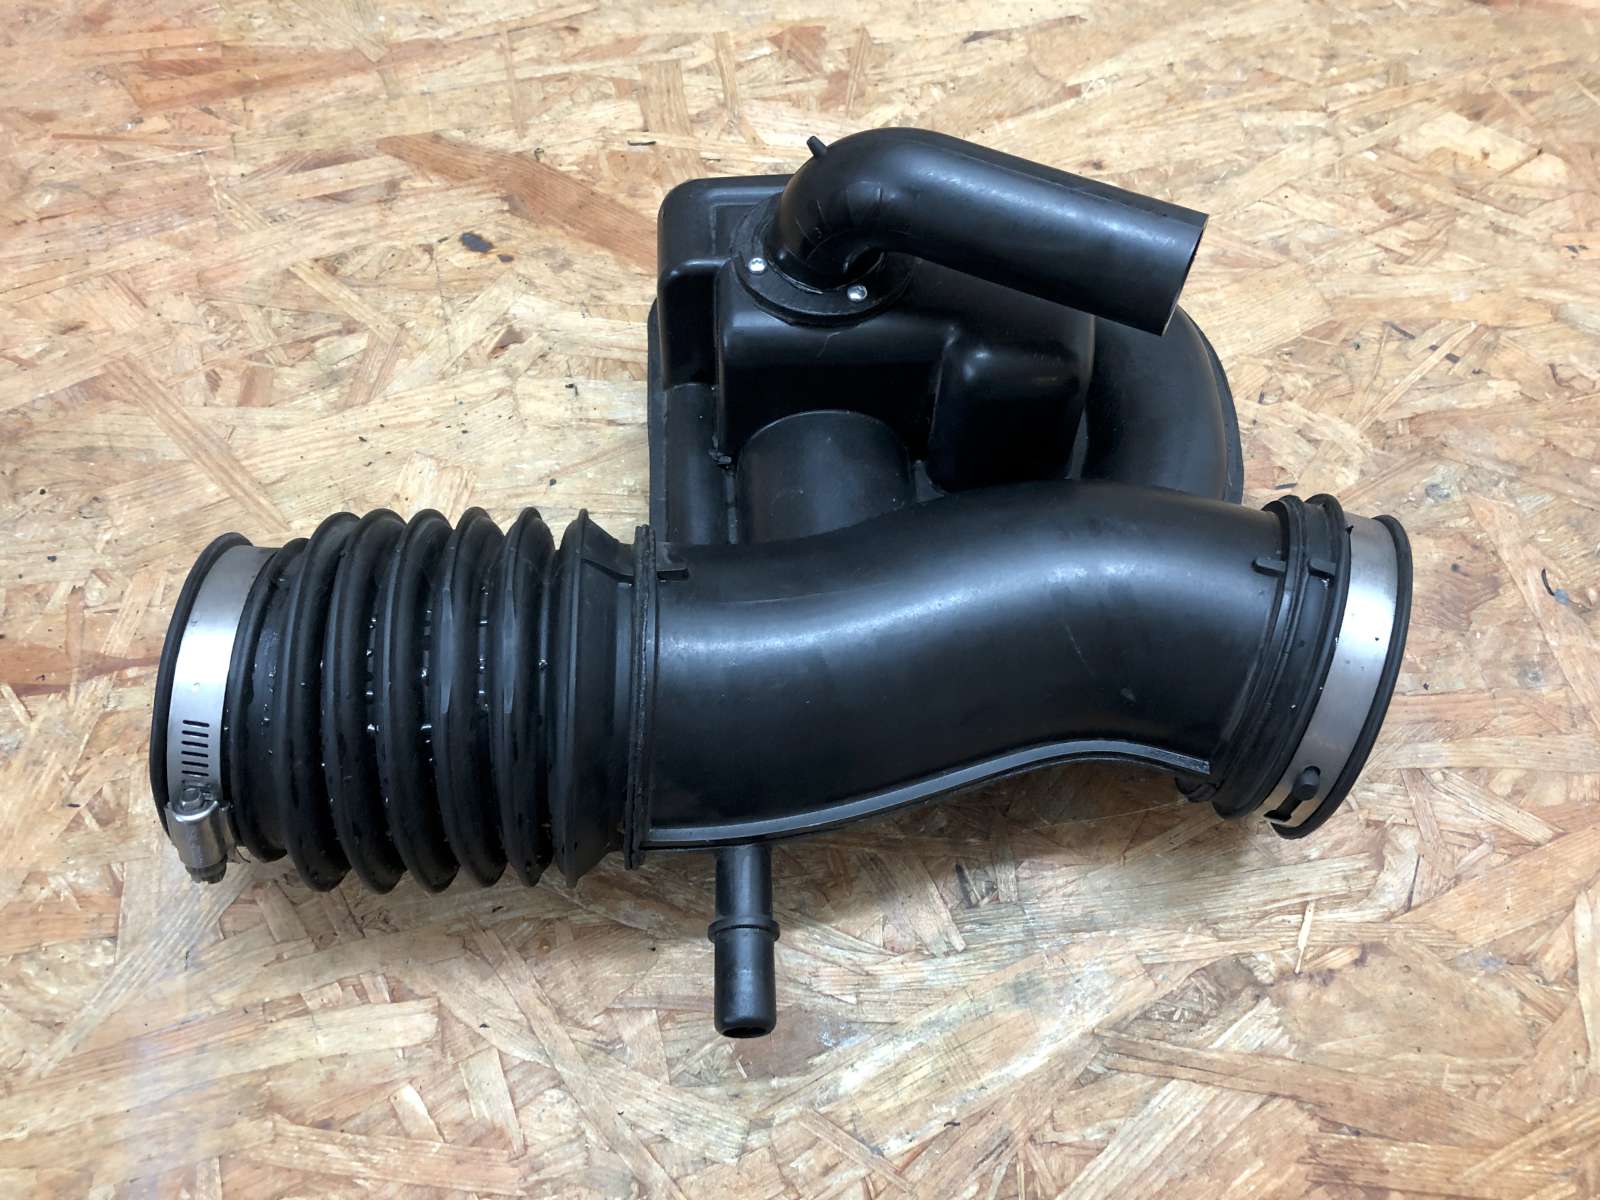
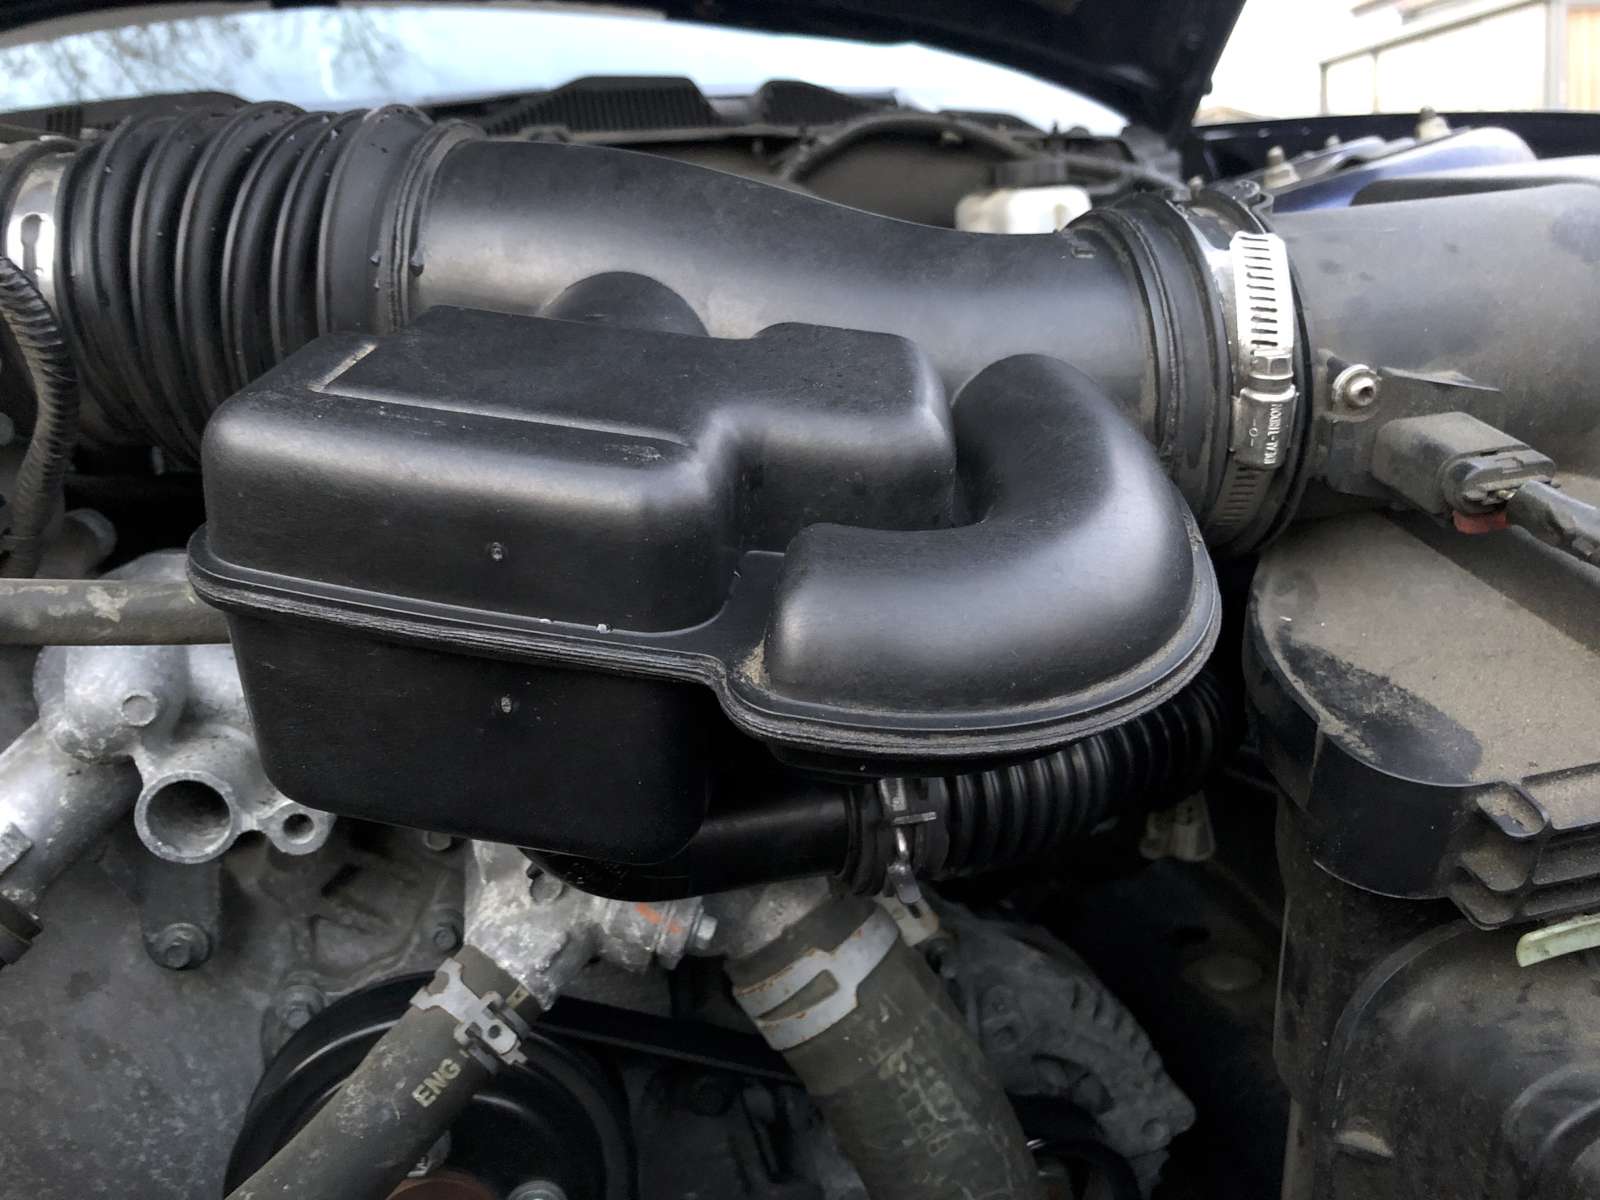
V8 Mustangs have a factory installed air intake sound tube that brings some of the engine sound into the cabin, but the V6 doesn't. Some V8 owners don't like this extra sound that they consider artificial and remove those tubes from their cars. So, it's easy to buy one second hand for quite cheap. Mine came directly from the US.
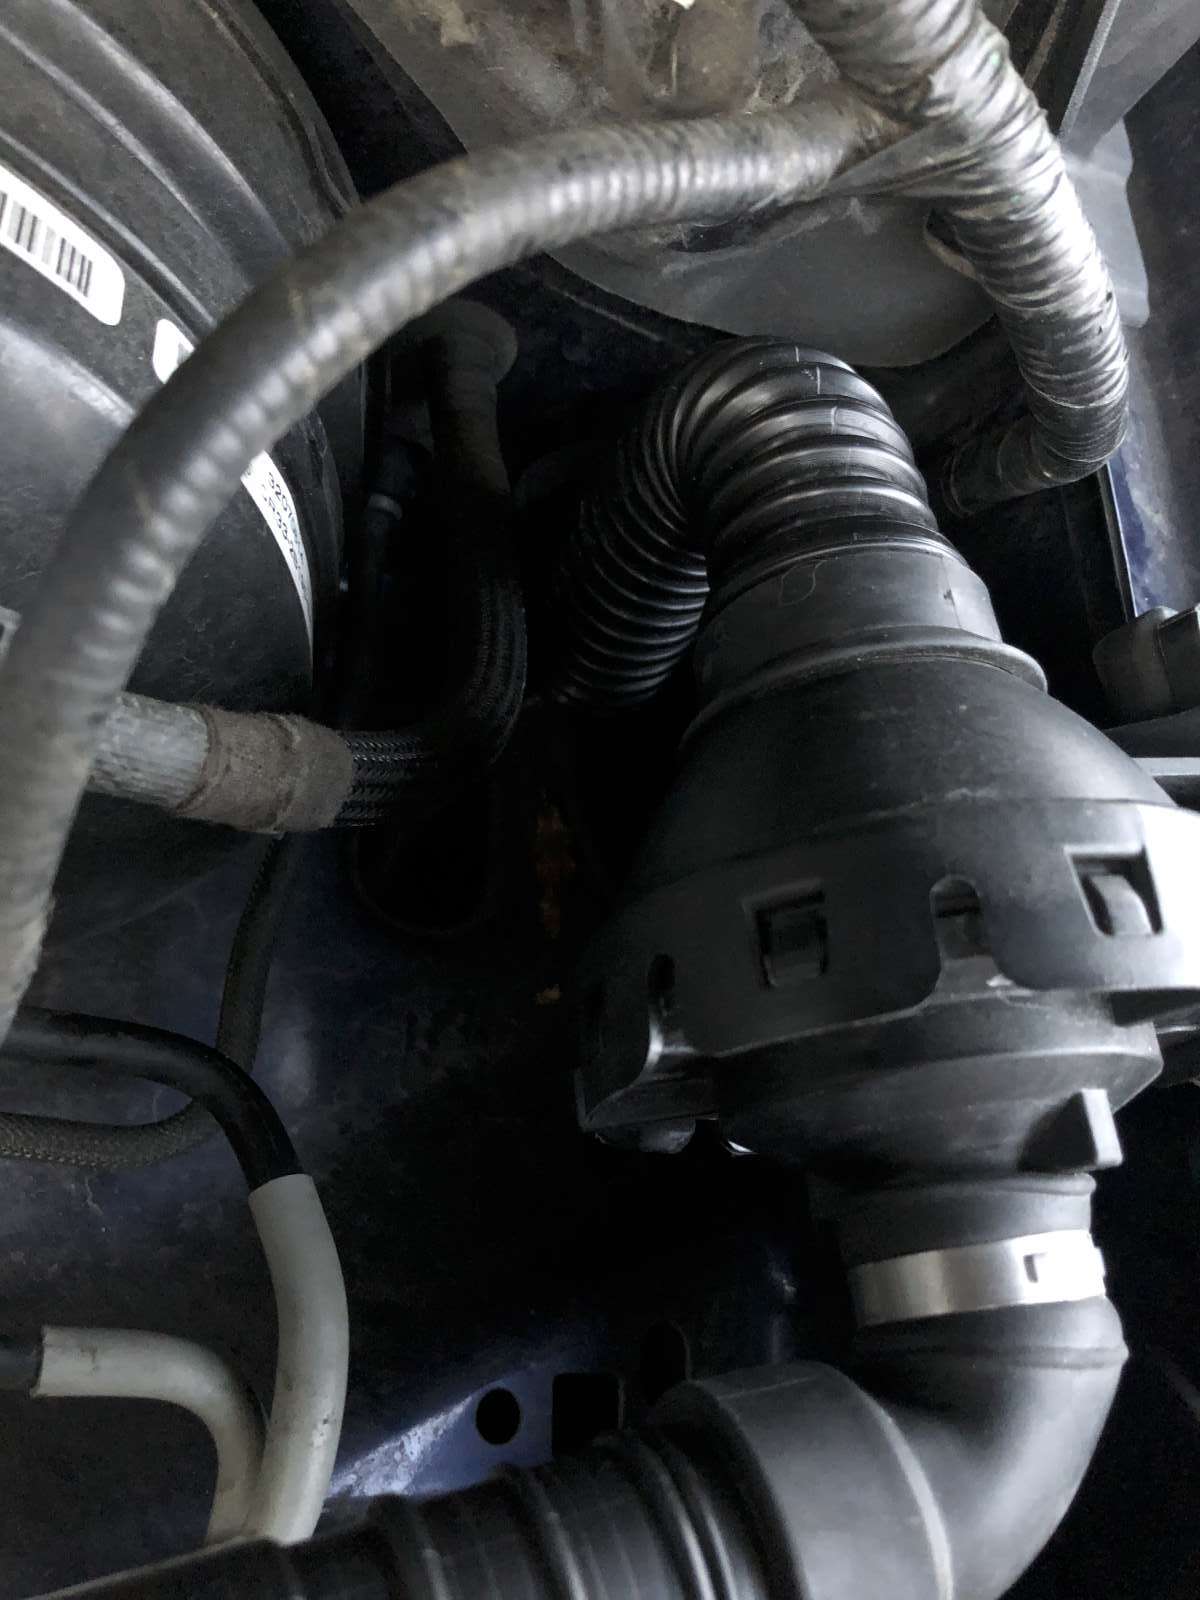
 View under the hood before installing the sound pipe. (click to enlarge) |
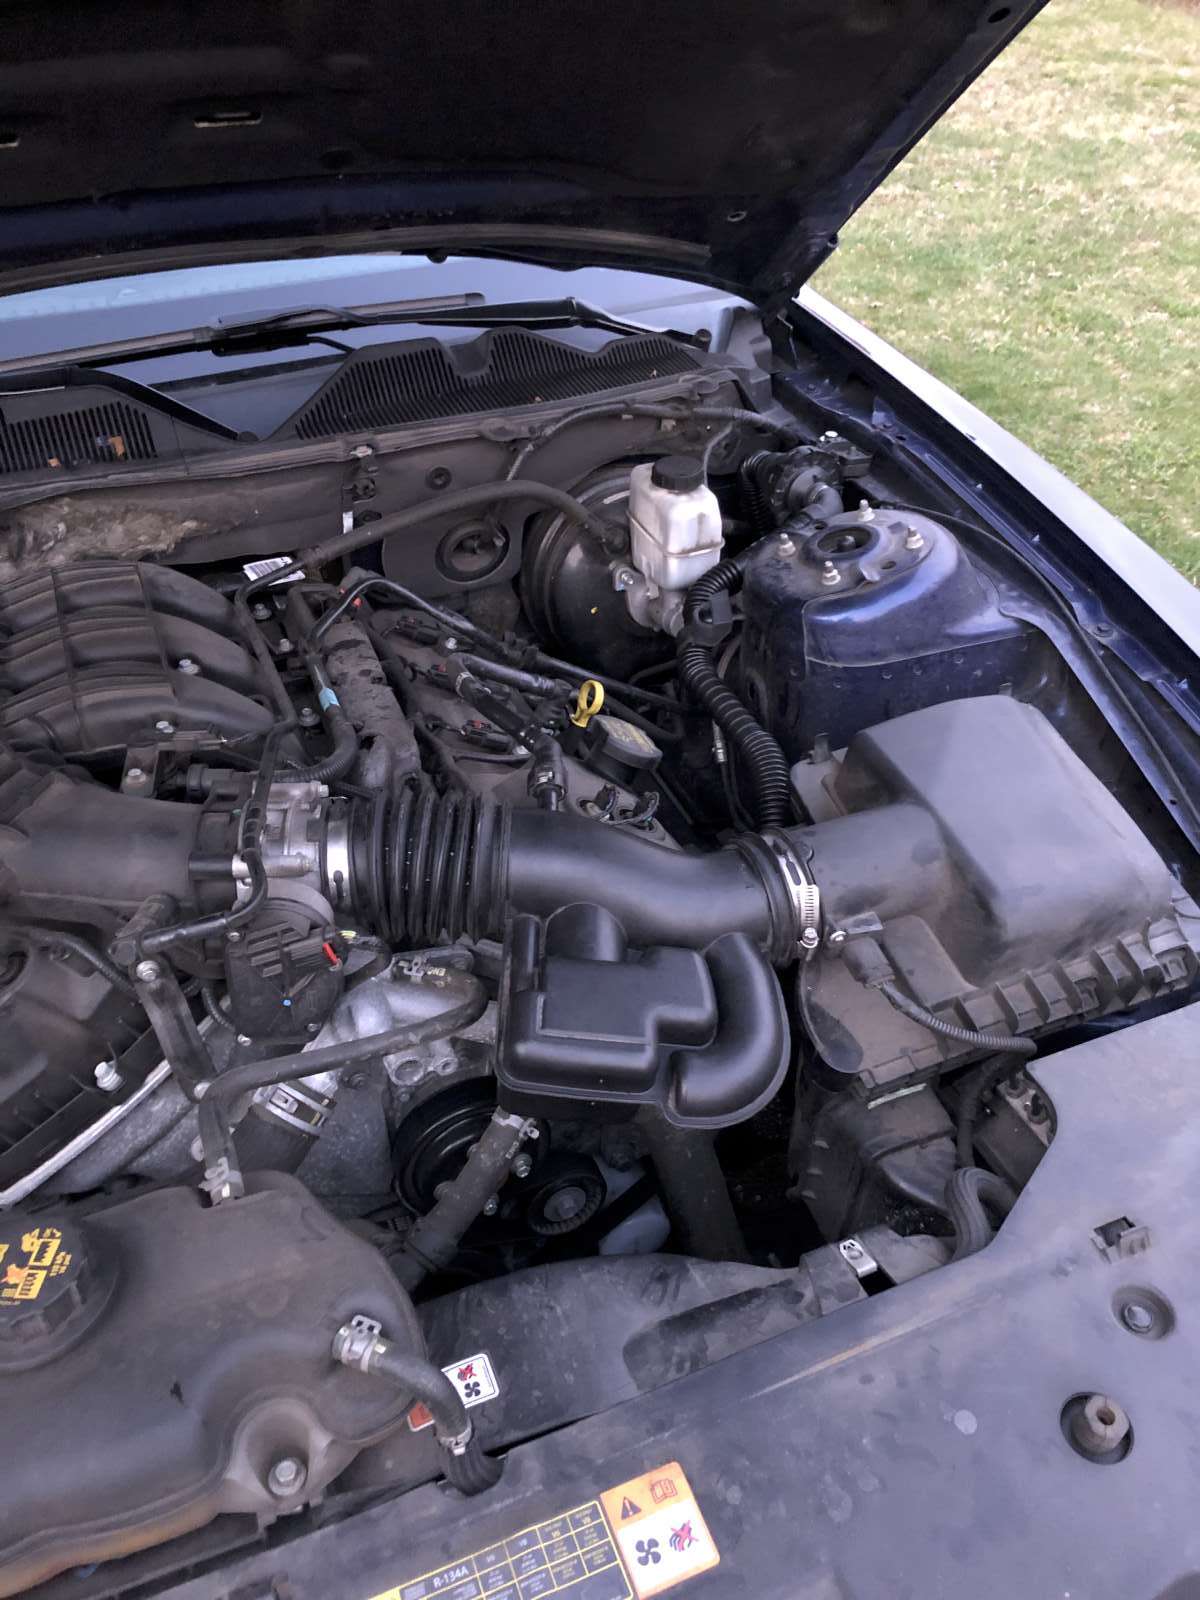 View under the hood after the sound pipe is installed. (click to enlarge) |
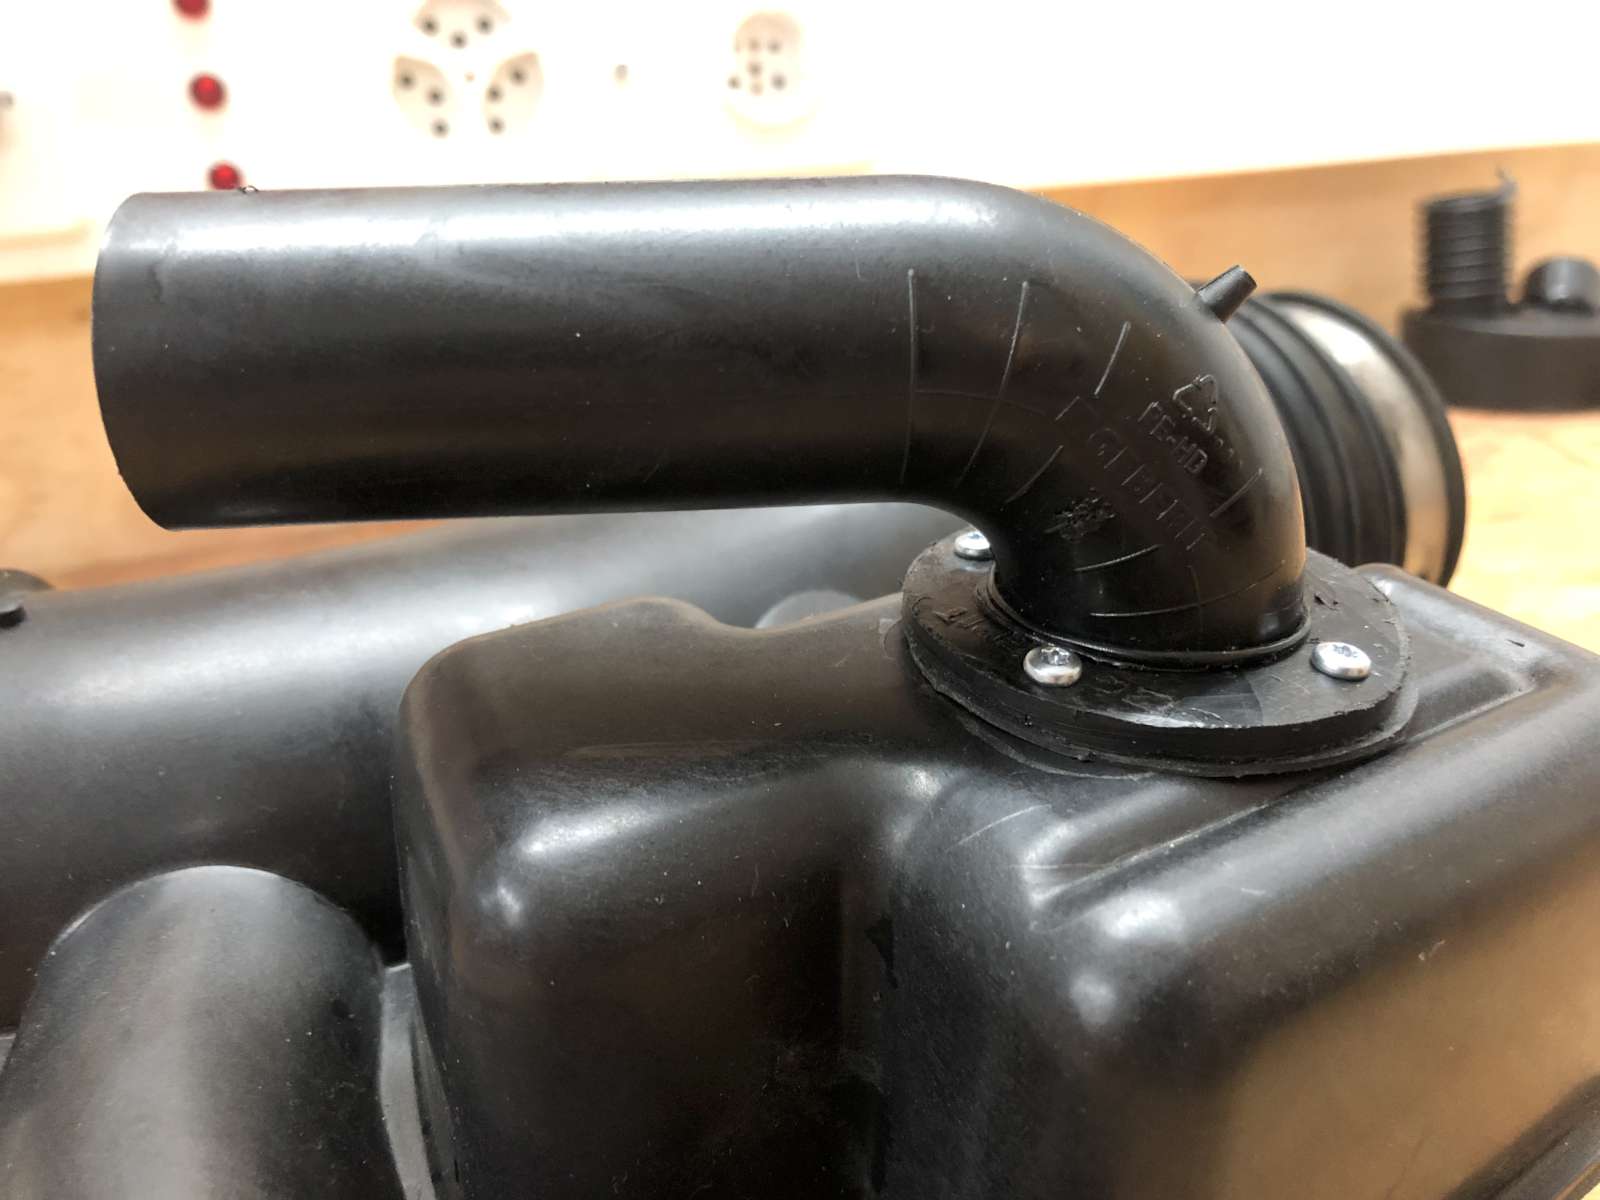
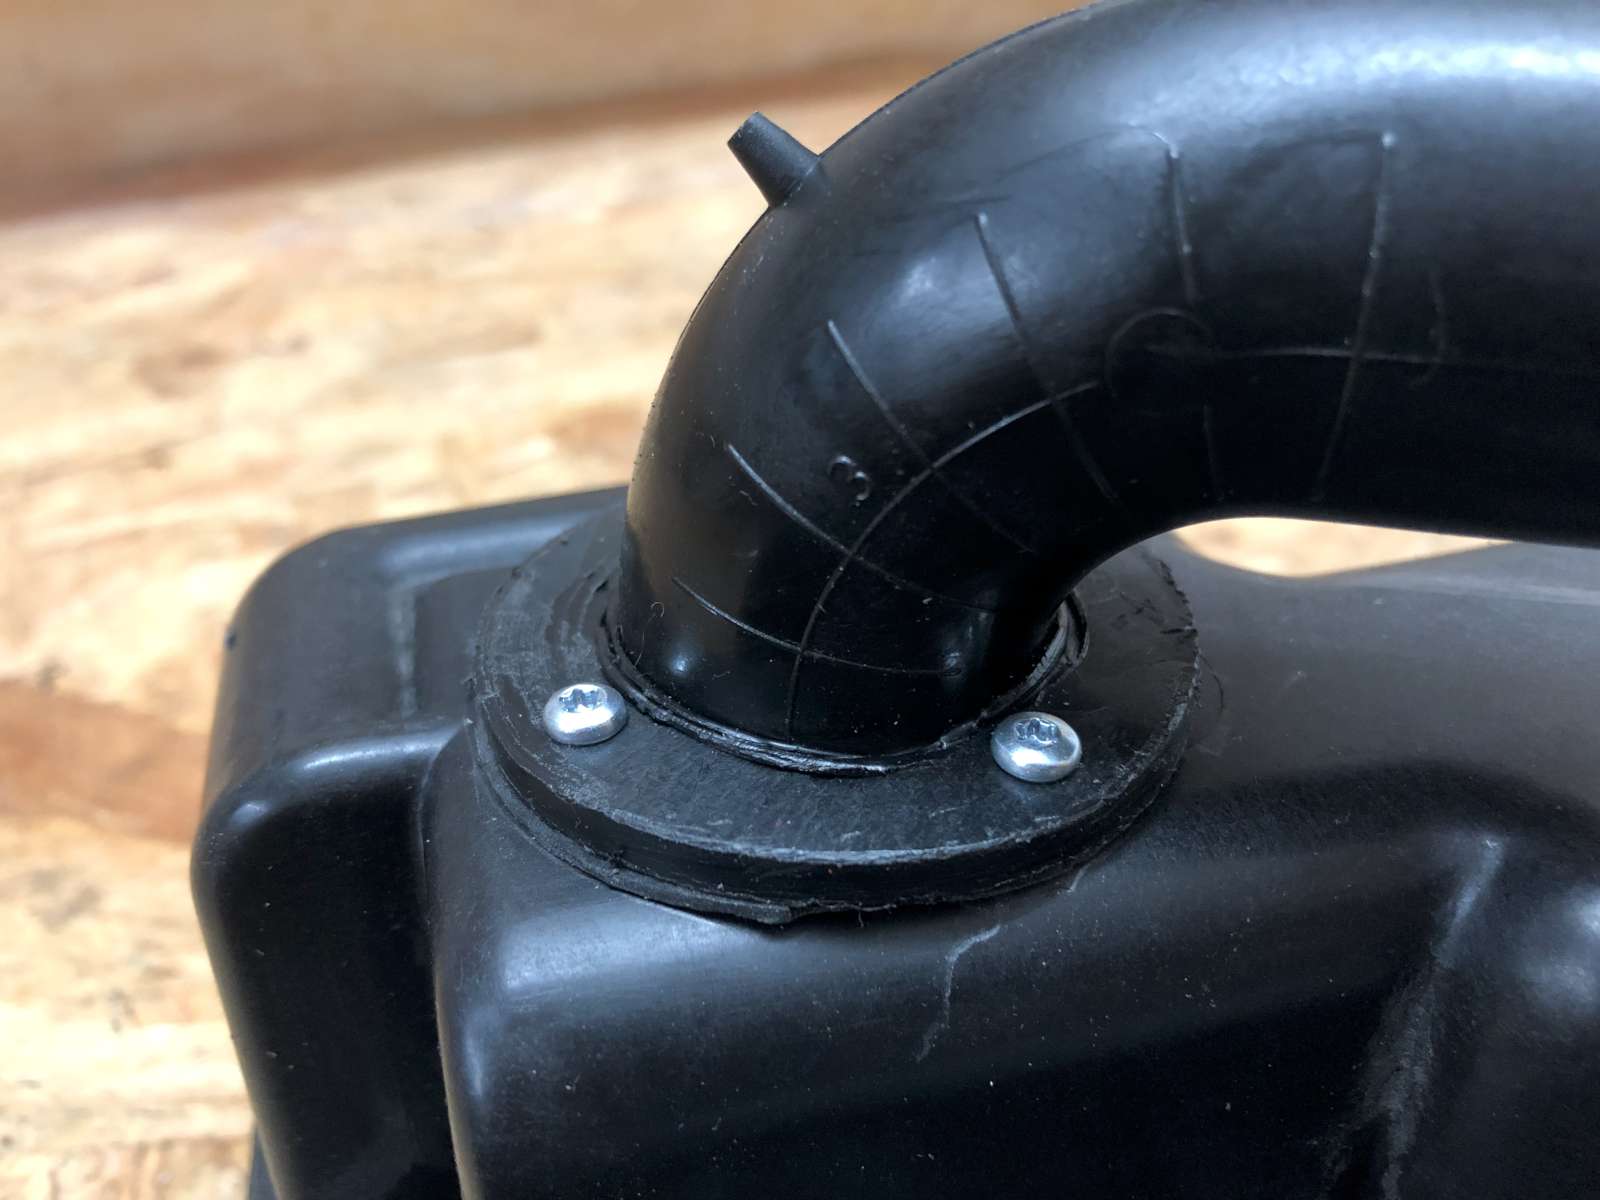
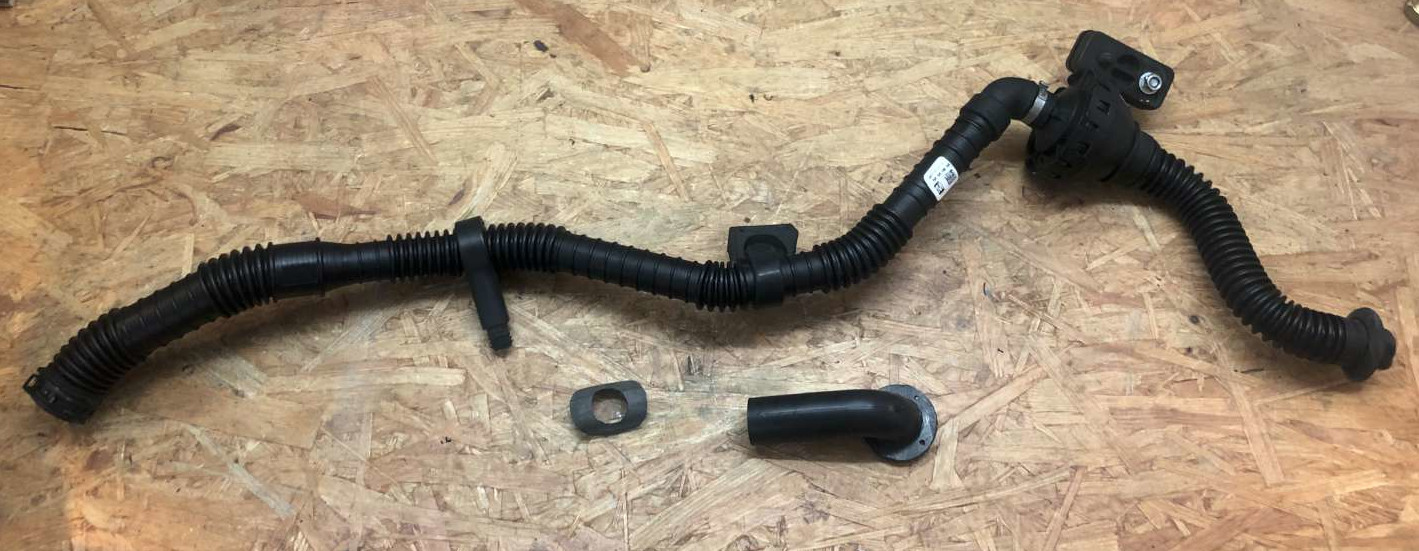
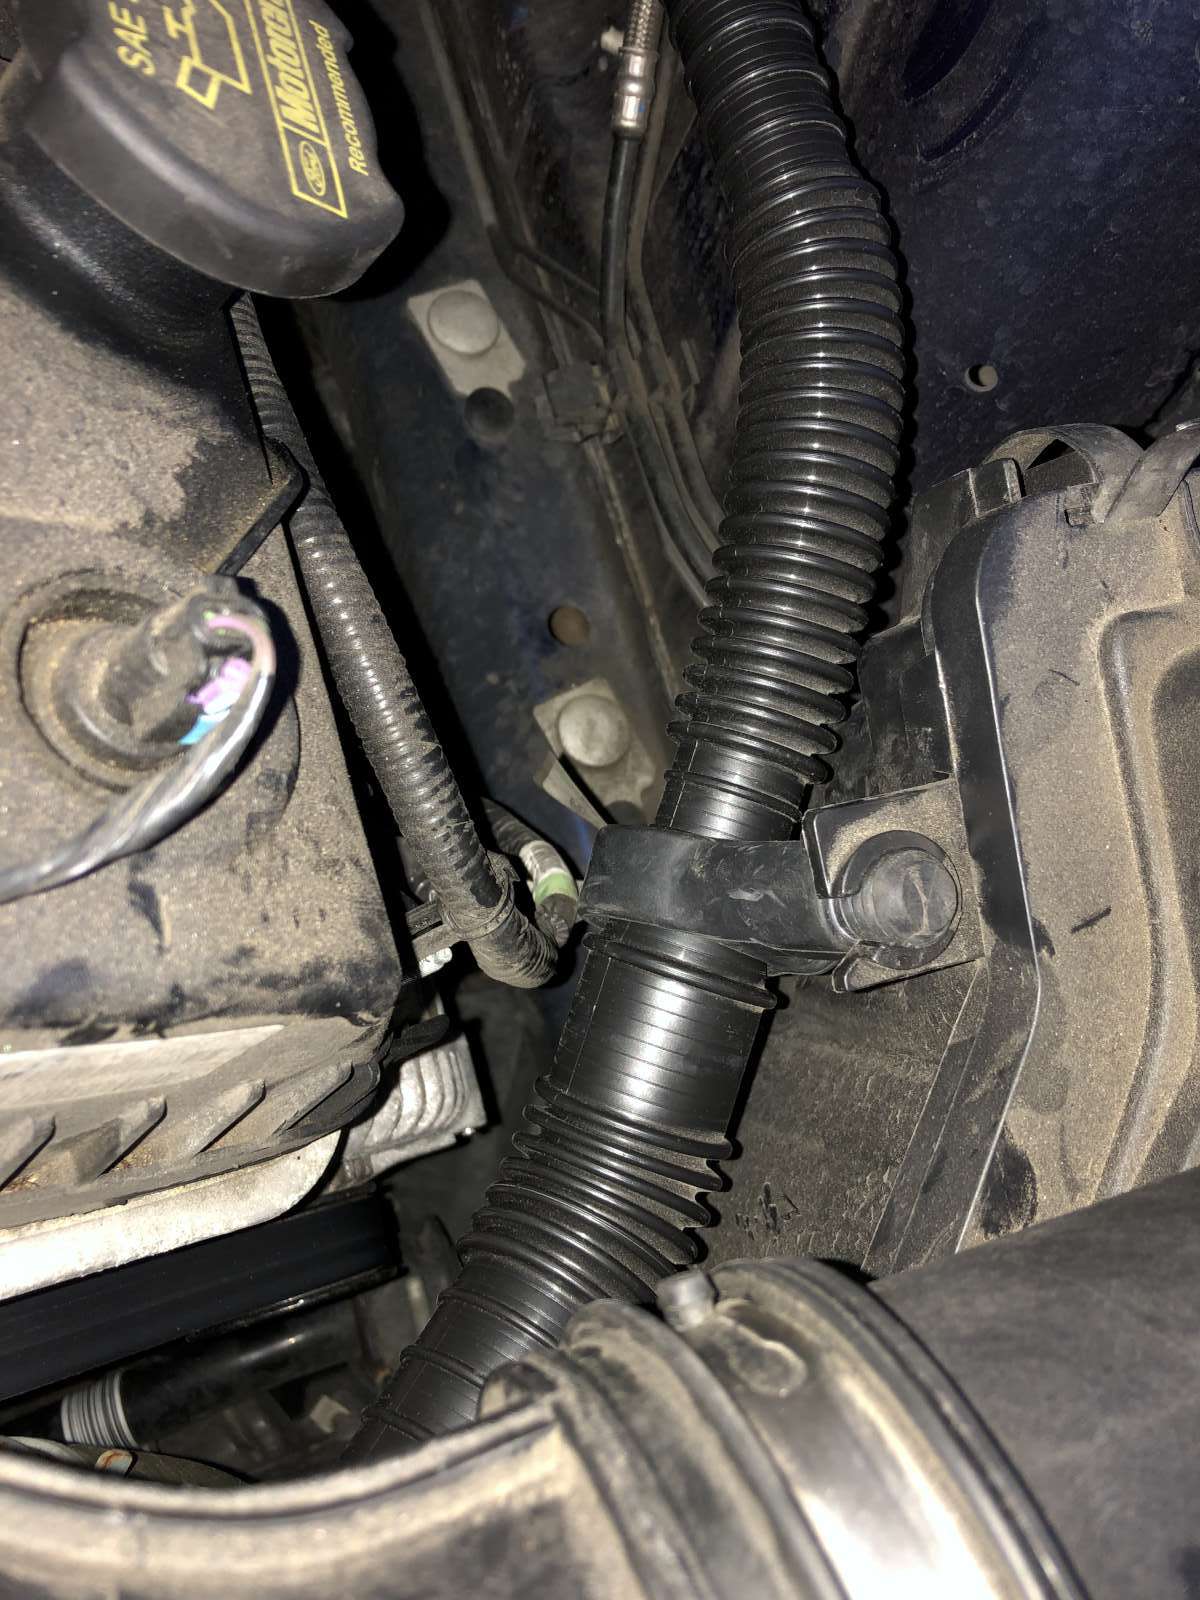
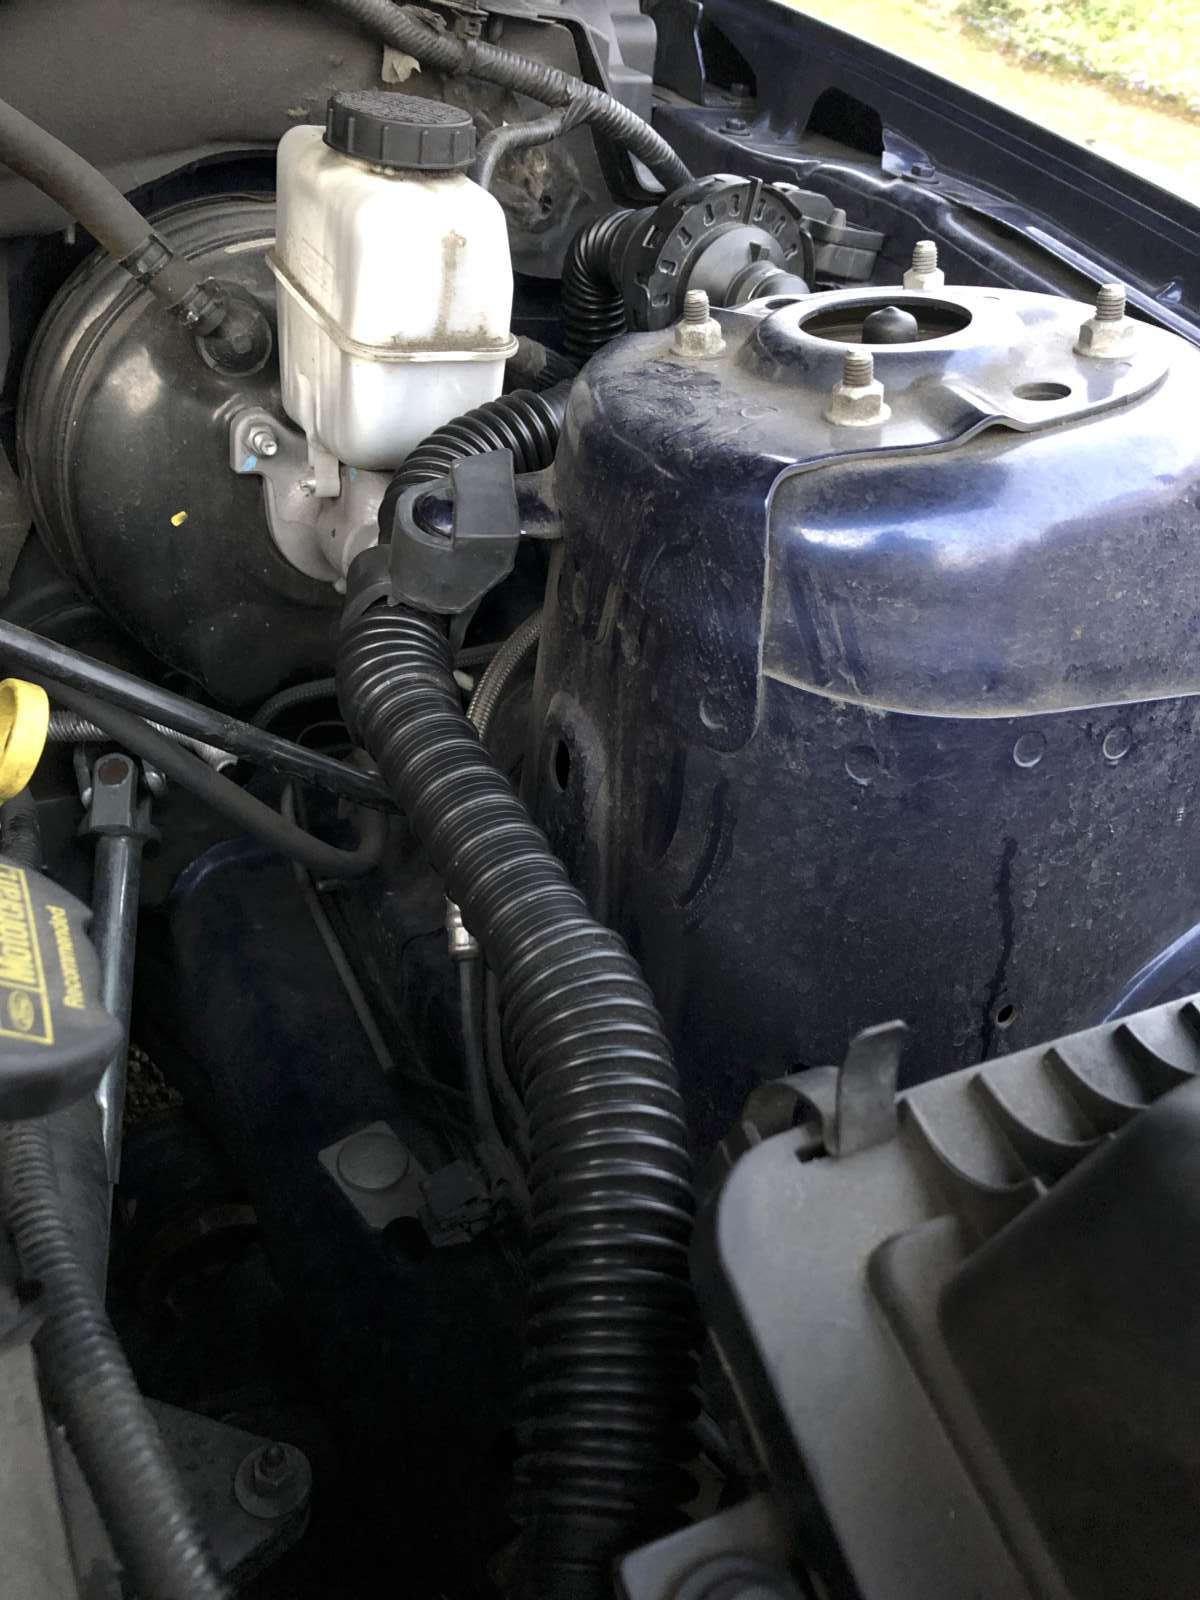
The sound tube connects to the intake duct, between the air filter and the throttle body, and brings the vibrations into the cabin through a small hole in the firewall next to the clutch pedal. It's not just an empty pipe, though: it has a diaphragm in the middle so that just the sound waves can go through while it's perfectly air tight.
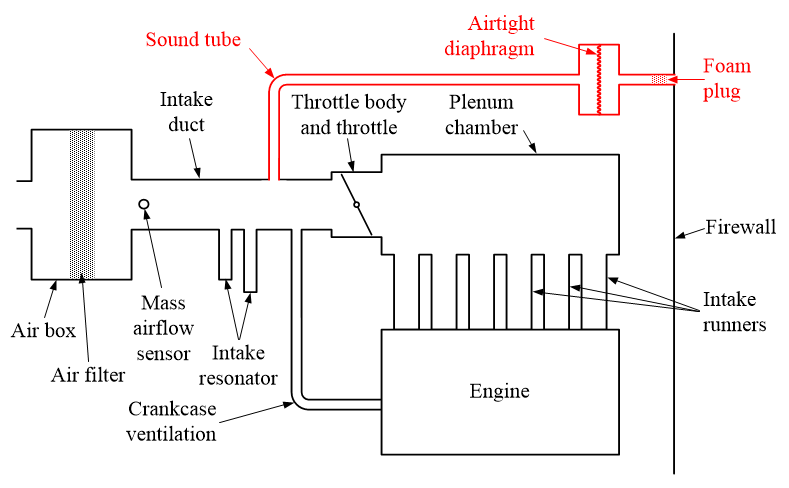
Simplified diagram of the sound pipe connection. (click to enlarge)
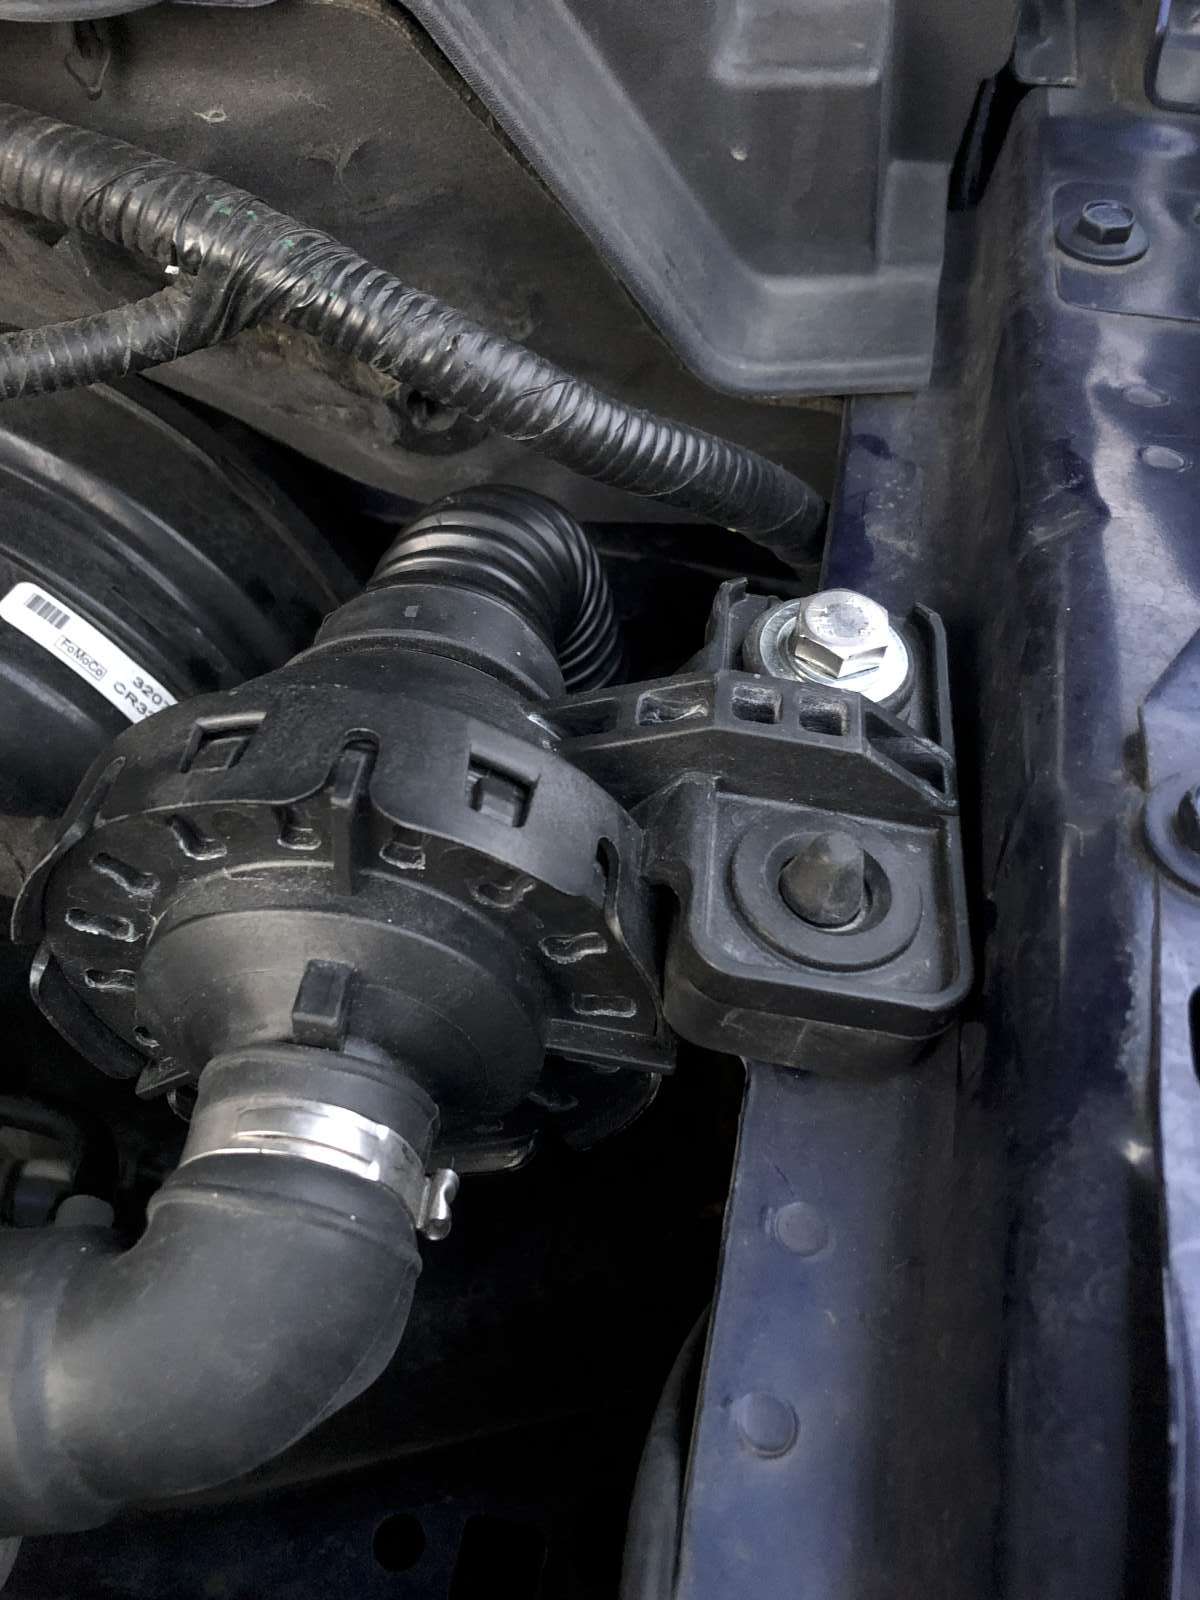
The body-shell of the V6 is already equipped with the necessary mounting points and the hole in the firewall is just covered with a plastic cap. So that part of the installation is easy. Just clip it in, add an M8 bolt and a nut to secure it in place.
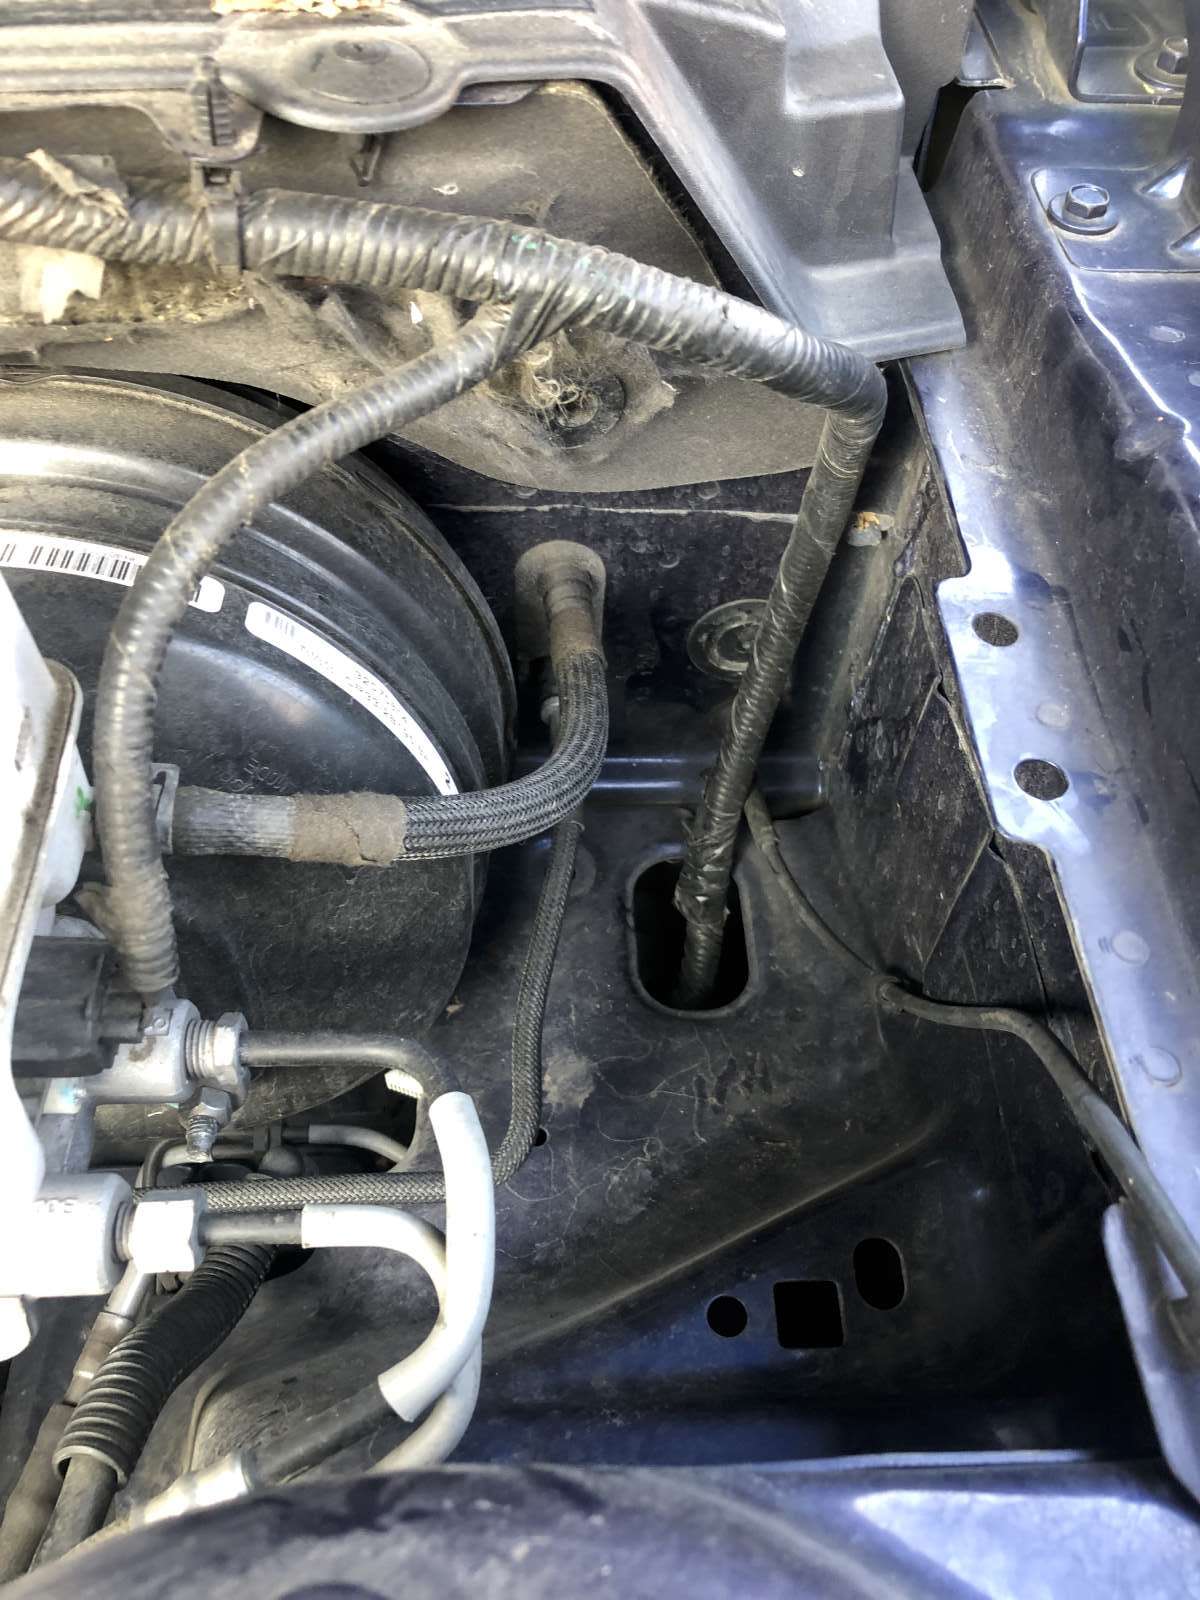 This is the hole in the firewall still with its cap on. (click to enlarge) |
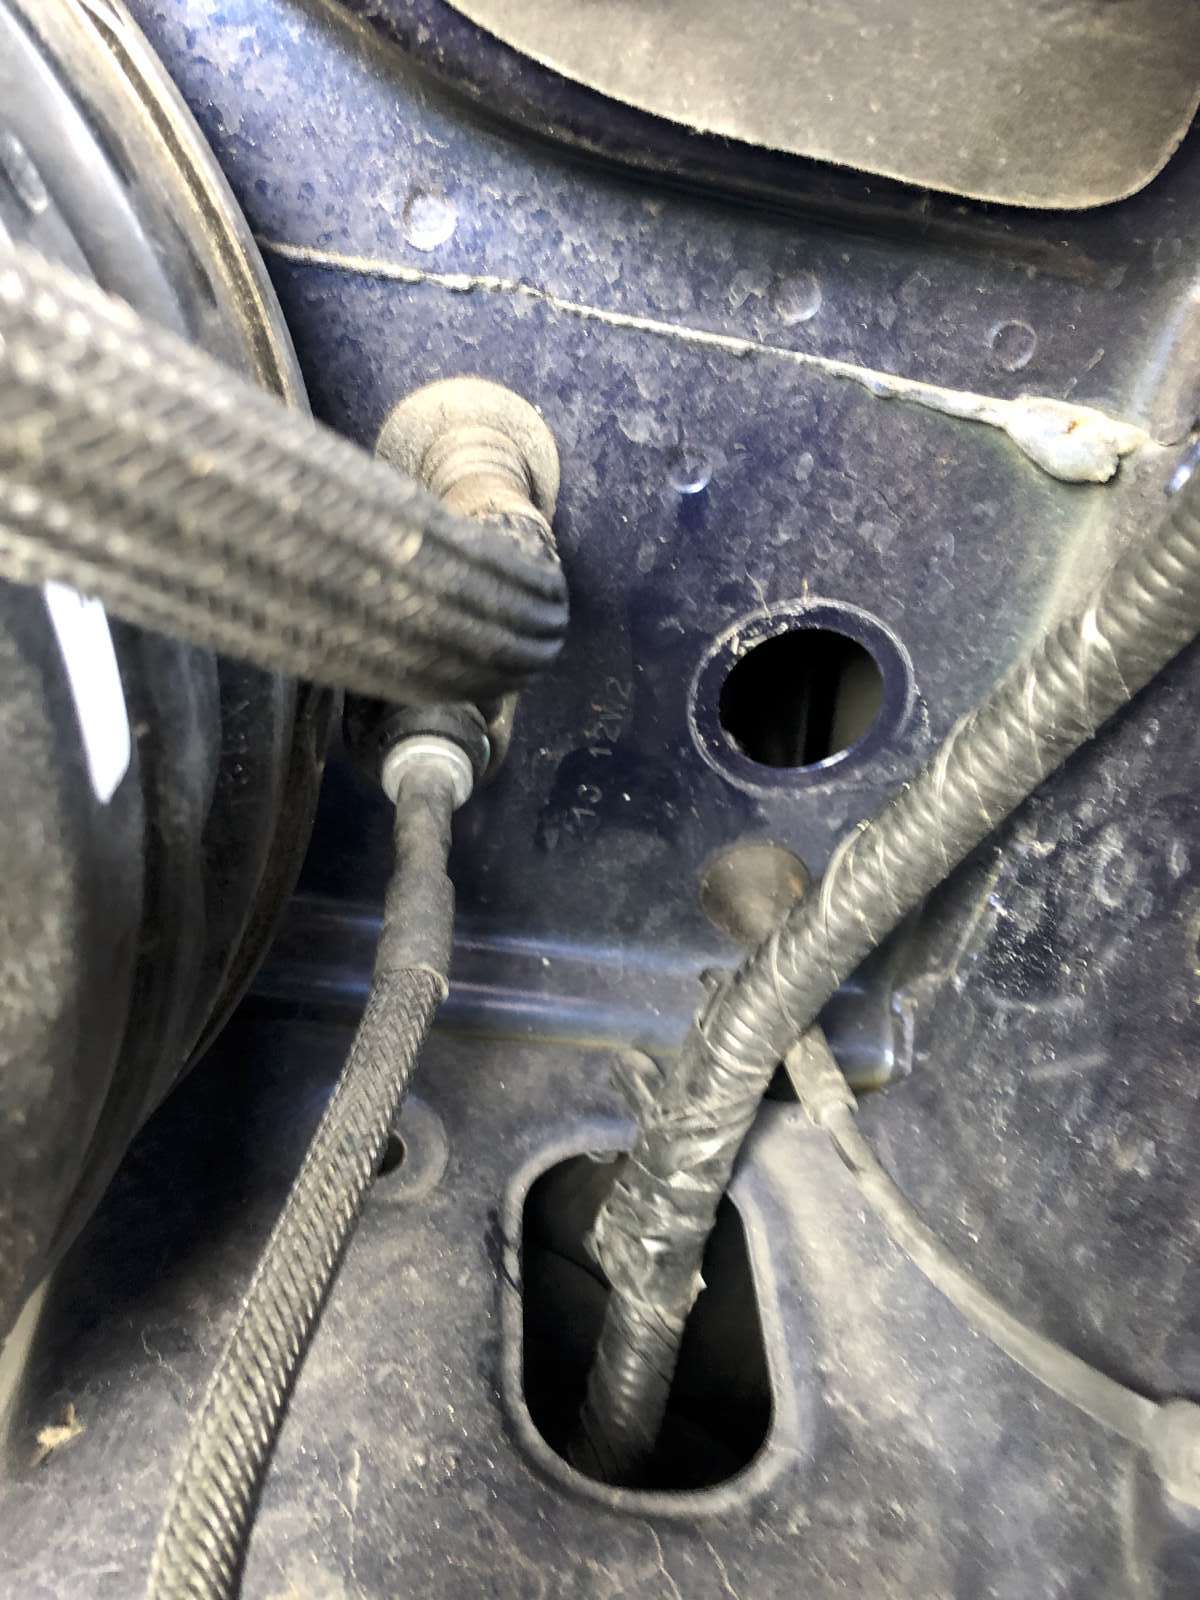 And this is how it looks like when you remove the cap. (click to enlarge) |
The harder part is to connect to the intake duct, because it doesn't have an extra connection for it. A hole must be drilled and a little adapter must be prepared. The duct is really easy to disassemble: just a couple of clamps to loosen and a breather pipe to unsnap. I chose to drill in the flat area under the larger of the two side resonators because there is enough space for the hole and to screw in a flange. A large step-drill and a hand-held drill gun is all you need for this.
 intake duct with the sound pipe adapter. (click to enlarge) |
 Close-up of the adapter screwed into the intake duct. (click to enlarge) |
 Another view of the flange holding the adapter to the intake duct. (click to enlarge) |
The sound tube fits perfectly on a Ø32 mm pipe and can be secured with a stainless steel hose clamp. I found a suitable pipe in a plastic kitchen sink trap that also has a 90° elbow. Being made of polyethylene I could easily "weld" it on a flange made of the same material (made from a cap for a larger pipe of the same type). To weld it, I used a propane torch to heat up a piece of steel rod of about the same diameter to about 270 to 300 °C, I turned off the torch, I pushed the two ends to be welded against the hot steel until the rims softened and partially melted, and I quickly assembled the two parts by pushing them together: they stick almost immediately without any additional material or glue. After a few seconds the parts cool down and are securely welded together. It takes a little practice, but it's not hard to do: plumbers to this all the time with polyethylene pipes, but they have a special electric hot-plate to make their job easier.
The intake duct is made of polypropylene reinforced with glass fibers: is difficult material to glue. And because it's a different plastic than my polyethylene pipe they cannot be welded together, neither. This is why I chose to weld a flange to the adapter pipe. I prepared a gasket of a suitable shape by cutting and old bicycle air chamber and I assembled the adapter to the intake duct with four self-tapping screws. It's important to make an air tight seal because the sound tube is located after the mass airflow sensor (MAF): you don't want any air leaking in your intake as this will ruin your carburetion. If your engine idles poorly after this modification, look for an air leak in your intake.
The sound pipe, its adapter and the gasket (click to enlarge)
There are two foam plugs that fit into the cabin end of the sound tube. If you install both you get a soft sound, if you install just one it gets louder and if you try it without any plugs it's really loud, so loud that you actually have problems discussing on the phone if you floor the pedal. I like the sound with one plug the best.
Because the sound pipe is connected before the throttle, it has no effect while the engine is idling or coasting as the throttle is almost closed and the airflow is low. But the more you open the throttle the more sound you get, I really like it. As soon as you release the throttle the extra sound goes away.
Everybody has a different opinion on this, but I like this modification and I consider that this is still the true sound of the engine as is not artificially generated in a speaker as it is done on some other cars.
 The intake duct reinstalled in the car with the adapter and sound pipe underneath. (click to enlarge) |
 This holder clips into the air filter box. (click to enlarge) |
 This colder clips into the front left suspension mount. (click to enlarge) |
 This M8 bolt hold the diaphragm to the shell. (click to enlarge) |
 This part of the sound pipes goes into the cabin through the hole in the firewall. (click to enlarge) |
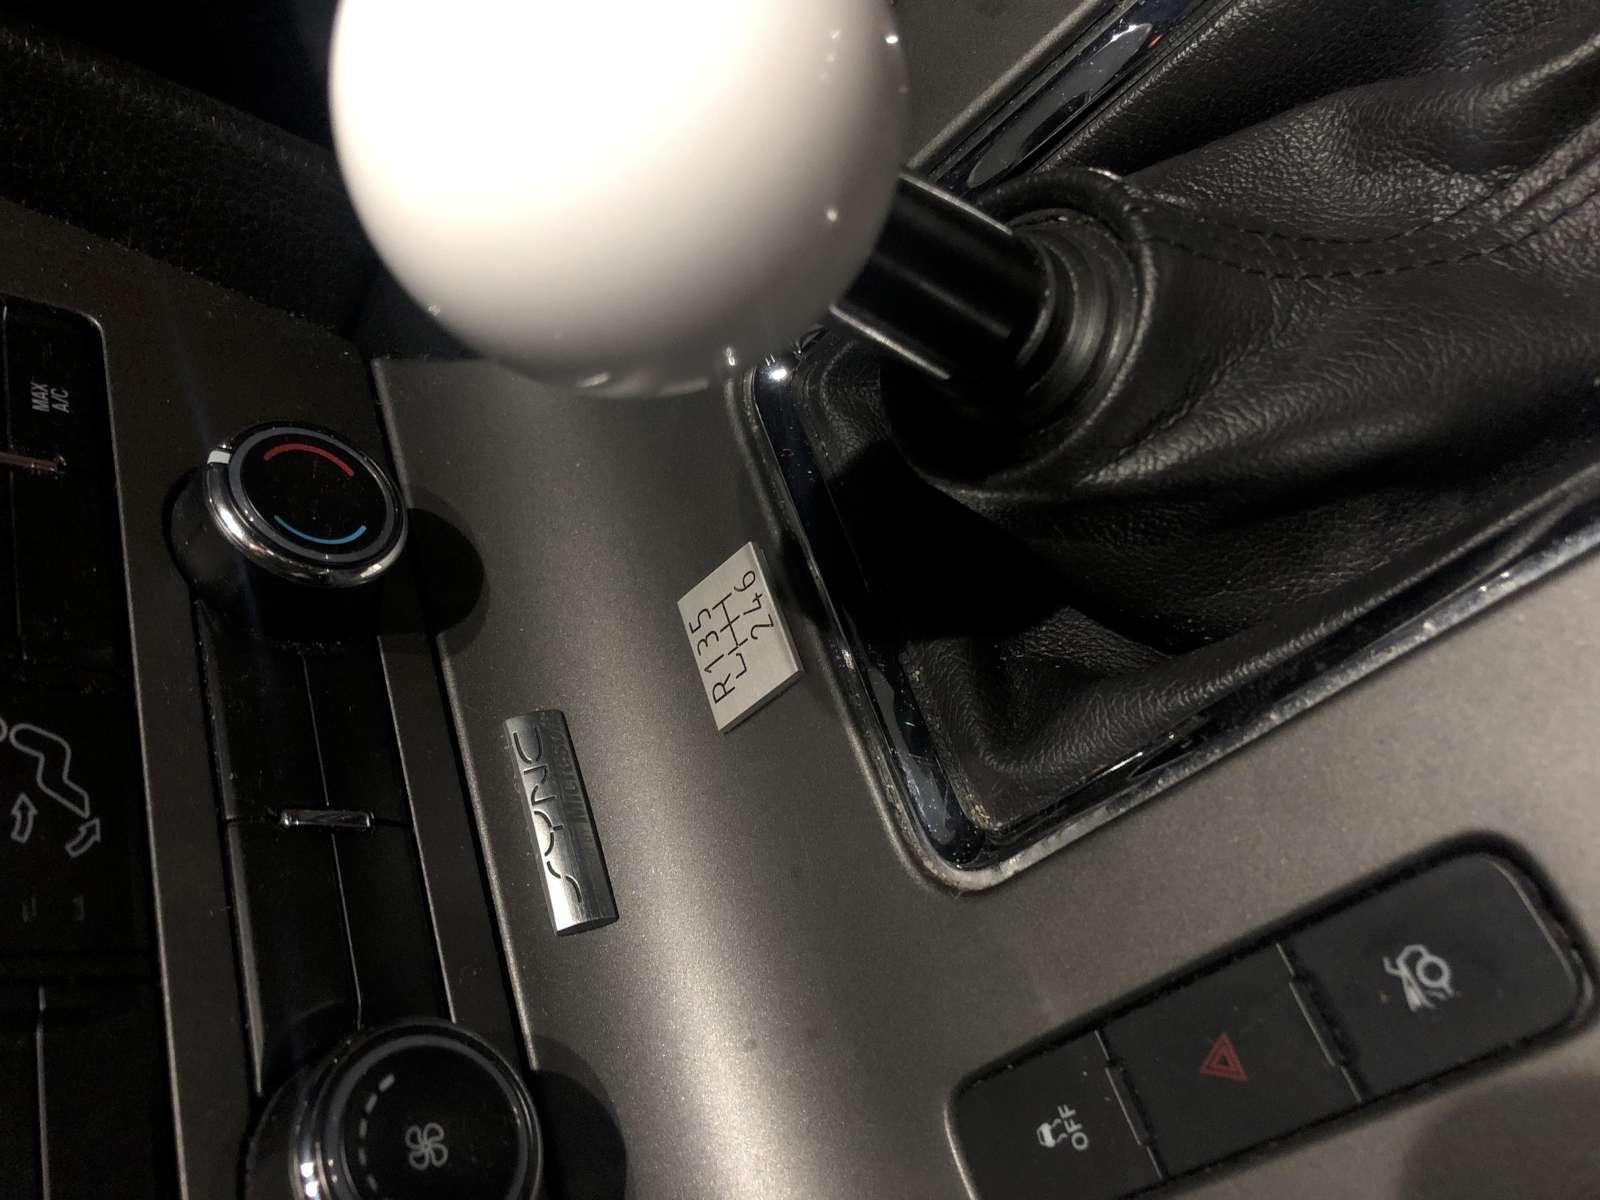
The shifter knob in this car started showing signs of wear and most importantly was a bit boring: it wasn't special enough for this kind of car. Mine has a 6-speed manual transmission.
The original shifter knob was a bit boring and showed some wear.
(click to enlarge)
As almost any Mustang owner, I watched Bullitt: the famous 1968 movie that made this car famous and enjoyed the wonderful car chase scenes. The car in the movie has a very distinctive white and round shifter knob... and of course I wanted the same.
It wasn't hard to find a cheap imported white ball knob. With its 54 mm diameter it looks and feels very good. By the way, the lever has an M12×1.25 male thread. But the new knob did not fit well with the existing leather booth, so I put a piece of black POM (polyoxymethylene plastic) round stock on my lathe and turned a simple adapter to keep the booth down and make the rough metal lever appear nicer.
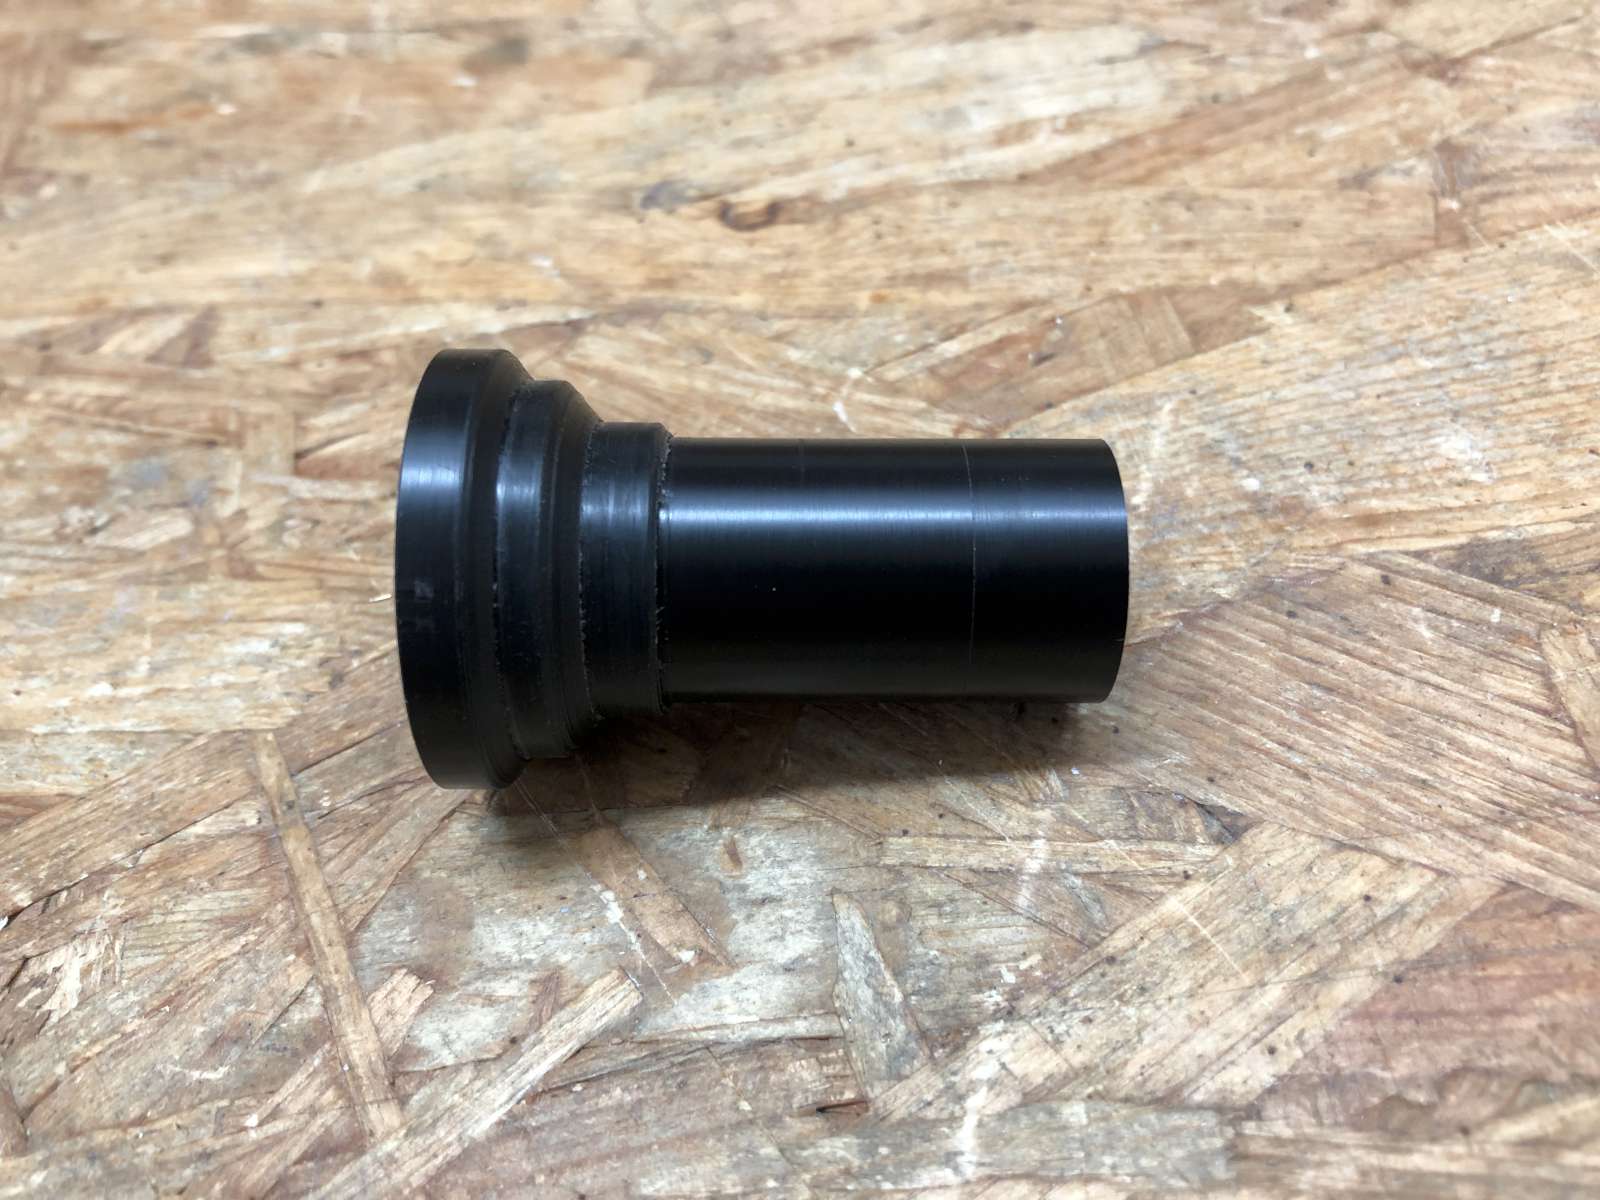
The adapter to hide the factory metal shifter lever.
(click to enlarge)
The steps in the diameter are jest decorative and have no practical use.
To prevent the knob from turning in your hand and unscrewing itself, I could have used a drop of thread locker, but I was afraid this may be difficult to disassemble. So I wrapped a few turns of Teflon tape on the shifter lever thread. The same tape plumbers use to use to seal black pipes threads. It makes the knob harder to unscrew without completely locking it.
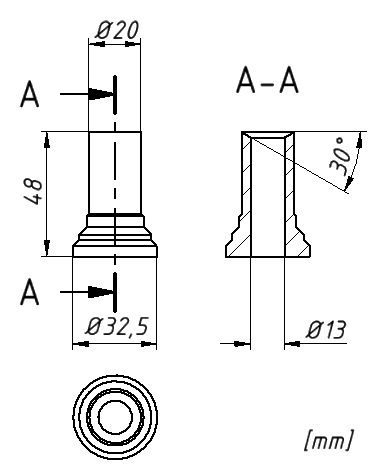
Drawing with the most important dimensions of my shift lever adapter.
Since I couldn't find a knob with the correct H-pattern engraved on it, I picked one with no gear pattern at all. No information is better than wrong information. I don't really need the H-pattern, I know how to shift in reverse... but I thought that if sometimes my wife wants to drive my car, she may need it. I didn't feel like engraving something on a ball, so a prepared a nice flat aluminum plate, engraved the pattern, filled the groves with black ink and placed it on the center console right in front of the shift lever.
The new H-pattern placed in front of the shift lever.
(click to enlarge)
I'm happy with this new knob. It's slightly larger than the original. I like the way it looks and more importantly it has a perfectly smooth surface that feels really good in the hand.
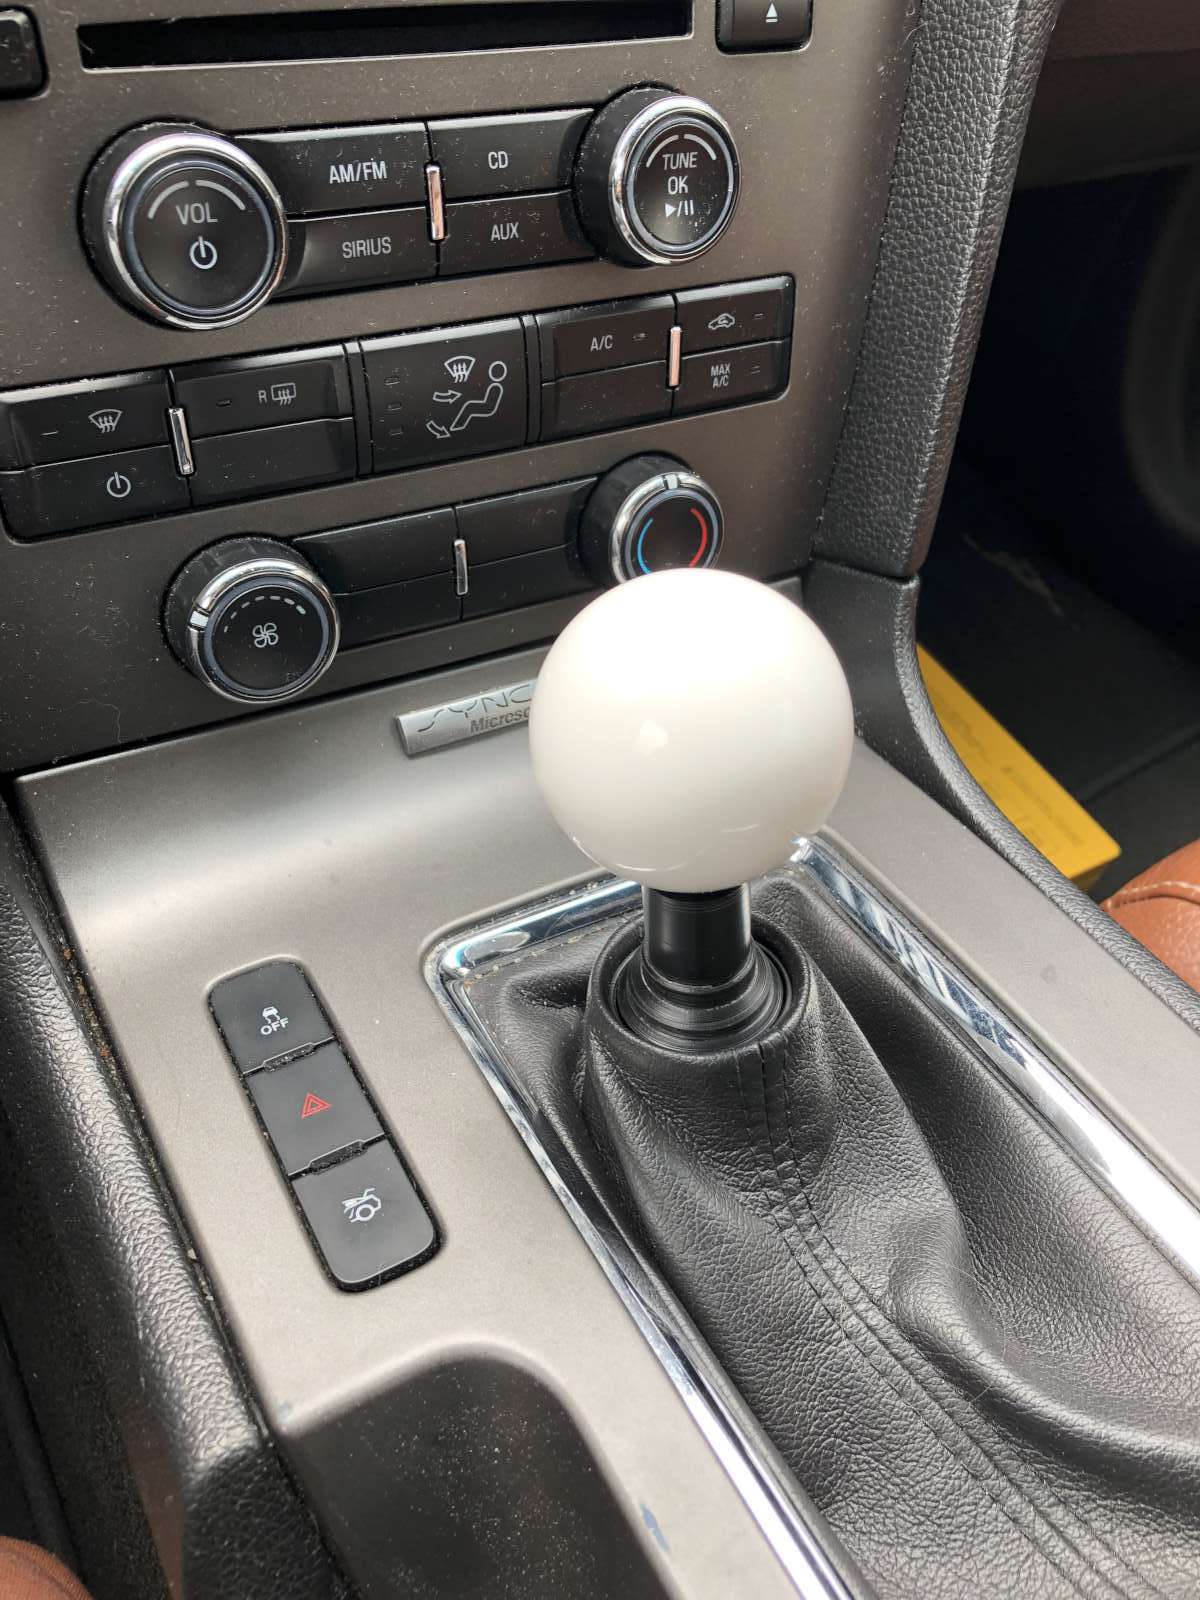
The new Bullitt-style knob looks and feels a lot better.
(click to enlarge)
This car came with an excellent factory stereo system. It blew me away the first time I pumped up the volume: wow, that 8-speaker 500 W factory stereo has an excellent sounds.
But the tuner sucks: it's designed for the American band-plan and it's poorly compatible with European broadcast stations. The FM band tunes from 87.7 to 107.9 MHz in 200 kHz steps, while European stations are aligned on a 100 kHz grid. So you can tune in a station on 88.1 MHz but not one on 104.0 MHz. That's really annoying. Furthermore it has no RDS decoder (Radio Data System) so the tuner cannot follow the same station while you drive from one area to another. But FM is gently fading out and it's being replaced by DAB+: in Switzerland the process of switching off FM transmitters has already started and will be completed by 2024. So trying to hack the tuner is not worth the effort.
The AM band (called the MW band here) is not better as it tunes from 530 to 1'710 kHz in 10 kHz steps while European stations are from 531 to 1'602 kHz on a 9 kHz grid. Again the two grids don't line up: you can tune in a station on 900 kHz but not one on 1'485 kHz. $ But this is not very important as AM broadcast is a thing of the past in Europe and only a few stations are left and can only be heard at night in my area.
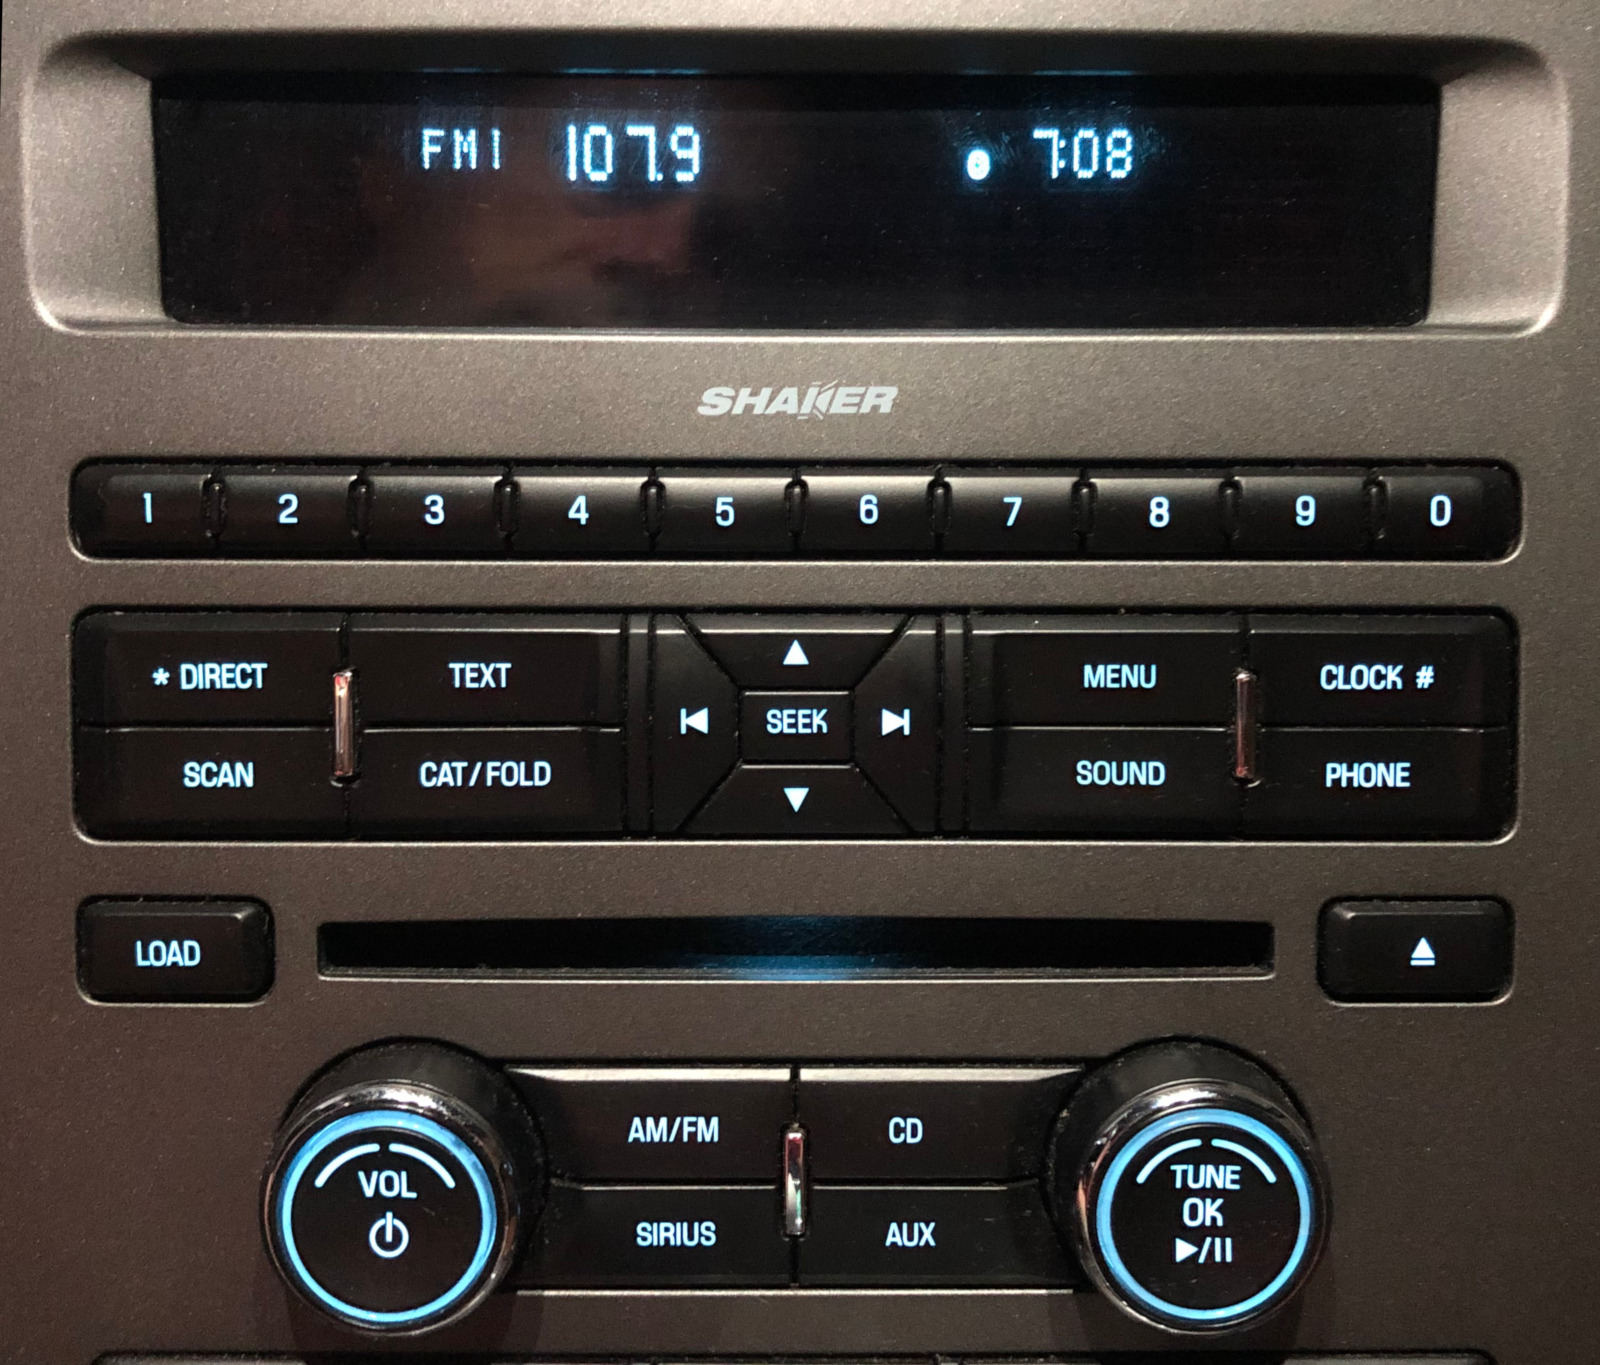
This nice and powerful stereo can only tune "odd"
frequencies: it can receive 107.9 MHz but not 107.8.
(click to enlarge)
I thought about replacing the whole stereo set with a modern and Euro-compatible one, but the factory one is so good that it would be a pity to replace with a cheaper one. Furthermore, it would ruin the interior look and feel of the car. So I simply added an external DAB+ tuner that I connected to the auxiliary input. This does the trick nicely. And the factory stereo is perfectly able to play mp3 files engraved on CDs and DVDs which is the media I use the most.
So, now the antenna on the rear right of the car is useless. As I always had to remove it every time I go to a car wash and then put it back, I decided to remove it for good.
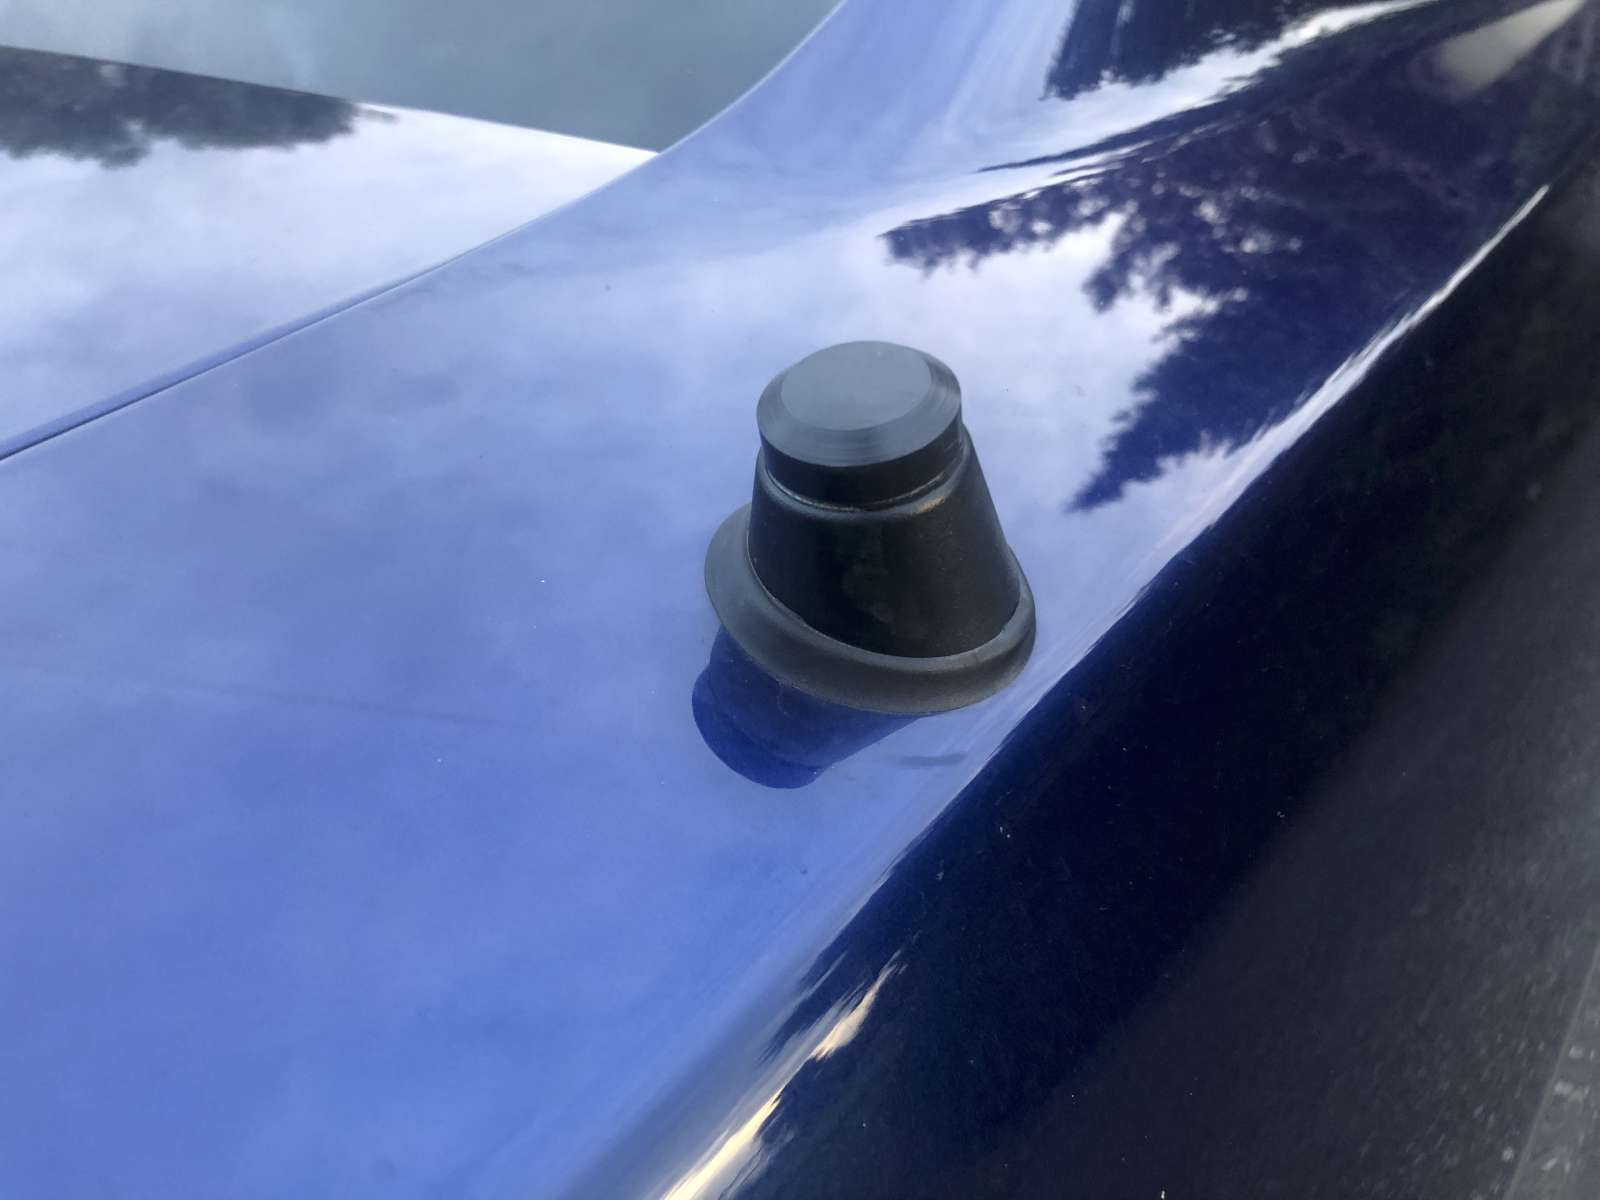
The antennahas been removed and replaced by the cover. (click to enlarge)
I turned a little POM (polyoxymethylene plastic) cap on the lathe, tapped an M5 hole in the center and screwed in place of the antenna using a piece of M5 threaded rod about 12 mm long. I was surprised to see that American cars use metric fasteners... but it's a good surprise, because finding imperial screws and tools in Switzerland is not an easy task. I added a gasket made from a piece of a bicycle air chamber to make the cap water tight: I'm not sure this is really necessary, but it doesn't hurt.
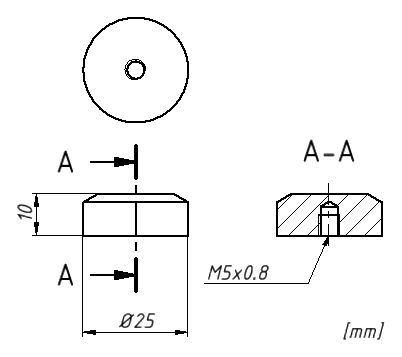
Drawing with the most important dimensions of my antenna cover.
A better solution would be to completely remove the antenna holder, seal the hole with a suitable panel and body filler and repaint the whole part... but this is not something I can easily do at home and didn't want to pay a fortune to a body shop. And I can still screw the original antenna beck in place in a few seconds if I really want to.
I you plan to work on your car, you should know what you're doing. But here are a few basic rules, just in case you forgot...
The majority of the electrical circuit of a modern car is constantly powered on, even if you turn the ignition off and remove the key. Always disconnect the negative terminal of the battery before doing any modification. If you leave the battery connected and you do something wrong, at best you'll blow a fuse but more probably you'll destroy some expensive electronic module. So, it's much better to be safe and always disconnect the negative battery terminal first.
Disconnecting the negative terminal is enough, there is no need to disconnect the positive as well.
Why the negative terminal? Well, because it's much safer. In fact, the body-shell is connected to the negative terminal and if you accidentally touch the shell with your wrench while disconnecting that terminal, nothing bad will happen as everything is at the same potential. If, on the other hand, you disconnect the positive terminal while the negative is still connected; if you touch the chassis with your wrench be prepared to see big sparks and to melt something. Never use a tool on the positive terminal when the negative one is still connected. By the way, this is why most cars have an insulating protection on the positive terminal... to remind you to disconnect the negative first.
Also, when working on the intake, you should be extra careful that nothing goes into the engine. If somethings falls in the intake manifold and gets sucked into the engine it will probably destroy it right away. I don't even want to imagine what would happen if a screw or a nut falls through the intake manifold and get stuck between a valve and the head... So cover all the openings with masking tape or with a cloth and check twice that nothing is left behind when reassembling.
I'm now much happier with my car: it runs exactly as before, but it's exactly how I want it and I can finally relax and have fun without being worried by these annoying details. You certainly have a different opinion, but I thought sharing these modifications anyway not for precise suggestions but more for inspiration of other tweaks.

My American car meets the Swiss mountains. (click to enlarge)
Is this all? Well, I'm now very happy with the comfort of this car, but who knows what I may want to improve in the future... after all, "better" is the worst enemy of "good".
| Home | Mechanics | Page hits: 016428 | Created: 08.2020 | Last update: 10.2021 |