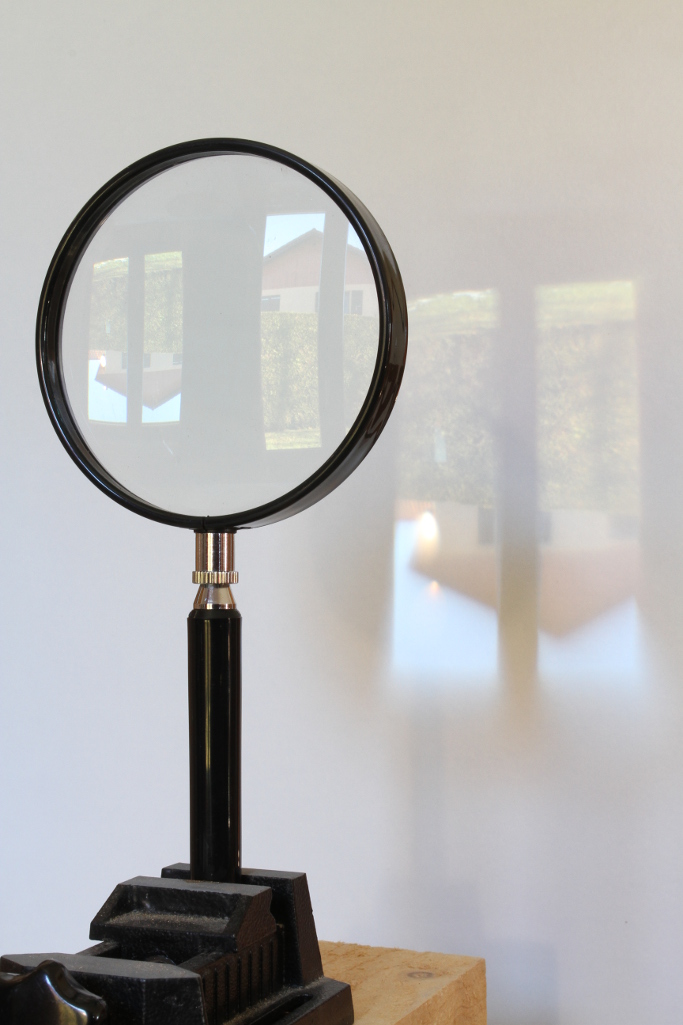
This magnifier lens is projecting an image of the view outside the window on a screen (click to enlarge).
When taking pictures or filming a movie with a camera, a lens (or a system of lenses) is used to project an image of the scene we want to record on a light sensitive film or on a digital sensor (called imager). Imagers have different sizes but are usually fairly small (from a few millimeters to a few centimeters in size) but the scene we want to shoot can be of any size: from less than one millimeter in the case of macro photography up to thousands of kilometers when reproducing, for example, the moon. The distance of the scene can also vary from a few millimeters up to infinity (or very very far). The question is how to select the most suitable lens in terms of focal length to fit a specific need.
This magnifier lens is projecting an image of the view outside the
window on a screen (click to enlarge).
The lens is the interface between the object space (the scene, the real world we want to record) and the image space (the projection of the light emitted by the scene). In the figure below, the object space is on the left of the lens and the image space is on the right.
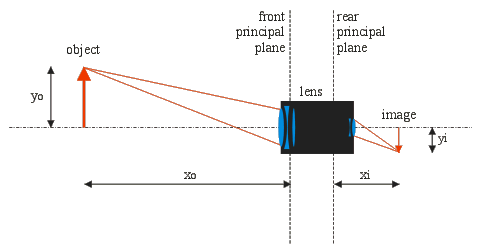
The object, the lens and the image with distances, sizes and planes.
Light goes from left (object) to right (image).
Even if not explicitly drawn, between these two spaces, the light is only allowed to go through the lens; no light can go directly from the object space to the image space. This is physically achieved by enclosing the imager and the lens in a sealed box, leaving only a small aperture forcing the light through the intended path. This enclosure is missing in the picture with the magnifier above (or the camera lens below) and the resulting image has low contrast and looks grayish.
Let's suppose we want to take an image of an object, here represented by a red bold vertical arrow. Arrows are used to represent objects and their images because it's immediately clear if images are upright or inverted. The object is located at a distance xo from the lens and has a height yo ("o" suffixes denote the object space). The image is formed on the film (imager) plane at a distance xi and has a height yi ("i" suffixes denote the image space).
Here, for clarity reasons, the object is represented as laying on the optical axis and occupying only half of the possible space; in reality, the object is usually centered on the optical axis and occupies the full space (and could also be anywhere above, below or across the optical axis). With first order approximations as used here, nothing changes to the proportions if the object is centered or not and the same formulas apply: xo is the size of the object and xi is the size of its image, regardless on the vertical position relative to the optical axis.
Distances xo and xi are measured from the lens front and rear principal planes respectively. If we only had a single thin lens (meaning they are thin compared to their focal length and the curvature radii of their surfaces), we could measure xo and xi from the lens itself, but because camera lenses are complex optical systems composed by several lenses packed together in a tube, even if the whole system behaves like a single lens, it's usually not possible to consider it as a single "thin lens"; the lens has a thickness that cannot be neglected. A thick lens has two principal planes: rays enter the thick lens as if the lens was thin and located at the front principal plane end exit it as if the lens was thin and located at the rear principal plane. The tricky part is that these two planes do not necessarily match, they can be anywhere inside or outside the lens and the front plane can also be behind the rear plane. If the object is far away, this is not a problem, but when doing macro photography it's hard to know from where distances should be measured.
The position of these planes is almost never specified by the lens manufacturer and it's hard to guess their position. If you use a commercial camera with a compatible lens on it, the distance xi is already adjusted to allow a perfect focus and you don't have to worry (the rear principal point is always one focal length ahead the film plane when the lens is focused at infinity). You also have to consider that normal photo lenses are composed by several group of lenses that are moved relative to each other to focus (or zoom) and this may also change the position of the principal planes.
The location of the front principal plane cannot be neglected when doing macro photography. To determine its location, just use the lens to take a picture, determine the magnification (size ratio between the image and the object), calculate xo and xi and measure them back from the object and image respectively to see where the planes are located.
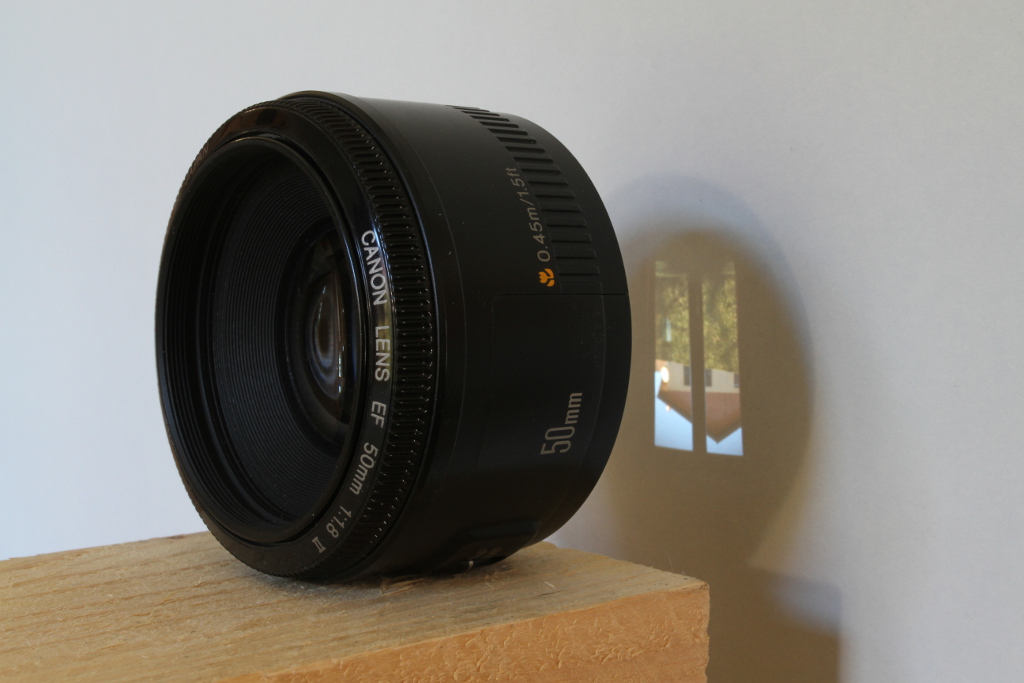
This SLR photo lens is projecting an image of the view outside the
window on a screen (click to enlarge).
Infinity is a very long distance and, theoretically, light rays coming from an object at infinity are parallel to each other, but in practice you don't have to go that far. A distance xo that is much greater than the focal length f is close enough to infinity.
We have an object that emits (reflects) light and a lens that forms an image of that object at a distance behind the lens. In order to calculate the size and the position of that image, two equations are required. These equations use the focal length f of the lens, which is a characteristic of the lens and is usually expressed in millimeters. The first equation is defines the condition of focus and establishes a relationship between object distance xo, image distance xi and focal length f.

Here dimensions are just distances and not coordinates: they are all positive and laid out as shown in the above diagram. Some formulas on textbooks use a negative sign for upside-down images or image space; this is not the case here.
The second useful equation establishes a relation between magnification, object or image distance, and the focal length. Magnification is by definition the ratio between image size yi and object size yo. Because of the similar triangles, M is also the ratio between image distance xi and object distance xo (the two parts with f are already combinations of the previous equations).
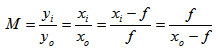
With these two equations, it's possible to determine all the parameters of a simple (geometrical) optical system composed by a single lens. Except for the problem of the principal planes explained before, this is also valid if the lens is a complex system composed by many lenses behaving like a single lens, as it's the case with photographic lenses.
With some trigonometry, it's also possible to calculate the angle of view ω, which is a function of the focal length f, the magnification M and the size of the imager, here represented as yi, that should be interpreted as the largest image that will fit in the imager.

The following calculator will do the math for you, just enter the object size yo, the image size yi, the object distance xo and press the "calculate" button; the calculator will compute the missing values.
If you are using a camera lens, you shouldn't care too much about xi: the lens is already designed to form an image at the right distance corresponding to the camera mount.
Actually, xi il always very close to f. When the lens is focussed at infinity (xo = ∞), xi and f are equal. In normal photographic conditions, xi is just slightly larger than f. As the object distance xo gets smaller, the image distance xi increases. Focussing the lens is obtained by adjusting xi. In macro photography, where xo is very small, xi can be quite large and to obtain a sharp image, it may be necessary to increase the distance between the lens and the imager, for exemple with an extension tube. This will make a non-macro lens work at close distance, but the quality of the image may (will) be degraded. Still, it's worth trying.
Please remark that usually imagers or films are rectangular, meaning that if you use the calculator for determining the field of view, you will get three different values if you calculate for the height, width or diagonal.
The table below reports the dimensions of most common imagers and films. These values are useful in determining the maximum object size yi for a given imager.
| Imager size | Height [mm] |
Width [mm] |
Diagonal [mm] |
| 24 × 36 mm2 | 24.0 | 36.0 | 43.3 |
| APS-C | 14.8 | 22.2 | 26.7 |
| 1" | 9.6 | 12.8 | 16.0 |
| 2/3" | 6.6 | 8.8 | 11.0 |
| 1/2" | 4.8 | 6.4 | 8.0 |
| 1/3" | 3.6 | 4.8 | 6.0 |
| 1/4" | 2.7 | 3.6 | 4.5 |
If you wonder what the size in inches of an imager means and how it's related to its physical surface, this comes from old video camera (vacuum) tubes and describes their outer diameter. The diagonal is roughly two thirds of the outside diameter. Camera tubes disappeared in the 1990s replaced by CCD sensors, but the old standard size denomination is still in use.
The basic concepts of (first order) geometrical optics applied to photographic lenses have been briefly exposed. For this, unfortunately, the physical concepts behind these phenomena have been greatly simplified; for more details I strongly suggest consulting the books reported in the bibliography section. Still, I hope that the simple calculator will be handy in selecting the most suitable lens for any given condition.
| [1] | Warren J. Smith. Modern Optical Engineering - The Design of Optical Systems. 3rd Edition, McGraw-Hill, 2000, section 2.3. |
| [2] | Eugene Hecht. Optics. 4th Edition, Addison Wesley, 2002, chapter 5. |
| Home | Optics | Page hits: 122809 | Created: 10.2005 | Last update: 08.2013 |